Deck The Halls With Boughs of Holly
Now that you’ve got everything nice and covered up, it’s time to decorate!
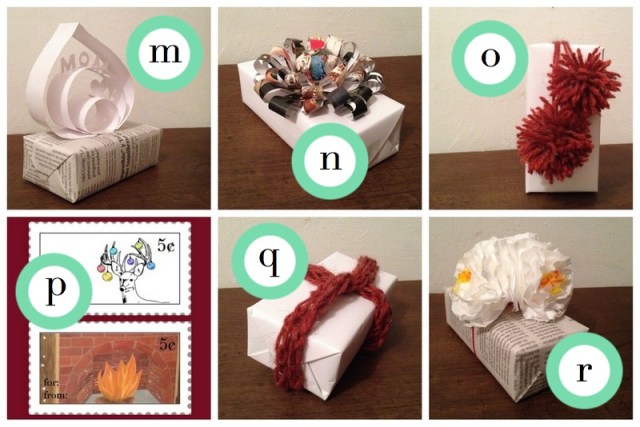
m. Pop-up bow – Remember how exciting pop-up books were when you were little? They’re just as fun when you’re an adult and the pop ups are perched on top of your package.
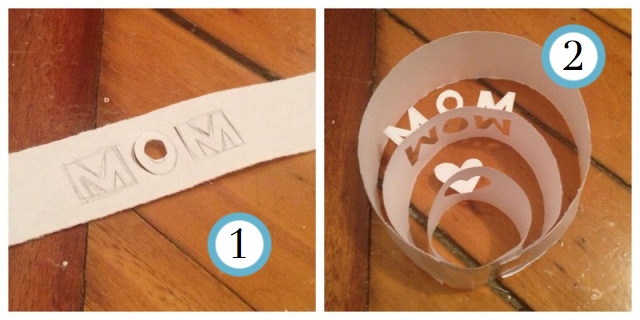
1. Draw bubble letters onto a strip of 1″ wide thickish paper. If your letter has a whole in it (O, Q, A, D, B, P, R), do yourself a favor and use a hole punch.
2. Cut around everything but the bottom of the letter and fold those puppies up. Fold the strip of paper into a circle and tape it together.
n. Magazine bow – Magazines are seriously so much more attractive than bows. You can use black print on white, a photo or find a series of pages in exactly the colors you want to make a gradient. If your package is small enough, you can use strips of magazine as ribbon and wrap them around the sides of the box as well.
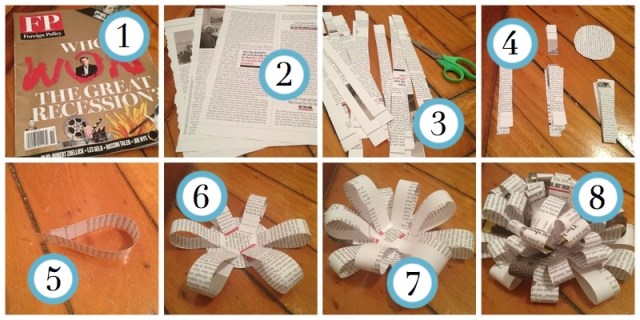
1. Grab a magazine that you’ve already read or a catalogue you’ve already paged through.
2. Find three pages that you really like, rip them out and cut off the jagged edge.
3. Cut the sheets into strips. Depending on the size of the bow, your strips can be anywhere from 1/8″ to 1″.
4. Cut the strips into different sizes. I has 12 that were half the length of the magazine, 12 that were about half an inch shorter, and 12 that were a third the length of the magazine. You don’t need to do any calculations, just cut reasonably-sized pieces. You’ll also need a circle for the base.
5. Starting with the longest strip of paper, loop it around like a tear drop and secure it with a piece of tape, leaving about half a centimeter exposed so that the tape can stick to both pieces.
6. Tape 5 or 6 of these loops to the base.
7. Fill in the holes with more loops, progressively using smaller pieces until you have a bow.
8. When you’re just about done, make two circles out of paper and tape them to the middle.
o. Pom poms – Don’t get stuck in the land of bows. You can use all kinds of other things to decorate your package. For example: pom poms! You can’t see it in these pictures, but I accidentally bought glittery yarn and my pom poms were magnificent. I would definitely recommend it if you can swing it.
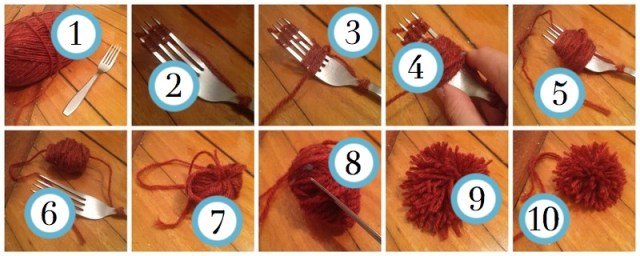
1. All you need is a fork and some yarn. Cut off a piece that’s about a foot long.
2. Secure the piece so that it doesn’t get in the way while you wrap. First wrap one side around the handle and then weave the other side through the tines so that there’s a big space to wrap between them. If you’re doing it right, your fork should look like it’s into bondage.
3. With the rest of the yarn, start wrapping in circles around the tines.
4. Use to fingers to make sure you’re not wrapping around the tapered part of the fork because you want it to be easy to slide it off when you’re done. I wrapped about 100 times to make this pom pom.
5. When you’re finished, unweave the short piece of yarn from the tines.
6. Slide the wrapped ball of yarn off the fork and unwrap the other side of the short piece of yarn from the handle.
7. Tie the short piece of yarn as tightly as you can.
8. Start cutting through one side of the wrapped ball. It’s easier if you start with the top layer and cut the rest as they show up instead of going for it all at once.
9. At this point, you’ll have an ugly thing that looks more like a mop or a muppet than a pompom. Give it a haircut.
10. Once everything’s all evened out, you have a pom pom with a string that you can attach to anything.
p. Stamp name tags -Instead of getting those little stickers, make your own gift tags shaped like stamps. I made a template that you can print out so that you can draw your own stamps and another that you can download if you’d rather design them on your computer.
q. Finger-knitted ribbon – As much as I like crafts, I have no idea how to big-kid knit. I’m pretty nifty with my fingers, though, and so finger knitting a ribbon takes ten minutes or less.
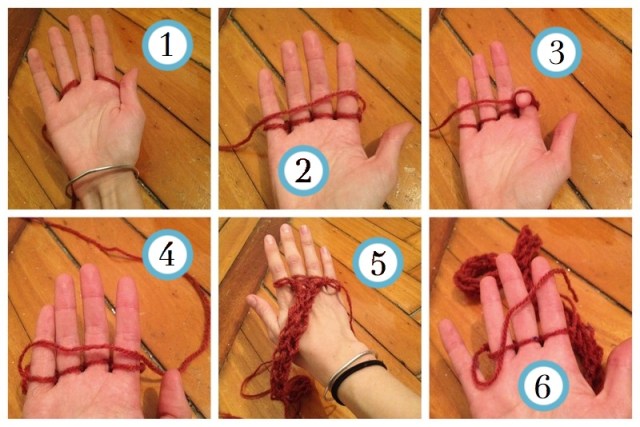
1. Holding the beginning of the yarn against your hand with your thumb and wrap the rest around your fingers. Start by going in front of your index finger, behind your middle finger, in front of your ring finger and behind your pinky. On the way back, go in front of your pinky, behind your ring finger, etc. Now let go of that little part you were holding with your thumb. It’ll be fine.
2. Bring the yarn in front of your hand, from your index finger to your pinky.
3. Take the loop of yarn wrapped around your index finger and lift it over the yarn lying across your hand and over your finger. Do this with each finger across your hand.
4. Bring the yarn in front of your hand, from your pinky to your index finger. Repeat step 3, going from pinky to index finger.
5. As you continue “knitting,” a chain will form down the back of your hand. Pull on the end to help it grow.
6. When you’re all finished, snip the yarn from the skein and bring the end through each finger loop. Pull on each end and your ribbon will stay securely knitted.
r. Paper flowers – December doesn’t necessarily mean winter. Think of the Australians! Sometimes a flower is just what a package needs.
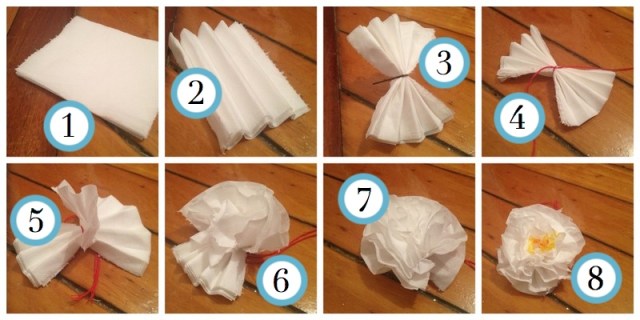
1. Remember how I said I hate buying toilet paper? Well this is the part where I bring it all back around. Take 6 squares of toilet paper and stack them together.
2. Accordion fold along the long side of the rectangle.
3. If you’ve got a bobby pin, this part is easier, but don’t fret about it if you dont. Take your pin and clip it on the middle of the accordion so it looks like a bow tie. This will create a cinch so that it’s easier to tie a string around the tissue.
4. Remove the bobby pin and tie a string tightly around the middle. Double knot it!
5. Carefully separate the first layer from the rest of the folds and bring it towards the middle.
6. Do the same with each layer.
7. Once each layer has been separated, fluff your flower up and trim off any edges that are too square.
8. I like adding a center to each of my flowers with markers so that no one confuses them with snowballs. Voila! You’ve got a flower.

Other ideas – thumb print cards, painted bottle caps, paint chips, doilies, heart envelopes, pasta, cookie cutters, boughs of holly or other fresh greenery


Comments
I think what I got out of this is that Laura likes licking the crease and is good with her fingers. :P
i typed the words “box” and “package” so much writing this article that everything/nothing sounds sexual to me now
No but seriously thank you–I need to make a gift bag!
Okay so I was like “I can make a gift bag without looking up the article again and also without glue!” and now it’s just really sad but whatever, it has presents in it.
such cute ideas!
I need to bookmark this!
I loved this Laura! It’s right up my alley! I don’t know if I’ll be able to kick my wrapping paper addiction entirely, because like the song, it’s one of my favorite things, but it will definitely help cut down on it.
But there are so many awesome ideas here. Bookmarking this for sure.
Also also also you can get into Furoshiki (Google it for endless videos) which is the Japanese art of wrapping presents in fabric. I use old sheets torn up, or cheap cloth from a yardage store, or even old t-shirts torn up. Particularly good for oddly-shaped things.
Holy shit this furoshiki business is the best wrapping idea I’ve seen for weirdly shaped things.
it seriously is! and it’s faster, greener, and generally cheaper than just about any other wrapping art.
Ever since my company started doing furoshiki-inspired wrapping (with fun scarves that support good causes!) I wrap most all my gifts in fabric (and use a scarf I loved but never wore as my purse). furoshiki.com/techniques is quite useful for basics:-)
This is just the perfect post. Laura, you are my idol.
Wrapping always gets creative in my house because we’re all trying to disguise the actual gift — your gift card will be inside a box of cereal, weighed down with six rolls of pennies; your earrings have been stuck to a packaging peanut thrown in a puzzle box with a bunch of decoy packing peanuts (and the puzzle pieces are in a shirt box, and the shirt was rolled up in your stocking); the keys for your new car are inside a pair of new driving gloves which are hanging from the tree. I once wrapped a hat in legos. But the all time winner was a little custom made puzzle, which my sister had to put together to read a clue which directed her to look in the linen closet for her gift, where she found an origami dodecahedron that she had to figure out how to take apart to find a silly putty egg. Pressed into the silly putty was a charm for her charm bracelet.
this is the cutest thing ever i want to be a part of your family
My family does crazy stuff with wrapping too. My brother bought a Folding chair for my dad one Christmas…and spent about six hours wrapping each section of it individually, so it was completely covered but could be unfolded and folded back up. It was hilarious. Dad took it to church and used it in his sermon.
Your family sounds amazing too.
ahhh I love the pun!
…said a hip hop the hippie the hippie
to the hip hip hop, a you dont stop..
Also if you use plain white paper for wrapping, you can use watercolor techniques from the AS Penpal post. I’ve been spattering secret Santa gifts with red/green paint and I’ll probably make some thumbprint people soon.
And I’m definitely going to make a few popup bow name tags, as well as a couple of package-esque boxes with brown paper and stamps!
The other day I used butchers paper left over from moving to wrap a Kris Kringle, then drew (I can’t draw) in oil pastel all over it. It looked so bad. Such a pity I hadn’t read this! (Although since the gift I was giving was Autostraddle inspired tea, maybe it’s just as well. People already think I’m obsessed!)
But now I’m making Eric Carl style Xmas cards, which are super adorable.
These are all great ideas, but I’d still rather hire you to do it for me Laura!
These are amazing….and even though it turned out really good, I think I’d feel a little weird using a TP roll for that one packaging.
FYI, I wrapped a present in magazine pages with a magazine bow for white elephant at a party tonight, and it was a huge hit. Everyone things I’m super talented now, when in reality I’m just too poor to buy wrapping paper. So thanks, Laura!
Aww thanks for thinking of Australians. I just learned it is going to be 40 degrees celsius where I am on Christmas! Christmas in Australia on a scorching summer’s day, indeed.
Cool flower but i think the magazine blow wins this year.
Fantastic, excellent publish and also the precise product information, time to share tell my friend in facebook.