

Sometimes I wish I actually could live an Instagram- or Pinterest-worthy life, but we all know that’s not realistic. There is one thing, however, that makes me feel a little bit like my home life is in order; it’s also got the added bonus of making my apartment, however cluttered and terrible, smell like a bakery. That, friends, is baking fresh bread whenever I want to. In fact, there are stretches of time where I bake fresh bread every other day. And I’m busy! So I figured I’d share some of my tips and tricks with you, in case you wanted to live that fresh bread life too.
The Easiest Recipe in the World
My bread baking adventures began when I tried to make bread in a slow cooker, which I found out was a big fat lie after many sad, barely edible attempts. But my desire to enjoy effortless fresh bread didn’t go away with that epic disappointment, so I searched for REALLY easy bread recipes. I found this, the easiest bread recipe in the world.
The reasons it’s so easy are a) it’s three ingredients and water and b) it requires no kneading. It’s also really resilient — you can mess it up and correct it and it mostly doesn’t change how it tastes. Once I effed it up and didn’t add enough flour and I still managed to fix it. But it does take quite a long time to rise; at least 12 hours to be exact. You should read through the recipe and follow it for real the first time you make it, but I will let you know the changes I’ve made to it—I whisk together the 3 cups flour, 1/4 teaspoon active dry yeast and 1 teaspoon of table salt even though it calls for 1 1/4 teaspoons. Like I said. I’m busy. I don’t have time for that extra 1/4 teaspoon, and also it doesn’t change the way the bread tastes that I can discern. (This came about by accident because I make this recipe from memory and I remembered it incorrectly.) Then I go ahead and add the 1 1/2 cups of lukewarm water and, instead of using my hand like in the New York Times video, I use a wooden spatula. Otherwise I get all sticky, and I don’t have time for that. Cover it with cling film and let it sit for the rise time — but we’ll talk about the rise time later, when we talk about fitting it into your schedule. First I want to tell you about the tools that have made this go quickly and easily for me (and have cut down on the clean up, too).
My Tool Recommendations
For mixing the bread, I recommend a big ole 8-cup pyrex with a handle on it, so you can turn it out easier. Also nothing sticks to pyrex and, if you have a dishwasher, it’s totally dishwasher-friendly!
I do use cling film, but I reuse the same piece of cling film for the entire process of one loaf because I try not to use too much plastic when I can help it.
There is nothing better for bread baking than a Silpat mat — it’s a French silicone mat that is supposed to be used in place of parchment paper in the oven, but I use it to turn bread out on because I don’t have to flour it. That cuts down on clean up immensely, because I don’t have flour all over the butcher block and because a lot of the time it just rinses clean and I add the tiniest bit of soap and that’s it. This is one of my favorite kitchen tools literally ever.
So the temperature for bread baking is really high — in this case (and in most cases) it’s 450 degrees F. My oven mitts actually couldn’t handle it, so I did my research and came up with Grill Armor Gloves (they’re good up to 932 degrees F!). I like them because they give me dexterity and also no hot hands.
And last, you do need a 3 to 5 quart, oven-safe-at-450 degrees container with a lid to bake this in. I use a cast-iron dutch oven, and that’s my only concession to something that’s not the easiest. But honestly, aside from having to dry and oil the thing every time I clean it, it’s not the hardest to clean because bread releases really well from it. However, if you want something a little easier to use, get an enameled dutch oven.
Great, now we’re set to actually bake it. But how to find the time?
How To Fit It Into Your Life
Okay, so the thing about this is a rise on this bread can take 12-18 hours, with success even if you let it rise as long as 24 hours. That’s what makes this so good — even if your day changes unexpectedly, probably this bread will still be okay. Now I set my own schedule and prefer to get down to the serious work in the afternoons and evenings (morning for journaling and tea and all that good stuff). So I’m going to give you the times I actually do this, and then I’m going to suggest other times for different sorts of schedules.
7pm the night before: Measure out all the dry ingredients into your favorite pyrex, and whisk them together. Add the water, stir it up and cover it with a piece of cling film. Set aside overnight.
8am or 9am (13 hr or 14 hr rise): You’ll know the dough is ready when the upside is peppered with little air bubbles.

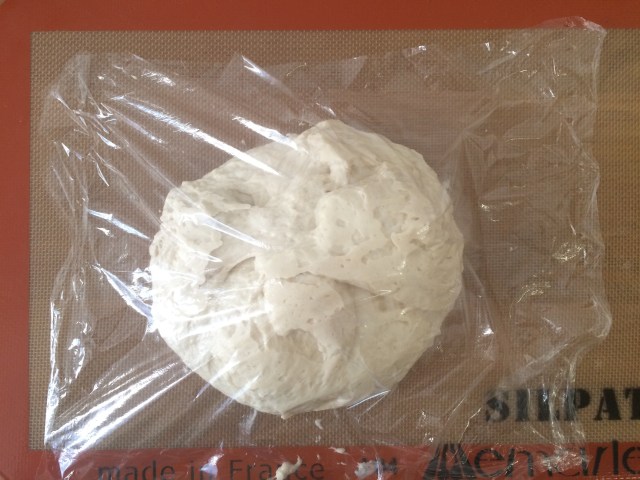
If it looks like that, remove the cling film and set it aside. Turn the bread out onto the Silpat mat. Fold it over itself a few times and cover the resulting dough ball with the same exact piece of cling film. Do it pretty loosely—the dough is gonna get bigger again.
8:30am or 9:30am: Grab the dutch oven or whatever be-lidded, oven safe at 450 degrees container you’re using and put it in the oven. Preheat the oven to 450 degrees. This means that, when you eventually put the bread in it, the cookware will be SEARING hot. That’s key, as it helps form the crust. Doing it during the preheat saves time because you’re busy. Let it sit in the oven, though, for at least half an hour, even though your preheat will likely be done before that.
9am or 10am: Remove your dutch oven from your oven oven very carefully using Grill Armor gloves, because as previously mentioned it is SEARING. Using a trivet or your stove, set it down and remove the lid. Sprinkle a little flour in the bottom of it. Fold the dough over on itself a few more times and then legit just toss it right in there. FUCK SHAPING THE BREAD INTO SOMETHING FANCY YOU’RE BUSY AND IT’LL BE GORGEOUS ANYHOW. Just trust me here. Put the lid back on the dutch oven, put it back in the oven oven, and let it bake for half an hour. Inhale deeply over this next half hour because your apartment will smell awesome.
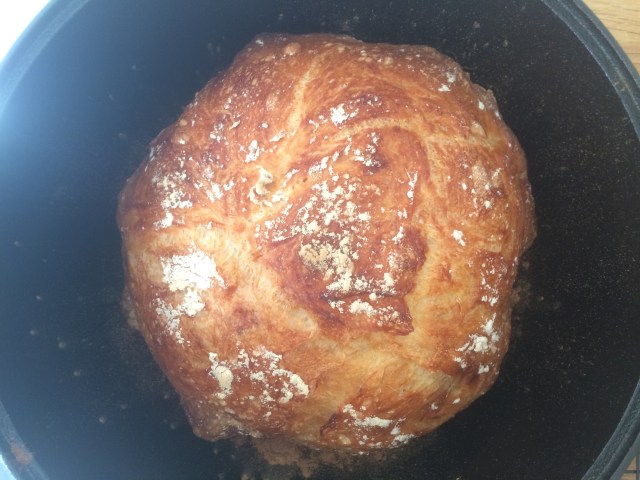
9:30am or 10:30am: Using your Grill Armor gloves or equivalent favorite heatproof hand-thing, remove the lid and set it on a trivet or your stove. Let the bread go for another 15 minutes. This’ll make the crust nice and brown.
9:45am or 10:45am: Remove the bread and put it on a wire rack to cool. This is the actual hardest part: let it cool for real. That’s what forms the lovely internal structure of the bread. If you simply cannot wait until it’s entirely cool, let it stop being searing at least. Listen to the bread crackle as the crumb structure is birthed into this world.
Need bread for the breakfast hours? Start the whole process at 6pm the night before and turn the bread out at 6am, preheat 6:30 am, bake at 7am, bread by 8am. Prefer some fresh dinner bread? Teach at school? Then start the process at 10pm the night before and leave it for a 17hr or 18hr rise and turn it out at 2 or 3 pm. That means bread by 5 pm! Need to run an unexpected errand? NO FUCKING PROBLEM. Once I timed poorly and went to go eat lunch with my visiting mother when I should’ve been baking the bread and guess what? Turned out and under plastic, I was sure it would be over-proved, but NO DIFFERENCE. This recipe is ideal for people who give just the bare minimum amount of shits about bread baking in relation to the rest of your life.
Now I find one loaf lasts me and my fiancée two days. The crust is always better on the first day, and I highly recommend not storing it in anything for that first day. It’ll hold up without going stale. But when you go to bed that night, wrap it in either wax paper or tin foil; I can say with certainty that plastic does it no favors, and neither does a covered cake plate (I was trying everything at the time).
Now I also want to stress to y’all — if you don’t care about eating fresh bread, that’s perfectly fine. No rule exists that I’m aware of that says you have or have not your shit together if you can spend time baking bread. And nothing says that your fresh bread lifestyle isn’t a Saturday-Sunday thang, or other days off adventure; that is also a perfectly valid fresh bread lifestyle. I will also tell you that it is one million times less expensive than buying bread of the same quality (okay, not actually one million times, that’s hyperbole) and if you show up to a party with one of these loaves, everyone will love you especially if you’ve coordinated with someone who has good taste in in cheese.
So what about you? What are your secrets to shoehorning some quality homemade bread into your schedule? Do you have a favorite easiest bread recipe in the world?


Comments
I currently have rolls rising in the kitchen. I love the smell of homemade break. When I had an in home day care I got a breadmaker to make the dough and then would form it into rolls or pizza dough several times of week for the kids in my care. Homemade bread it the best! Thanks for this article, Ali!
Also now I want a dutch oven. I do have an amazon gift card from the holidays…
Have you got any recommendations with regards to the kind of flour you use? Like, does it work with whole wheat as well? Buckwheat? Etc. And what about adding stuff like flax seed, is that possible with this recipe?
Any thoughts?
I like using half bread flour and half whole wheat. When I try using all whole wheat the bread is quite dense.
If you want to use buckwheat for flavour, you could probably just replace a small, equal amount (by weight). If you want to bake gluten free, I’d use a specific recipe for that as the proportions can be pretty different. You can totally replace parts or all of the flour (again, by weight, not volume) with whole wheat or rye. The texture will be different but it will be tasty! I usually just add a fistful of seeds when mixing the dough.
I adore bread, so thanks for this! I normally set aside a weekend to make a freezer full of Mel’s Kitchen French Bread Rolls with butter instead of oil and a bit more sugar than the recipe calls for. A ziplock of 9 packs great to be toasted up on camping trips too :)
This is such kind and forgiving bread-baking advice. It makes me feel like baking my own bread is actually something I could do! Thanks Ali!
I needed this. I always put off buying bread because at least half of it always goes to waste and I have all the ingredients to make it at home anyway, I just don’t have a lot of time! This looks so delicious and easy that I’m going to try and squeeze it in this weekend.
The name is Moore, Breadly Moore. I’m on a roll with this; will rise to the occasion, like some kind of baked item.
I have a bread machine (breadbot, as I like to call it), but I miss the analog way of making bread, but not enough to do all the work mom used to do, with the kneading etc. So this article is perfect! I even have a crock pot already (soupbot).
YES. NO KNEAD BREAD IS THE BEST AND SO EASY AND MAKES ALL OF YOUR FRIENDS THINK YOU’RE THE MOST BADASS BAKER EVER. That being said I highly recommend the book Flour Water Salt Yeast by Ken Forkish because it’s very simple and he explains everything and really breaks the whole process down and even had different recipes for if you want to make it wheat bread or if you want to make pizza dough or breads with preferments or levain (sourdough starters, he even tells you how to make a mature starter and how to use them in the recipes) etc. It’s awesome!
This is exactly how I want baking explained to me at all times.
Thanks for sharing this with us, Ali! I think this is the bread recipe I really kneaded in my life!
I’ve yet to find a diy bread recipe I like (fingers crossed for this one!) but this is my favorite cracker recipe: http://bit.ly/1WuU9y1
It’s similarly easy and v. delicious with rosemary and sea salt.
I cannot comprehend making no-knead bread, because I’m a terrible person who likes getting violent with my food.
Fresh baked bread warms my heart and feeds my body, but something I used my fists on constructively feeds my soul.
At least that’s what I think that thing is, it could be something else. I was baptised a little late.
But unmph dutch ovens y’all pretezels, frying up a batch of chicken pieces, and now lazy non-food aggressive bread sometimes a crock pot won’t do.
No-knead bread is fucking miraculous. Thank you for sharing the magic!!
Yes! No-knead is the bomb. My GF goes one better and makes it with sourdough instead of yeast, which both our stomachs thank her for. I am somewhat of a purist and like it with a percentage of wholemeal flour – maybe a third? – and apart from that no seeds or weirdness of any kind.
I supply the excellent kitchen gear INCLUDING the Silpat (how frickin’ great are they?! I got it for pasta dough prep initially.)
I’m doing this RIGHT NOW and going to drive a couple hours north to visit a friend while the bread cools down in my car, it’s going to smell awesome.
I’m starting a bread baking evening course on Monday so this is super, super timely for me! It sounds delicious, and I love, love, love the logistical breakdown that you give for it.
The only bread I know how to make so far is soda farls made with yogurt instead of buttermilk. They’re quick and easy to do! No need to knead! I can multi task them with my morning routine! They can be eaten fresh outta the pan! (well, after splitting and buttering, because I’m not a savage).
I need to write it up for a friend, will post it here too if it wouldn’t be stealing Ali thunder.
please do!!!
Ali you understand my thoughts on baking perfectly. Sometimes it’s not worth the extra effort to shape it or glaze it (just don’t let Mary Berry hear us).
Working single mom, and I know how to bake things. Perhaps it’s the total lack of personal time, but I have never been able to sit down and calculate the specific hours and timing for this specific bread recipe. Homemade cinnamon rolls, yeasted dinner rolls, pretzel rolls, pizza crust–all that I could grasp.
Thank you for making this tangible with start times based upon whether you want fresh bread for breakfast or dinner, super helpful!
heres a shortcut: when you measure out the dry ingredients, measure out several loaves worth and put them into mason jars. saves a step for next time… and the time after that… and…