

Despite my parents’ practice of hiding potential craft supplies (known to most people as “garbage”) in the bottom of the trash can, I still haven’t outgrown my habit of saving cereal boxes, beer cans, and toilet paper rolls to recycle for projects. Which is why, over the past month, I’ve been making trips to Brooklyn (thanks, Stef!), recycling-bin picking on walks with my mama, and harassing my friends to save every can they drink.
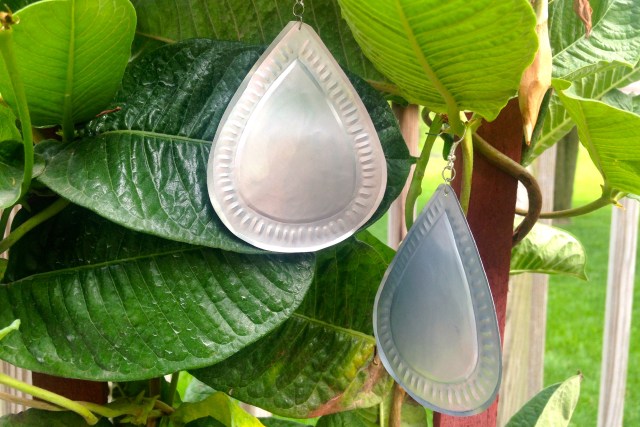
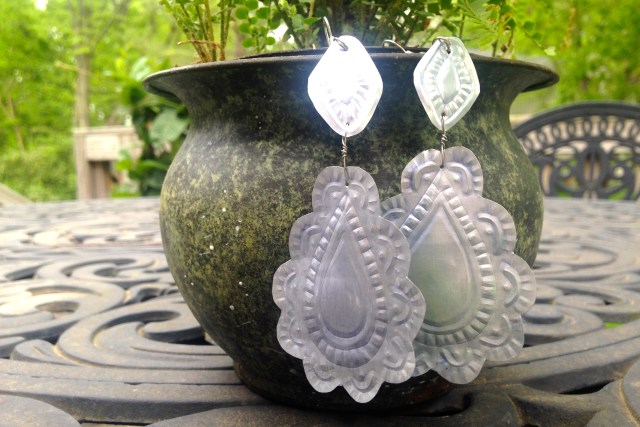
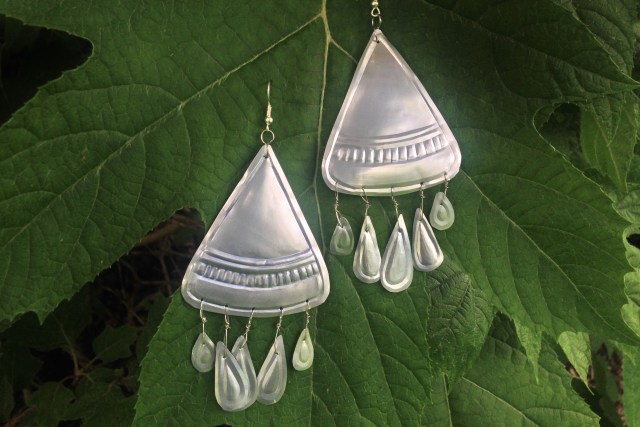
This week at A Camp, we’ll be using all these cans to make simple repoussé earrings. If you’ve got a can waiting to be recycled, bust out your scissors and join us. And if not, I bet there’s something cold in your fridge just begging for you to drink it.
Materials:
- 1 beer or soda can, empty and washed
- 2 earring hooks
- 2 or more jump rings
- Paper and pen or templates
Tools:
- A knife
- Scissors
- Sandpaper
- A permanent marker
- Craft foam
- An old magazine, newspaper, or pad of paper
- An old ballpoint pen
- Nail polish remover
- Paper towel
- A push pin
- Needle-nose pliers
Instructions:
1. Take the aluminum can apart
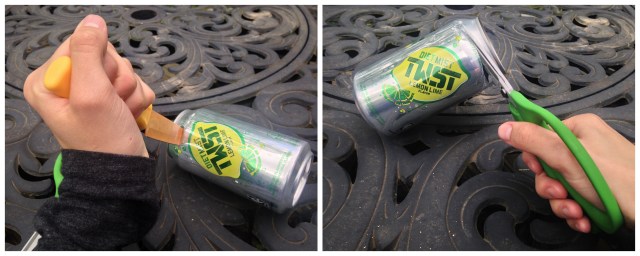
Start by carefully piercing a hole in the top with a knife, then cut around the can with scissors so that the top comes off. Cut a line along the can and do the same with the bottom of the can. You’ll end up with a sheet of aluminum to work with.
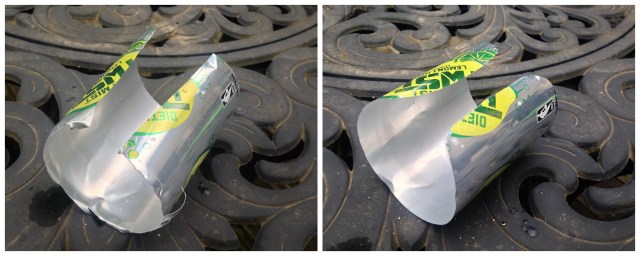
Even out any sharp edges so that you don’t cut yourself while you work.
2. Plan your earrings

I’ve made a few templates for inspiration (they’re PDFs so you can make them as big or as small as you want), but there’s no reason you can’t come up with your own design. Think about the outline, but also the designs you’ll emboss and where the holes will go. If your earrings are going to be symmetrical, fold the paper and draw half of your shape a la elementary school paper hearts.
3. Cut out shapes
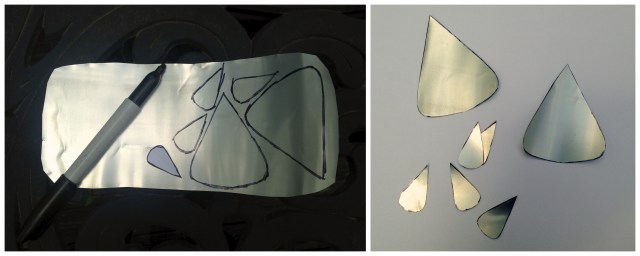
Trace your template onto the aluminum using a permanent marker. Cut it out using scissors. Don’t forget to round out any points so that there’s nothing pokey. The edges shouldn’t be sharp, but if they are, you can use sandpaper to take the bite out of them.
4. Get your repoussé and chase on
Place your metal on craft foam on top of an old magazine, newspaper or pad of paper so that you don’t mess up your table. Use an old ballpoint pen (bonus points if it doesn’t work anymore!) to emboss.
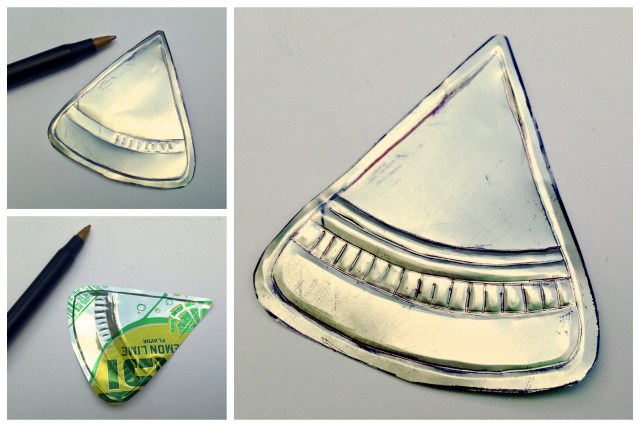
Repoussé is the technique where you create an impression on the wrong side of the metal so that it’s raised on the right side. Chasing is the opposite. By using the two together, you’ll be able to create a raised and indented design. If you find that the metal is curling too much, turn it over and work on the other side for a while.
5. Clean up
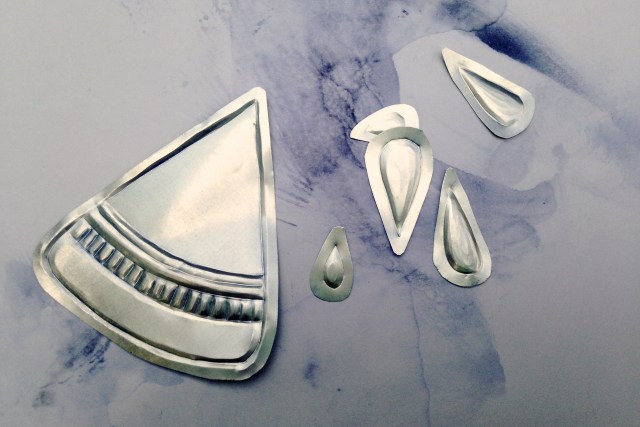
Chances are, you’ll have a little permanent marker and pen left on the aluminum after all that embossing. Using a paper towel and some nail polish remover, clean off both sides. If you’re doing a particularly complex pattern, you might find it helpful to clean as you go so that you can see how your design is coming along.
6. Put everything together
Use a push pin to make holes in the aluminum and then connect the aluminum pieces to the hooks using jump rings.
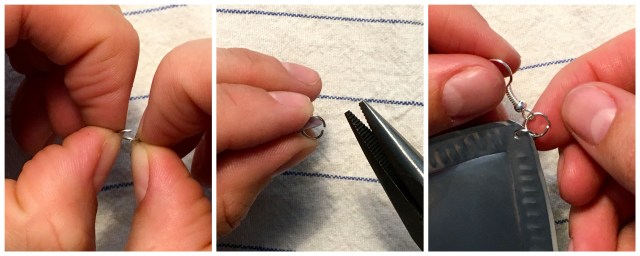
Open each jump ring with your fingers or needle-nose pliers, thread the ring through the hole, and then use pliers to cinch the ring closed. If you want to get really fancy, you can use thin wire to connect individual pieces by creating a wire figure-eight and looping each half of the eight through a hole.


Comments
These are gorgeous! I’m definitely going to make these for my girlfriend.
I’m so glad you’re gonna try it!
I want a pair of these! Such a fun and easy idea. I can’t believe you didn’t use any fancy tools, either!
Oooh maybe I’ll make some t-rex ones and send them your way <3
This looks awesome. When you say emboss, does that mean just push teh ballpoint pen against the aluminum surface until it dents or something? The only sense I’ve heard that word used is for embossed business cards etc, so I’m a bit at a loss as to how the process works. Do you just pretend you’re drawing on paper instead of aluminum? How hard to you have to push/press into the aluminum? Can you use other implements besides a pen? Thanks!
Not to step on toes but YES apply force til it dents is exactly how it works.
Have you ever held and looked at the back of embossed business card? The design is applied forced on the reverse.
Like a how the mold stamp is is backwards. Does that make sense? In the matter of how the design is applied on the reverse but comes out not backwards.
And not to be insulting or superior just factual embossing was process originally applied to metal, applying it to paper came later. First paper had to be invented, then it had to be made with a certain reliable quality and consistent availability.
I’m a non-practicing metalsmith history nerd getting a graphic design degree so if it in anyway felt I’ve talked down to you my apologies.
This is great; thanks! All new info. I agree metalworking is fascinating (part of the appeal of this post). That’s cool you studied the history and stuff. Yeah I was wondering if someone could use stamps like they use for leather work or wax seals to emboss aluminum, or just mess around with random kitchen implements.
One time I saw an exhibit from India and there were some craftspeople there, including a person who was chasing silver thread onto a silver bowl and it was totally mesmerizing and beautifully intricate. specialized tools, a little hammer and some others.
Another time I visited the Suzuki musical instrument factory in Japan and watched them apply the decoration by hand onto a saxophone, some kind of special pointed metal chisel or dowel to mark the surface pattern, and obviously great skill and practice. They had to work really fast and the saxophones are thousands of dollars and make hundreds of instruments every day; no mistakes allowed! Impressive.
Burgh I’m either too slow or too fast, but yeah tooling implements for leather work would do famously. Leather is tougher than aluminum.
I study all of the history.
All of it.
You’re welcome and it all depends on what design you’re trying to create. If you’re trying to follow Laura’s project and method a narrow round center punch would work best. I don’t know leather work that well and know like nothing on 21st seal making products.
I grew up watching my father jury rigging all sorts of things, reading National Geographic, Smithsonian magazine and my work reflects that.
It either looks like something from an ancient culture, is a found object, over sized or something rugged yet delicate held together with hope and determination…aka wire wrapping.
I respect delicate, unmarred, perfect works and the skill that goes into them but uh I can’t do them and sometimes they bore me. Which makes me feel like a brat.
<_<
that’s really cool you make your own metal things! they sound very interesting-looking.
Also the aluminum of the area Laura is instructing us to use is very malleable like…I’m not even sure what gage it might be. Maybe 30 which is 0.01 of an inch or 0.25mm
So you don’t have to press very hard, just firmly unless you’ve got neuropathy or another such issue.
Other implements Imma leave that to Laura cause I’ve never officially done repoussé and I have hand me down tools that might be harder to find for a normal person.
Metalwork is part of my family background I don’t know normal people implements, but for aluminum a standard pen sounds gud.
Hey Rey! I’m so glad Lex stepped up to the plate with all their rad info. High five, Lex! It sounds like you’re someone who I would want to hear talk for ages =)
Repoussé is typically done with a hammer and stamps (like leather stamps) on much thicker metal, but since we’re just using aluminum cans, that method can be a little overkill. You could use an awl, but I haven’t have much luck because it tends to just pierce the metal. I’d say try whatever tool you have in mind and see how it works since aluminum cans are practically an infinite material to play with. Let me know how it goes!
People who do this should post their pics, I need inspiration!!
Seconded! I would love to see what people make.
Ok this is like really cute and I’m gonna go on ahead and share on pinterest to show my mom, she’s liked just about all the recipes and art projects I’ve linked her from here.
You are the best, Barbara <3
For safely if one does not have earring hooks to recycle from an old pair buy stainless steel or “surgical steel fishhooks” can be found in most craft store and I know Walmart has them sometimes. They’re usually well under 12 dollars if it’s not a monster size pack of 50 or something.
Nickel allergy can be a hell of nasty thing.
Oh I love this, copper is expensive and found object work is one of my favourite thing of all time.
I have a purposely used the printed side of an aluminum can to make a pair of earrings (special NFL theme coke bottle, I was after the football) and seen my studio fellows do the same to make flower petals in gradations of colour.
Repoussé I’ve never officially done, but I have done lots of chasing and do so love using letter and numbers in ways that make them unrecognizable as characters.
I miss metal work and studio space so much, but this project I can do easily at home.
Thank you.
Gah, yes. My nickel allergy is horrific but I’m so conditioned to buying surgical steel that I forgot to even mention it.
Lex, do you have a website with pics? I’d love to see your work!
Default and autopilot happens stuff happens to us all. :P
No I do not have site for my work for I am a baby chicken along with being behind the times.
Plus uh my work was only documented on an iphone that I lost and couldn’t back up because the geezer laptop rejects all USB connections.
Disaster in motion at times with certain things I am.
“High five, Lex! It sounds like you’re someone who I would want to hear talk for ages =)”
I can talk for ages, it’s one of my faults supposedly but I’m sure you’d have something to share too. The studio space I shared that was one the really wonderful things was all of the talking and sharing. With art and crafted items open exchange of ideas and methods teaches an artist or craft person in way tutelage under one person, like master and apprentice style, can never match.
Sharing rad info as you say feels like a return on all that was shared with me.
what is craft foam?? is it like the green weird foam from the floral section??
actually I believe it’s those A3 sheets of colored foam, from arts&crafts in kindergarten… or cosplay armor
Barbara’s got it! Honestly, though, newspaper works fine. You just want a surface with a little give so that you can emboss designs into the aluminum.
Can i give up my day job and just make books and earrings for the rest of my life?