

Welcome to the another installment of Make A Thing, where we make handmade gifts for people. Or ourselves. Who doesn’t need something special in their life? Join in on the DIY fun and avoid the unnecessary consumerism of the world (and I promise you’ll save a few dollars while you’re at it).
Header by Rory Midhani
Okay, let’s start easy. We won’t even glue anything together today. We’ll ease into it, so: mugs! As someone who obsessively drinks coffee and tea all day every day, I know just how much a good mug can be appreciated. I also know how frustrating it is to be at someone’s house and not be able to find a clean mug (this is specifically aimed at my sister, who owns one mug and invites me over for coffee every morning, then gives me a highball glass to drink coffee from). Maybe you have these people in your life, too. This would also be a cute couples gift for your parents, your brother and sister-in-law, that best friend you haven’t seen in ages because she spends all of her time with her girlfriend… Think of it as a blank canvas to draw a silly picture for your cousin or write a literary quotation for your English Major crush.
Sharpie
Materials Needed: Sharpie, mug, oven
Level of Difficulty: Chamomile tea
Sharpies are the easiest and cheapest way to get this project done. You probably already own a sharpie and you can pick up a mug from the dollar store. I just used a blank one I already owned.

Step 1: Clean off your mug with soap and water, then dry completely. You can use some rubbing alcohol, too, if you’re feeling the need to be intense about it.
Step 2:: Draw your design in Sharpie. Feel free to trace it out with pencil first, but I just eyeballed it because I live on the edge. I picked a Beatles song and my girlfriend Zeller wanted You are my sunshine because she’s a copycat.
Step 3: Let your beautiful new mugs dry for an hour, then pop them in a cool oven. This is important! You don’t want to put them in a hot oven because depending on how cheap your mugs are or what materials they are technically made from, they could crack. Better to be safe than crying. Turn oven to 350°F and bake for 30-45 minutes. Turn the oven off and let them cool completely before taking them out.
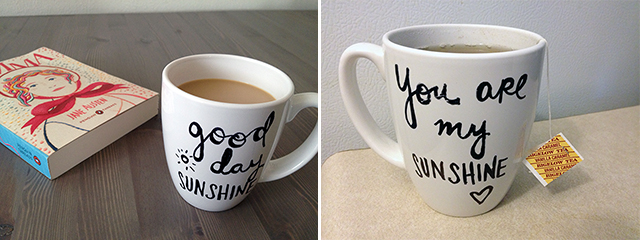
Step 4: To be on the safe side, I’d let them rest overnight so you don’t risk messing up your design when you wash them the first time. Here’s a picture of our mugs after I scrubbed the design really hard to see if it’d stay and then popped them in the dishwasher. The design scratched a tiny bit, so I’d recommend hand washing in the future.
Porcelaine Pen
Materials Needed: Porcelaine pen, mug, oven
Level of Difficulty: English breakfast tea with milk and sugar
Porcelaine pens are meant to draw on ceramics specifically, so the designs stay on a lot better than Sharpies. I made Zeller a pair of mugs for Valentine’s Day last year and after washing them about once a week since, they still hold up beautifully. I even drew on the inside of one mug and it hasn’t scratched at all. The one says, “I love tea and coffee and you!” because I’m a sap. You can buy them for around $3-$5 at any craft store (they’re usually located back by the glass paint).
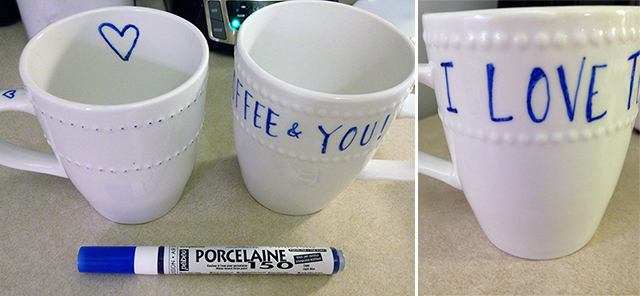
Follow the instructions on your pen! Every brand may be different. Here are the instructions on my Porcelaine 150 : “Shake well before use. Press tip repeatedly to start ink flow. Store flatwise. Allow to dry for 24 hours after application then bake in oven for 35 minutes at 300°F. Colors are resistant to dishwasher.”
Stencils and Paint
Materials Needed: Stencils (I used Martha Stewart pre-made silkscreens because they were on sale and caught my eye, but you can make your own stencils really easily — this will be in an upcoming tutorial, I promise!), glass paint (Martha Steward Gloss Opaque is what I used), a sponge dauber, mug, oven
Level of Difficulty: French-pressed coffee with cream and sugar
This one looks the prettiest, like you did something legit with your craftiness, but it’s also the hardest. I have to be honest with you and say that this project was difficult for me because I don’t have a lot of patience when things don’t work properly. That said, I’d suggest you use any kind of stencil on a mug that doesn’t taper much or at all. I used a small stencil on this one after finding anything bigger wouldn’t stick properly without folding onto itself because of the taper. It made the screen printing a little more difficult.

Step 1: Position your screen print on your mug about a half-inch from where anyone’s lips will touch. This is just me being paranoid, but I don’t want mishaps.
Step 2: Dip your dauber in a bit of paint and start slowly pressing it onto the design. Do about two coats for optimum coverage.
Step 3: While paint is still wet, peel off the screen very slowly. Rinse off the screen and lay it sticky-side-up for the tackiness to return after it dries.
Step 4: Let the paint dry for an hour, then place in cool oven and turn on to 350°F and bake for 30 minutes. Let mug cool completely in oven, then dry for a further 72 hours before washing and using.
Enjoy your beautiful re-designed mugs or fill them with hot chocolate mix, candy or sugar cubes shaped into hearts to give away!


Comments
Thank you so much for this article! I love handmade gifts, these are great ideas. I also already started some of my christmas shopping bag, so I might review everything else I had in mind =P
Can’t wait for other ideas to come! =)
whoa. whoa. This is so simple yet so brilliant. Also, a Michael’s just opened in Porter Sq. So hold on to your porcelain pen, shit’s about to get crafty.
http://weeklyad.michaels.com/
Make sure to use 50% off coupons! I use one every time I go. They can just scan it off your phone, too. It’s magic.
Even better! Thanks!
Sarah, you are so crafty. I love this! Looks like I’ll be making tons of mugs and tins of lip balm this Christmas…
lack of artistic abilities shouldn’t be a problem here, right? these are the perfect gifts!!
I love love love the stenciled on mugs!! I think I’m going to make those this year for people!!
This is definitely about to be my new favorite series! I’ve already started agonizing about gifts, but now I can just let you think of them for me :P.
These are sooo cute Hansen!! You might be getting a mug from me this year…
I was gonna say that same thing ;)
Mugs for everybody! Everybody likes mugs.
This is the best AND appropriately early enough before the holidays to actually allow for time to do the making… Each year I decide to make ALL THE GIFTS two weeks before Christmas and oh my does that not leave enough time to actually make all the gifts.
i recently got a mug as a present, and it was basically the best ever. you can never have too many mugs!
I liked ‘glue that shit together’. in my experience crafting and cursing go hand in hand
well, I like this a lot either way.
I love this. I’m pretty sure Jumbo Dauber will go down in history as Kristen’s phrase of the day for November 13 2012.
Also, I think you should mail me sugar cubes because I will not have enough patience for that.
Whoa. I had just written “make everyone matching coffee mugs” on my christmas list of shit to glue together. Autostraddle does read minds. Or queer minds think alike. Or something else to that effect.
Sarah, I appreciate that you always post crafty things that I’m actually capable of doing.
I love this feature, and I love this article! Your mugs are so cute! I have a bit of a mug problem, the exact opposite of your sister, it sounds like. My girlfriend made me donate several mugs when we moved in together because there were just too many.
I love this! Thanks for all the levels of difficulty!
This will be cool for the day we have to make gifts for our Secret Santa recipient!
I never knew you could silk screen a mug! That’s really awesome and gorgeous!
I’m trying to decide if learning this information is a good or bad thing. I’m a craft addict. :)
Basically – everyone I know is getting customised mugs for Christmas now. Excellent post! (Now to find out who in Australia sells Porcelaine pens…)
So hay, pencil doesn’t really take to porcelain. Any other ideas for pre-drawing a design? :-/ Sadly, my attempts to live on the edge and freehand it are a mite disastrous.
I’m planning on doing this – the first one, with Sharpies – as a floor event with my residents!