

all photos by Ari Gofman
The Jewish New Year seems as good an opportunity as any to officially introduce this brand new column. We’re going to share a full year of queer Jewish baking, cooking, and celebrating!
The column’s name is “Gey in Kikh” (pronounced “gay in keekh”), Yiddish for “go in the kitchen” (גיי אין קיך). It’s a queer, Jewish bilingual pun about cooking and feminism. Yiddish is one of several Jewish languages, along with Hebrew, Ladino, and more; it has been spoken by many queer Jews.
My vision for this column is to represent the wide range of the intersection of Jewishness and queerness. I’m looking forward to highlighting Sephardi and Mizrahi recipes as well as reaching out to guest posters who have different backgrounds than me. The recipe I’ll be sharing do not assume a background in cooking or baking, or Jewishness – I’m excited to share, and aim to be as clear and detailed as possible.
A bit about where I’m coming from: Jewishly, I’m coming from a secular, Ashkenazi background. My queerness has always been understood at least partially through the lens of my Jewishness – I learned about the concept of not being straight from a friend at secular Jewish Sunday School, and then the word queer at Camp Kinderland. Although I’m genderqueer and not a woman, I absolutely channel a lot of Jewish grandmother energy into my cooking: tons of tasty, filling food, with leftovers for days. When I’m cooking for myself, I go for unfussy recipes; when it’s for an occasion, I’m delighted to get to pull out the 50-step recipes.
So! Rosh Hashanah! There’s been a lot of Autostraddle coverage already: Last year Vanessa shared how she and her friends celebrate Rosh Hashanah which introduced me to 10Q, which, for each of the ten days between Rosh Hashanah and Yom Kippur (the Days of Awe), sends you a reflective question each day, to be sealed until next year, when your answers are emailed back to you. We’ve also been introduced to wonderful recipes like Lizz’s mom’s Lokshen Kugel, Vanessa’s mom’s honey cake and Vanessa’s mom’s South African bulkas, which I’m so excited to try to make.
Rosh Hashanah is often described as the Jewish New Year. This year, we will begin the year 5780. The thing is – turns out there are FOUR Jewish New Years. Rosh Hashanah is the first, on 1 Tishrei, and is traditionally viewed as the anniversary of creation as well as the head of the civil calendar new year. The others are: 15 Shevat, the New Year for trees; 1 Nisan, which corresponds to the season of the exodus from Egypt; and 1 Elul, the New Year for the tithing of cattle. I learned about these only in college, but they bring me a lot of joy – especially the New Year for the trees, which we will absolutely be celebrating together in this column.
It’s New Years, but there are also a bunch of other New Years that I celebrate, like the Gregorian one on January 1st, and the new school year energy of every September 1st (give or take a week).
Having three New Years celebrations per lunar year seems a bit excessive, but I’ve grown to really like it: it normalizes reinvention and rebirth as an extremely regular occurrence in a way that means that while I don’t really do resolutions, I get to hold the energy of reflection and visioning in a structured, communal way on a regular basis.
In many ways it reminds me of Queer Time – described by J. Halberstam in In a Queer Time and Place, to mean that “queer uses of time and space develop…in opposition to the institutions of family, heterosexuality, and reproduction.” To celebrate Jewish holidays – to take a substantial amount of time off from work for celebration when the (Christian) academic calendar has just constant labor scheduled until the end of November – always feels a bit in the same spirit of contrariness and joy. To celebrate multiple calendars, half of which contradict, feels non-normative in a comfortably uncomfortable way.
Apple Stuffed Challah
Adapted from Tori Avery’s excellent recipe, the recipe below makes one large loaf; if you want to make two, hers has always worked wonders for me.
Ingredients
Challah
3/4 cups lukewarm water, divided
2 1/4 tsp active dry yeast (1 packet)
1 large egg
1 large egg yolk (retain egg white for wash)
1/3 cup honey
1 Tbsp canola oil
1 tsp vanilla
1 tsp salt
4 cups flour (or more, if needed)
1 large apple, granny smith or another tart variety
3 Tbsp honey
2 Tbsp turbinado sugar (optional)
Egg wash
The remaining egg white
1/2 Tbsp cold water
1/2 Tbsp honey
1/4 tsp salt (a dash)
Instructions
1. Start by activating the yeast. In the large bowl you will later use to mix the dough (in my case, the KitchenAid bowl), mix 1/4 cup lukewarm water and 1 tsp of honey. The honey measurement does not have to be exact, feel free to just do a small spoonful or a large squirt. Add active dry yeast and let sit for 10 minutes. It will look foamy; if it has not expanded, try a different yeast.

2. Add: the last 1/2 cup of warm water, egg, egg yolk, honey, oil, vanilla, and salt. Mix thoroughly.
3. If using a KitchenAid, use the bread hook attachment. Begin adding the flour half a cup at a time. Keep mixer on low so the flour doesn’t fly everywhere. Add flour until the dough is congealed into a ball; knead/mix for around five minutes until it is smooth and not sticky – I found I had to add a bit of extra flour, but let it knead for a good while.
4. When almost done, boil a saucepan of water.
5. As the dough finishes, take out the dough and add a bit of neutral oil (vegetable or canola) to coat the bowl and dough. Put the dough back in, and flip so the whole round of dough is covered in oil.

6. Lightly dampen a (clean) kitchen towel and cover the dough bowl. Once the water is boiled, place the whole pan on the bottom rack of your oven, and place the dough bowl with the kitchen towel still covering it on the top rack. Close the oven to create a warm, humid environment for the dough to rise – do NOT turn the oven on! Let rise for one hour.

7. After one hour, take out the dough and either punch or poke the dough to remove the air pockets. Return to the oven for another hour.
Note: While I haven’t tried it, you should be able to do this first rise (what here takes two hours) overnight in the fridge if you want to break up the work. If doing so, bring the dough out to room temperature by letting sit for about half an hour before planning to shape it into strands.
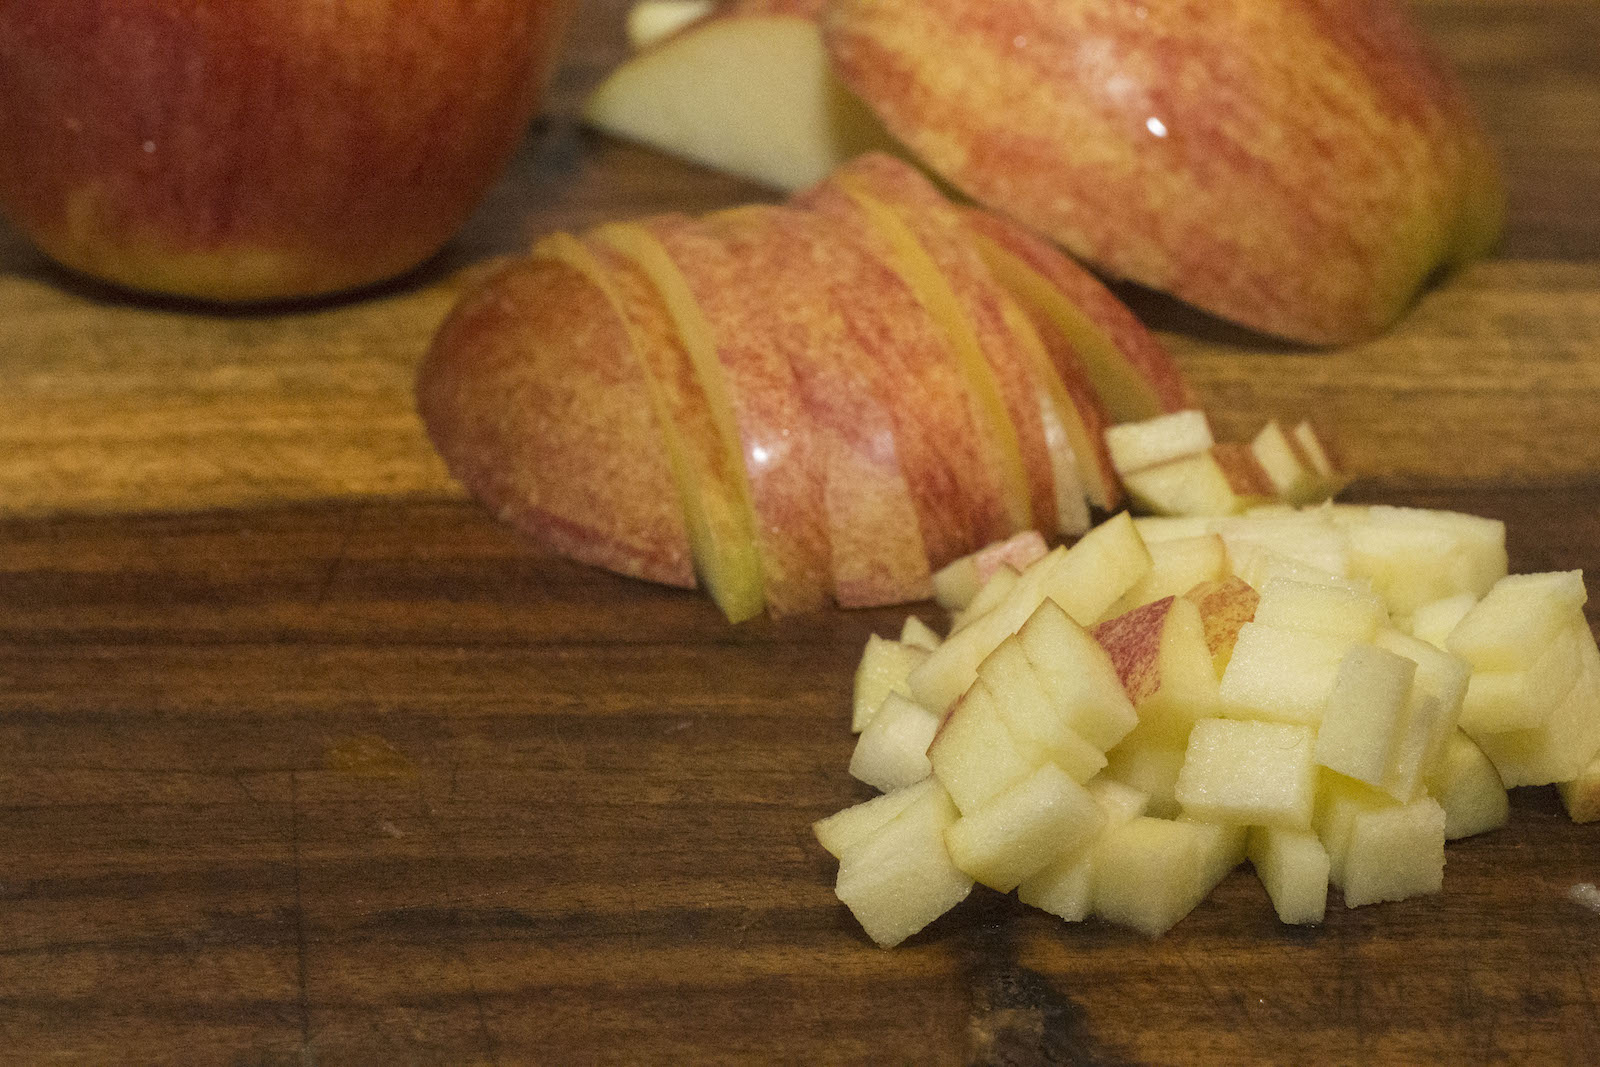
8. Fill a (large soup or small mixing) bowl with water and dissolve 1 tsp of salt in it – this is supposed to help drain out some of the liquid in the apples so they aren’t too mushy when baking later. Cut your apple(s) into very small pieces. I find cutting fruits and vegetables into tiny pieces very meditative; if you’re like me, this is your time to shine. I’m talking 1/4 inch small. Put them in the salt water and set aside until later, when we’ll be filling the strands.
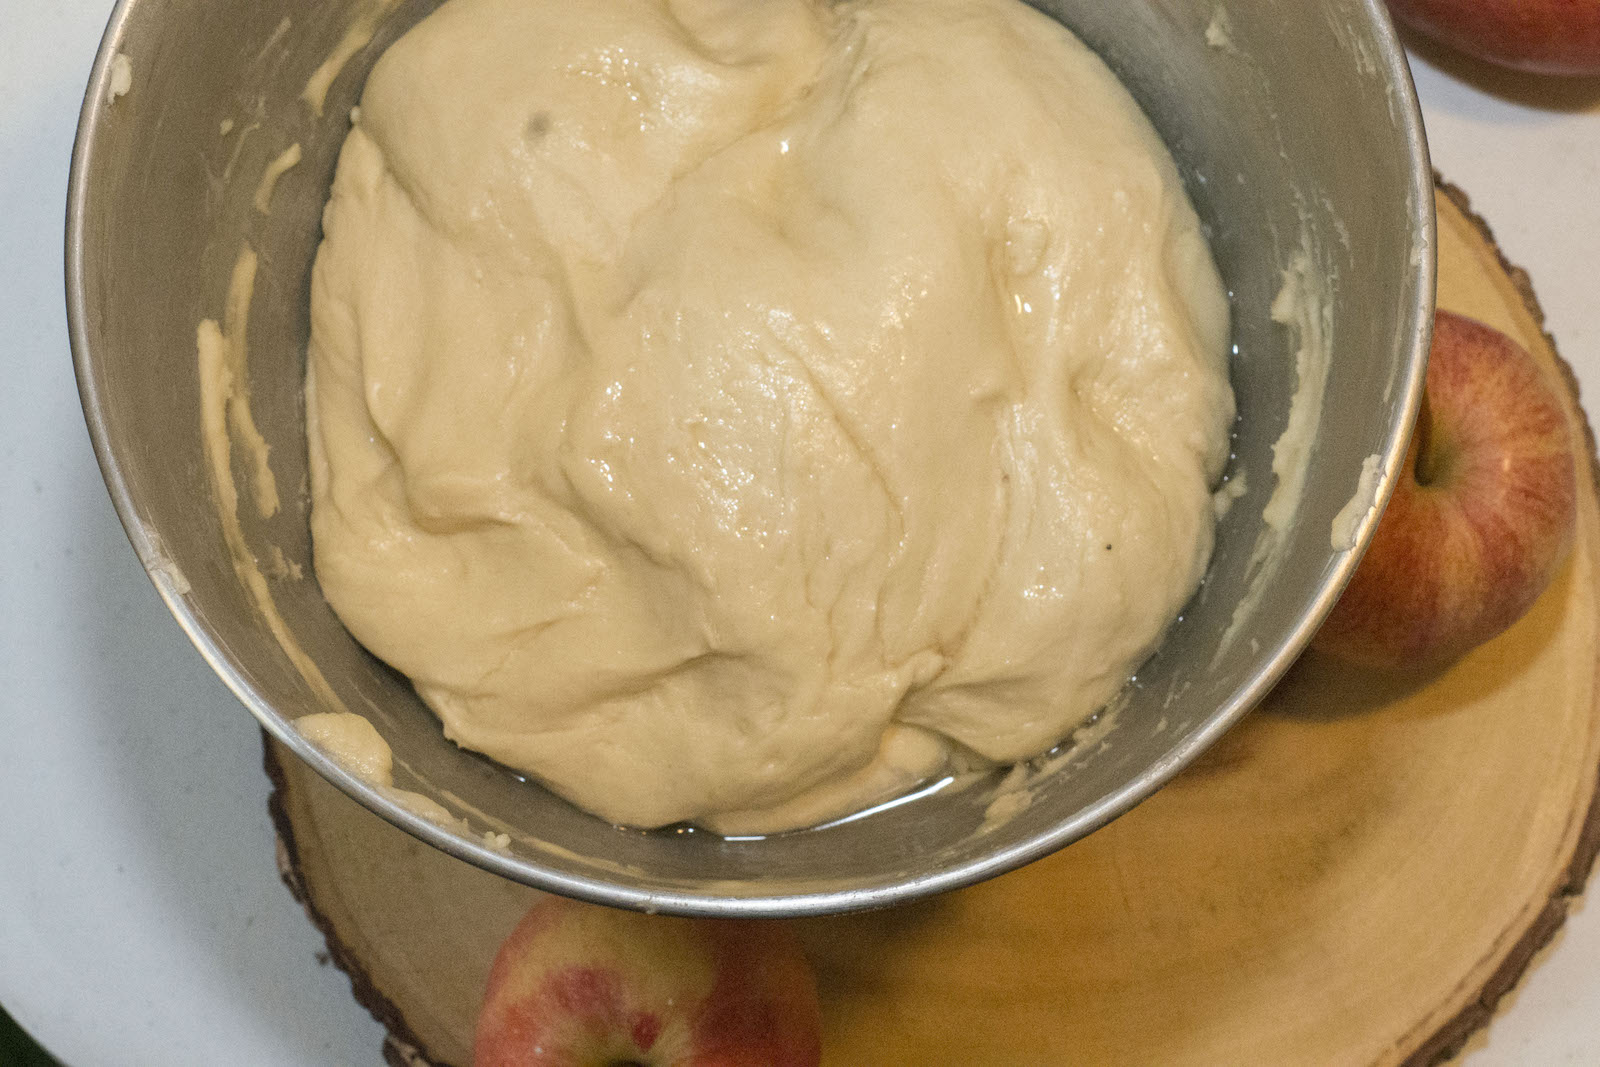
9. Remember that dough in the oven, which should have been rising for another hour since you let out your feelings on it? It should have doubled since its original size. If not, let it rise a bit more. Once ready, prepare a surface for shaping the challah: either clean a large countertop and dust with flour, or use your silicone mat. Plop the dough onto your prepared surface. The original recipe says to knead a bit here, but I’ll admit I’ve never done that and it’s been fine.
10. Cut the dough into four equal parts. Set aside three parts onto a plate or back in the bowl so you have space to work.
11. Let’s return to those apples, which have been happily soaking in salt water. Drain them in a colander, mesh, or other receptacle that facilitates draining very small pieces of apple. Pat them dry very thoroughly with paper towels – get them as dry as possible. Put into a small, dry bowl and add 3 Tbsp of honey; mix thoroughly to coat. If there is a large amount of liquid that comes out, drain out and add a bit more honey – we don’t want the liquid to go into the bread. Optionally, add 1/2 tsp of cinnamon.
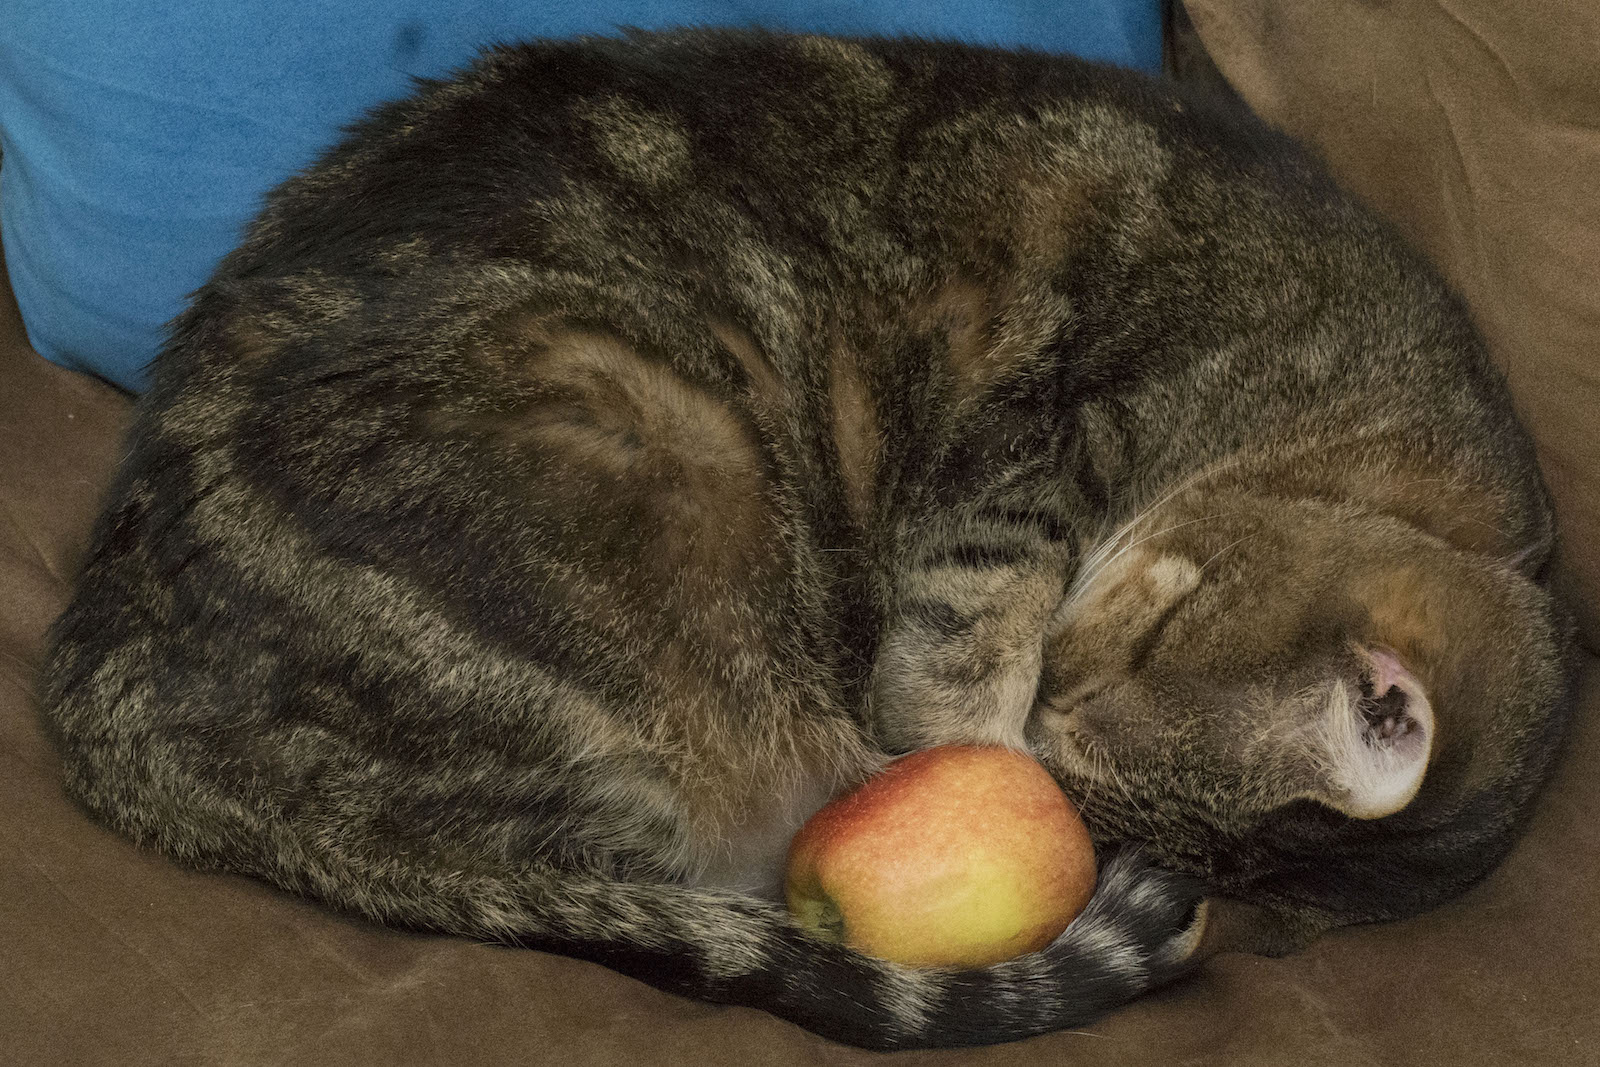
12. Let your cat play with one of the extra apples; accidentally facilitate the creation of an apple-stuffed croissant cat:
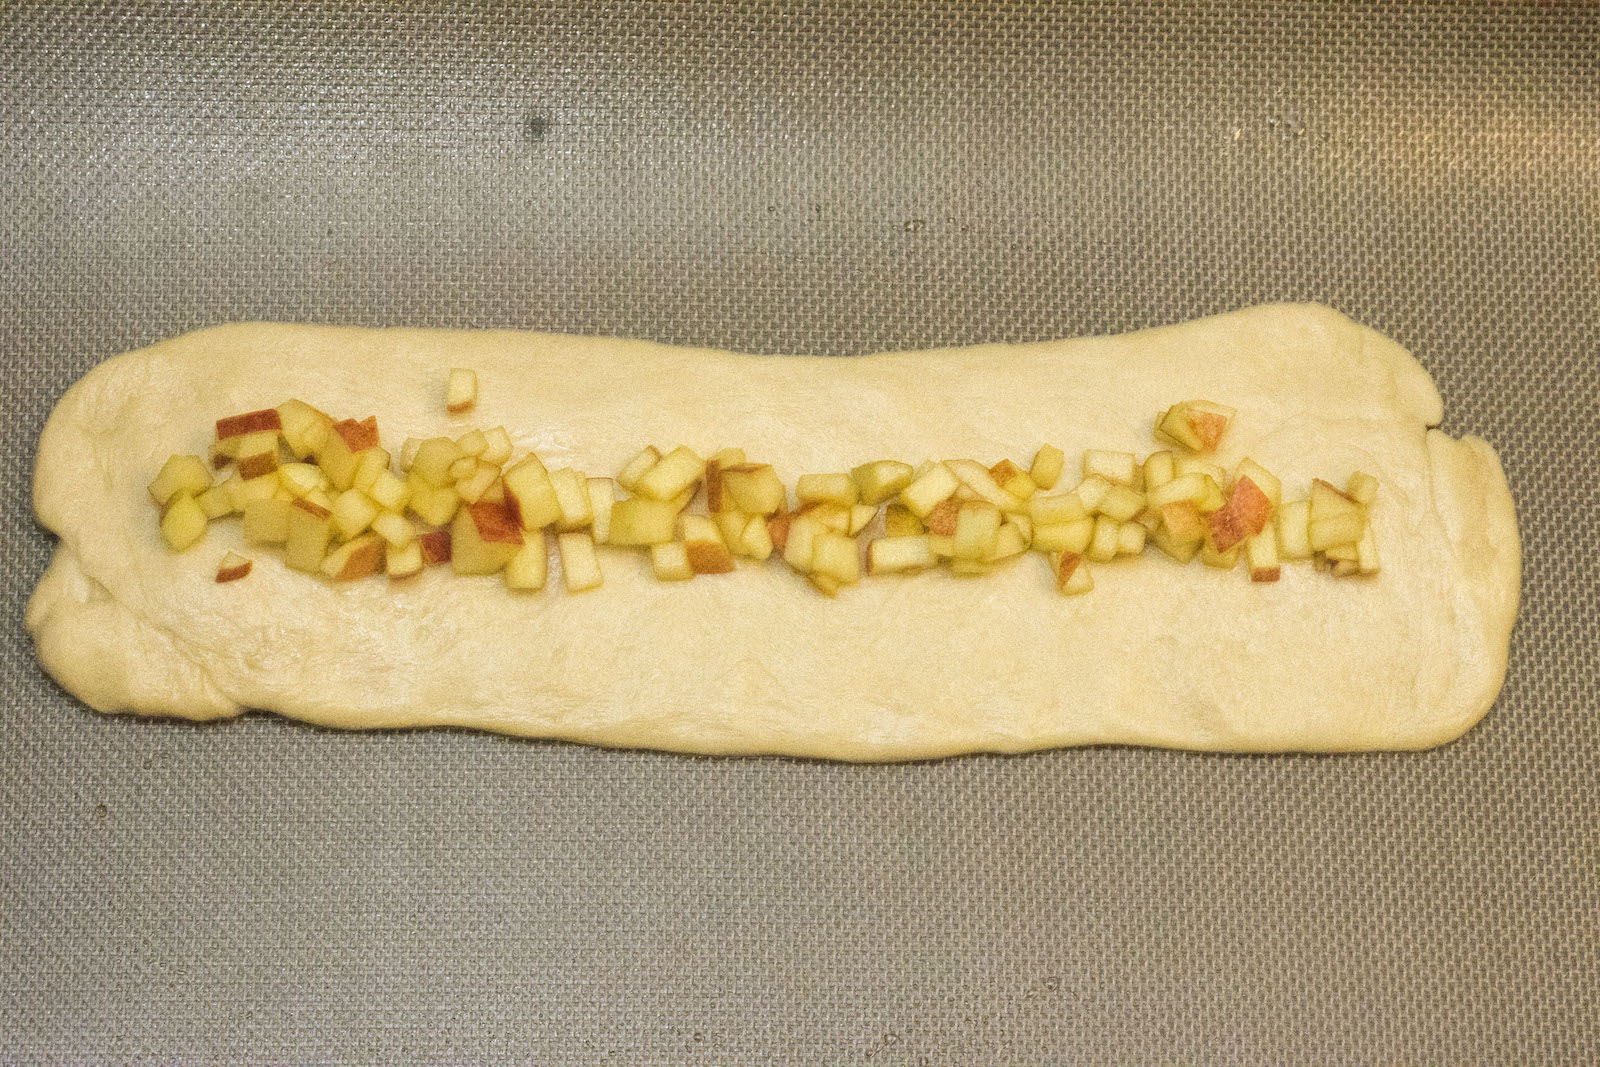
13. Okay, back to the dough. Shape the remaining part into a long rectangle, about 12 inches long and 4 inches wide. It should be pretty thick – thick enough to hold the apple filling, and the inevitable liquid – and absolutely does not need to be perfect.
The reason I suggest bouncing between dough and apples is that hopefully in the few minutes that took, a little bit of liquid will have leaked out of the apples. Retain 1 Tbsp of liquid for later. Now that we have our rectangle, add a few tablespoons of chopped apples – a quarter of the total amount. There should be at least half an inch of dough as a border around the apples; I tend to leave 3/4 of an inch. Note: I would add a bit more apples than are shown in the photo.
14. To create your strand, roll the TOP edge DOWN to the bottom and pinch to firmly seal all around.
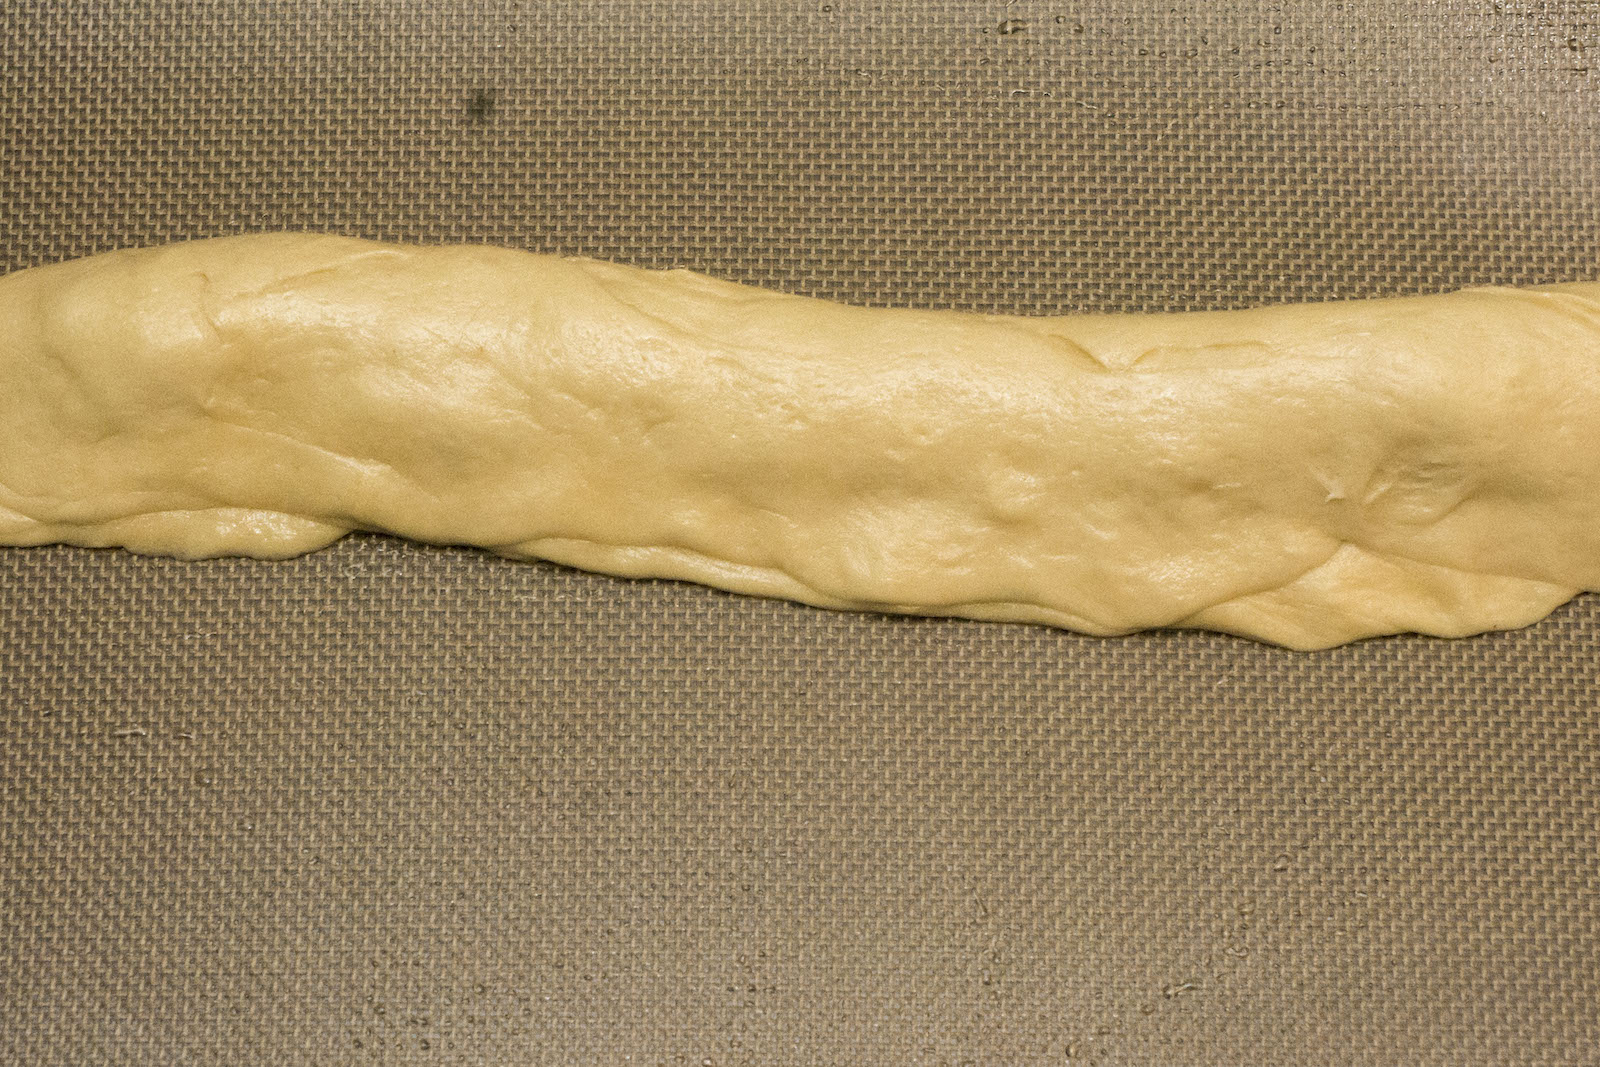
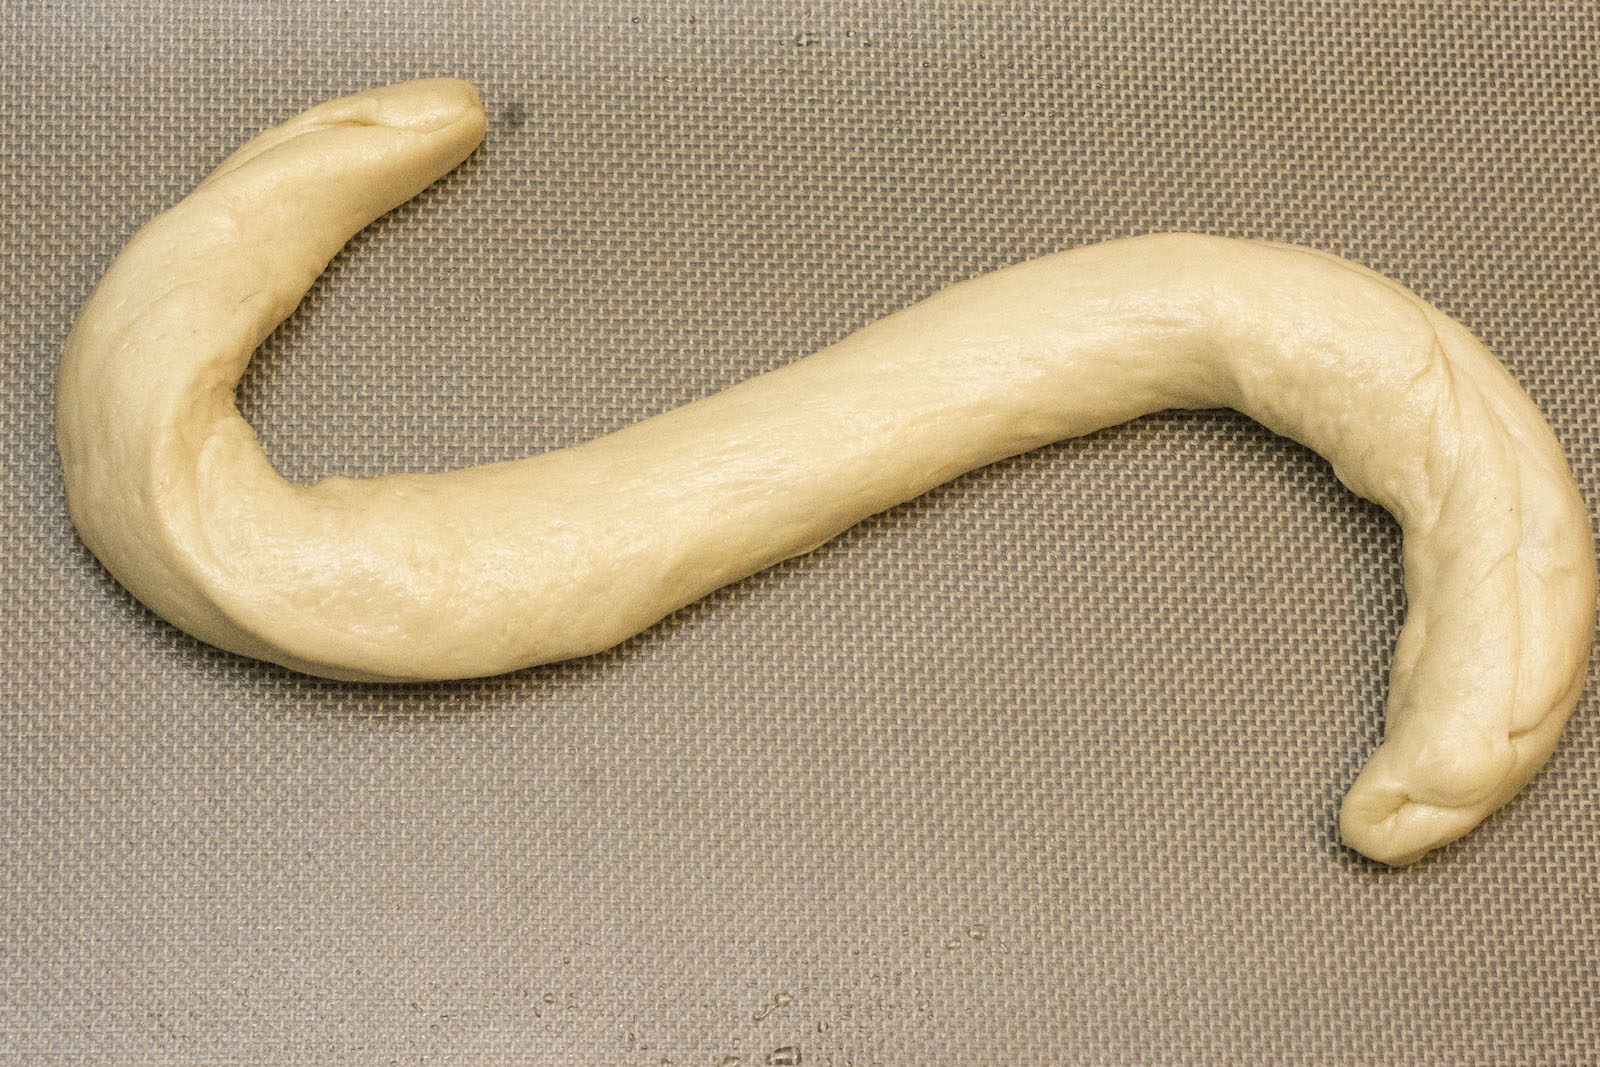
15. Once sealed, gently roll between your palms, with pressure on the center of the strand, to create a longer, thinner roll. Try to avoid breaking the dough (letting apples through), but if it happens, just re-seal and continue. Roll and taper gently until the strand is smooth and about 16-18 inches long.
16. Repeat with the other three parts, creating a total of four strands with apple stuffing.
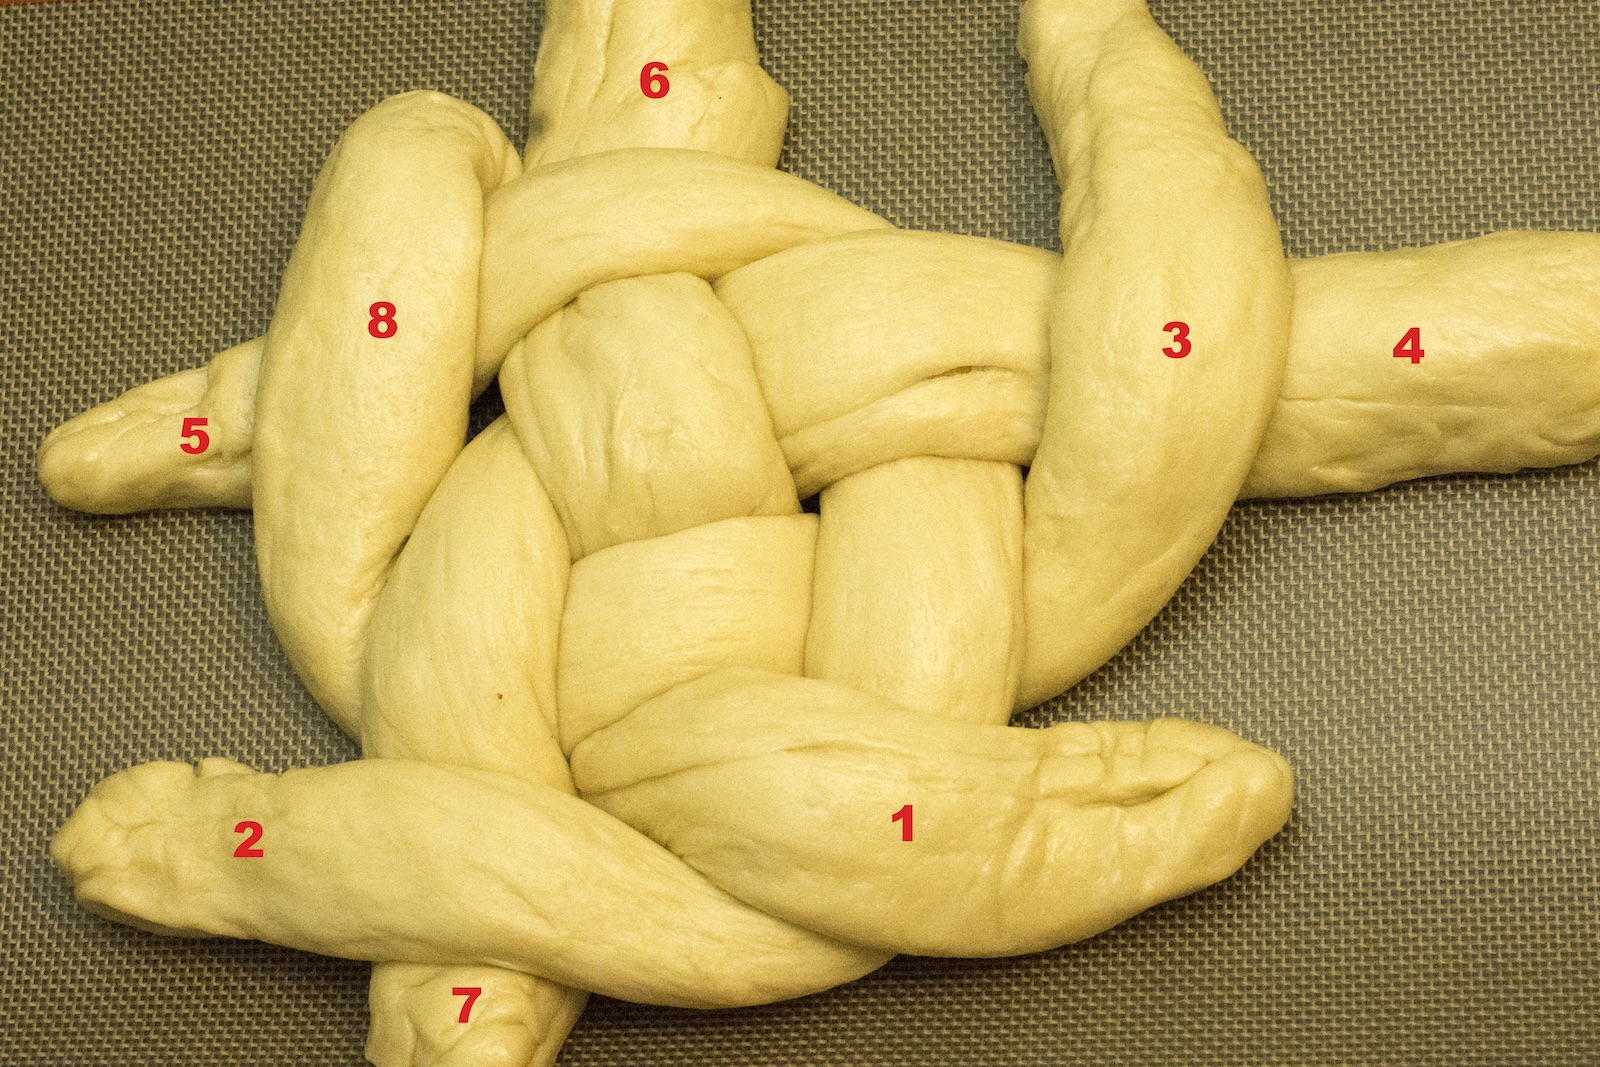
17. Now comes the fun part! We’re ready to braid! This is a special, celebratory circular four-strand braid for Rosh Hashanah. If you’re not familiar with it, try practicing with string you have lying around. Broadly, I kind of visualize it as two cyclones going in opposite directions, in case that makes sense to anyone else.
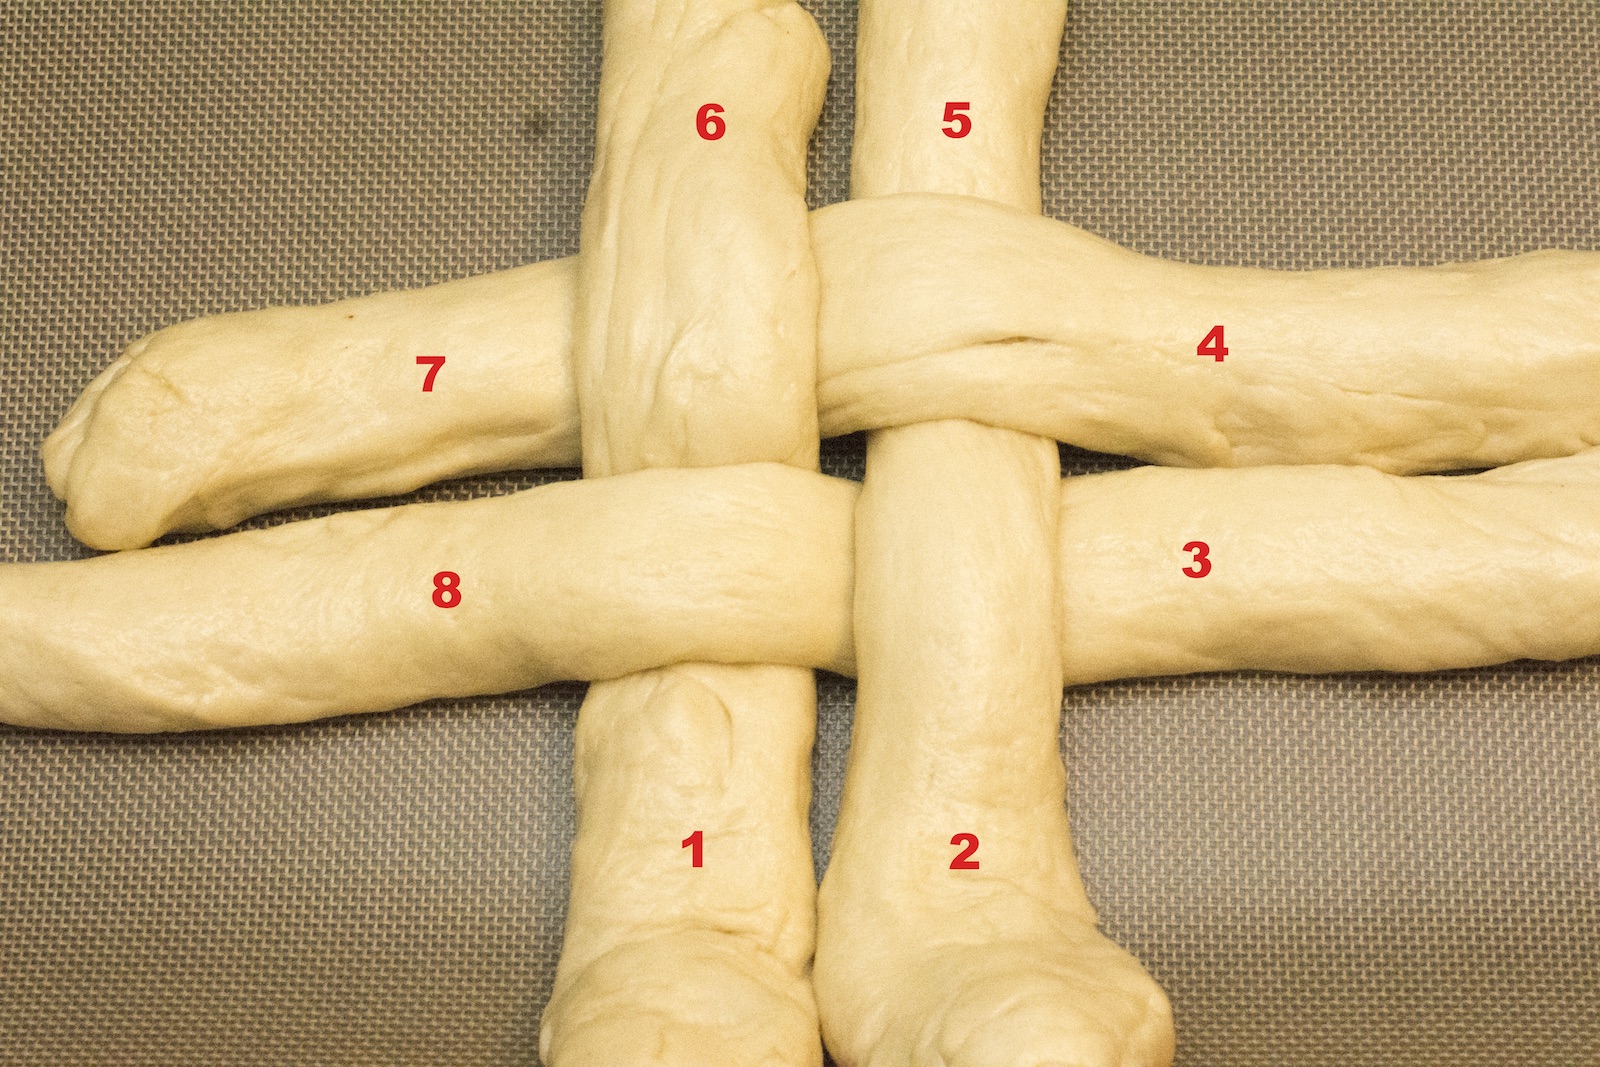
First, lay your strands perpendicular to each other, with two strands going in each direction. Then, over-under them (is there a verb for that?); to follow the directions I have, have the lower left vertical (1) be underneath the lower left horizontal (8), as in the diagram below. I’ve labelled all the strands in the images to help you along. Keep the center fairly tight, but the dough will expand, so a bit of a gap is fine – you just want to leave as much dough as possible for the ends that will be doing the braiding.
18. Take strand 1 and cross it over strand 2.
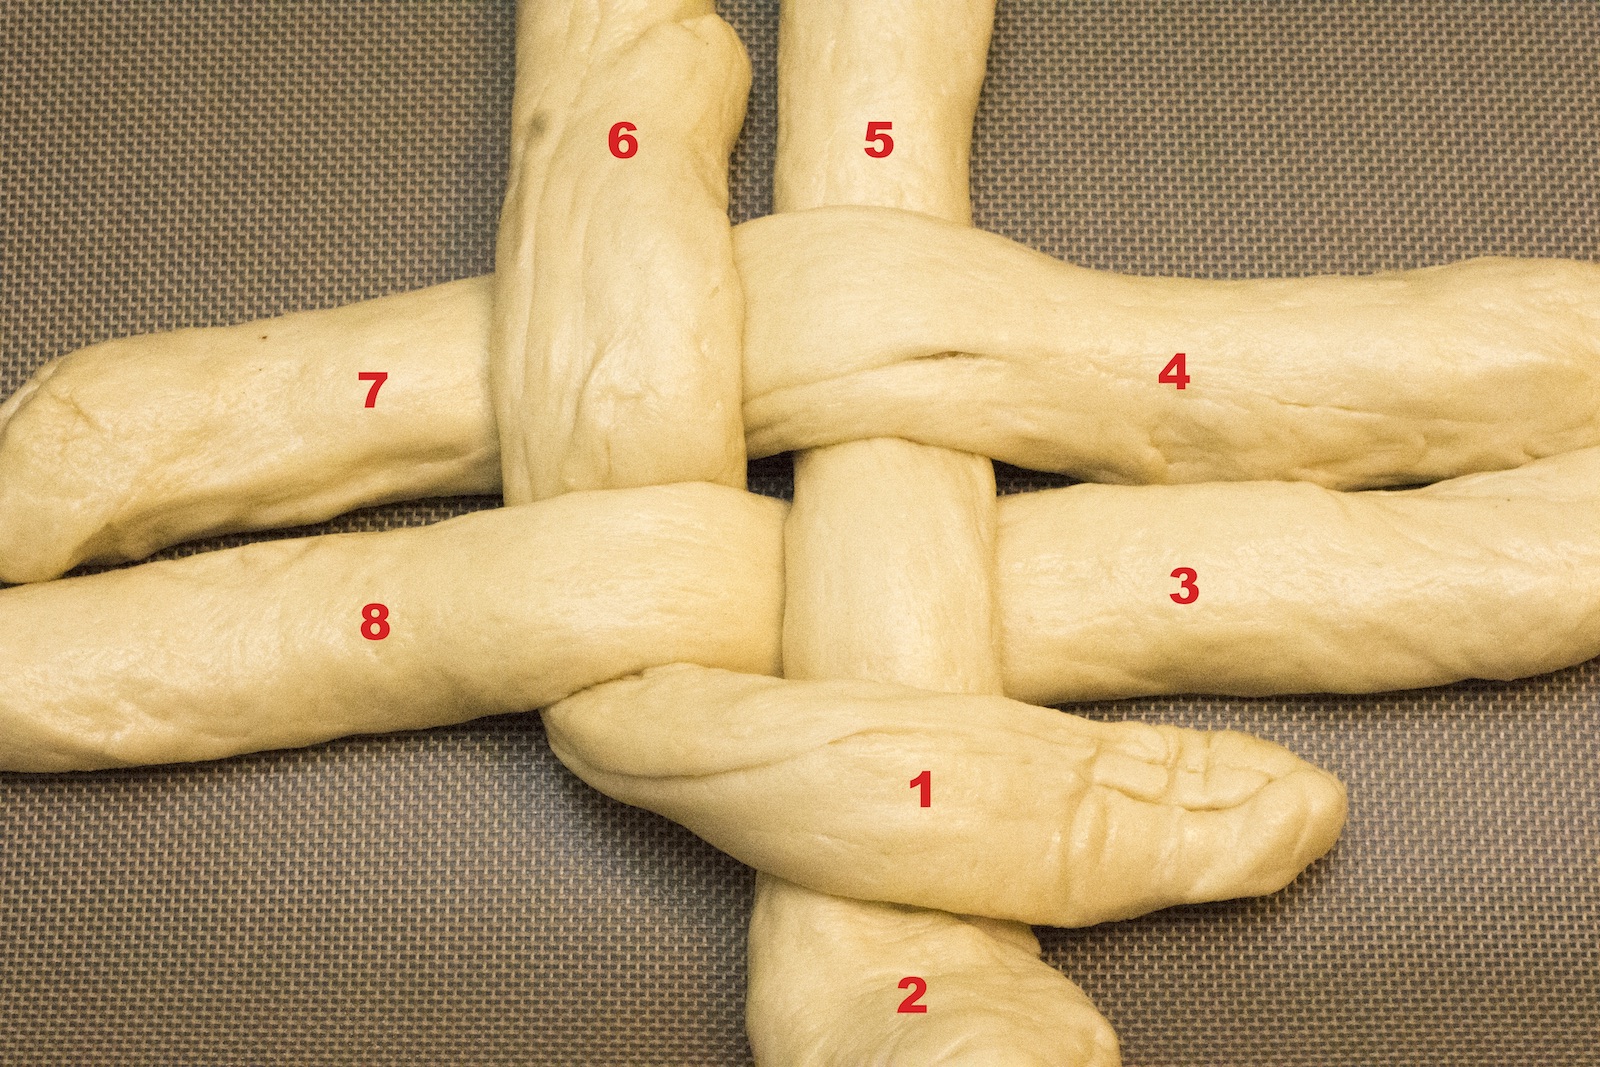
19. Take strand 3 and cross it over strand 4.
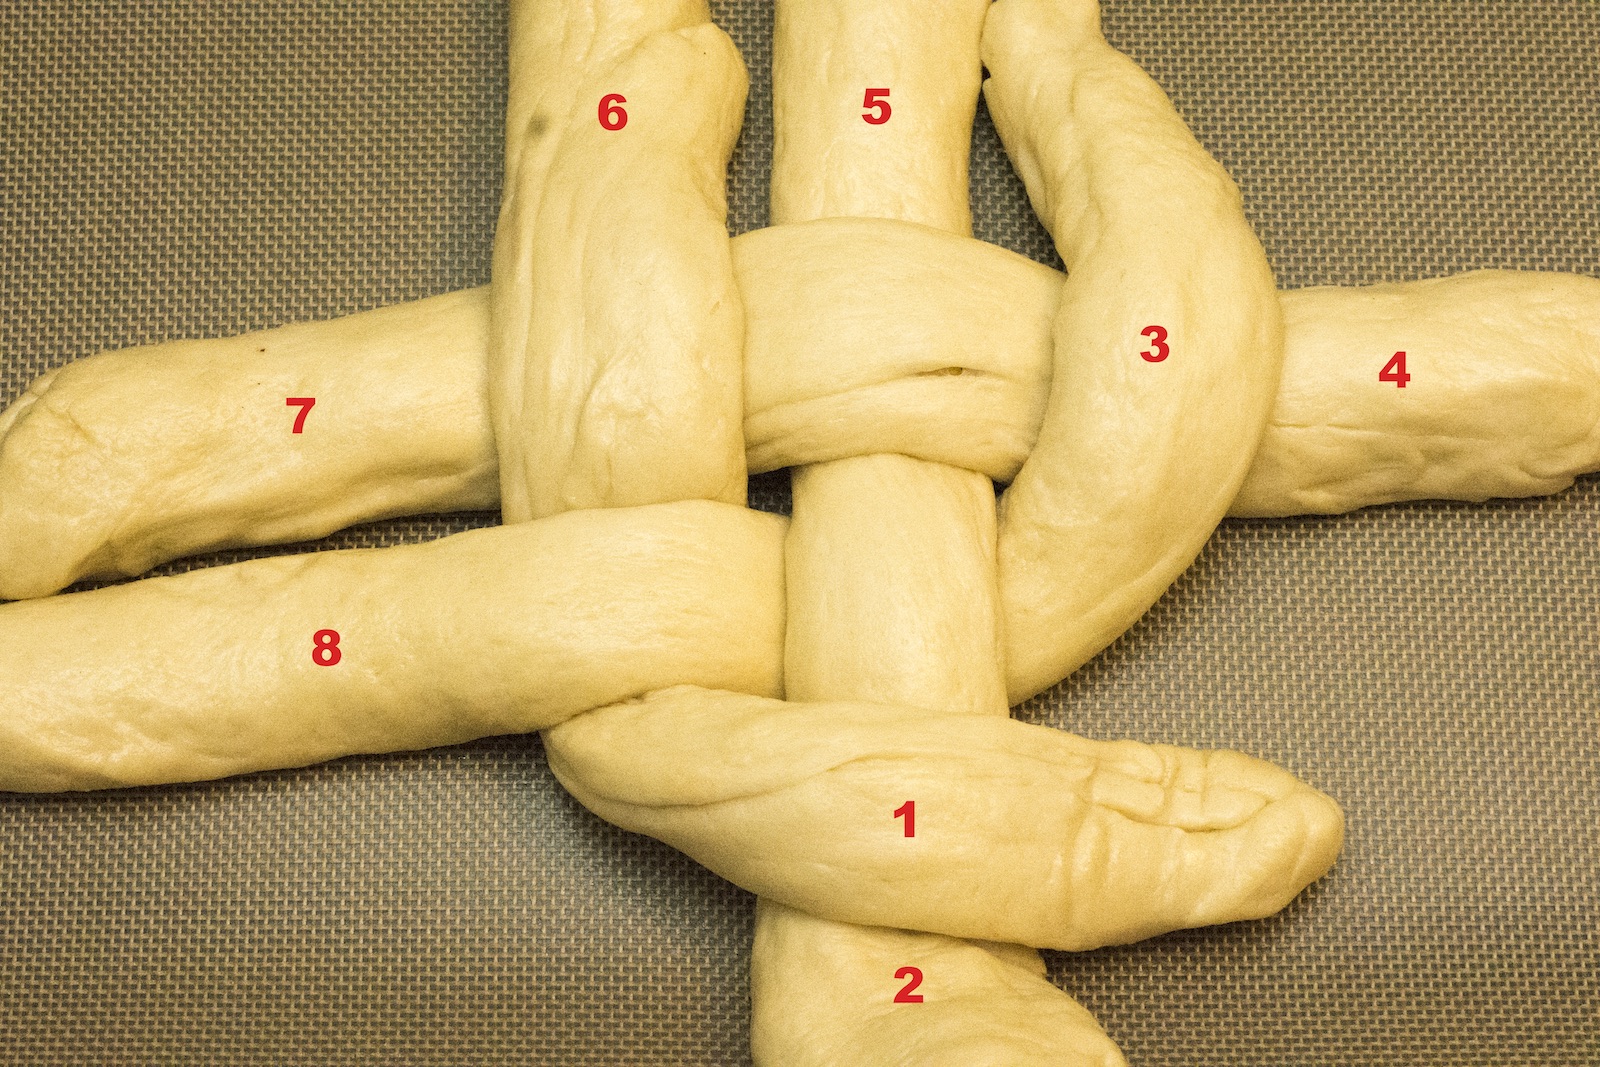
20. Take strand 5 and cross it over strand 6.
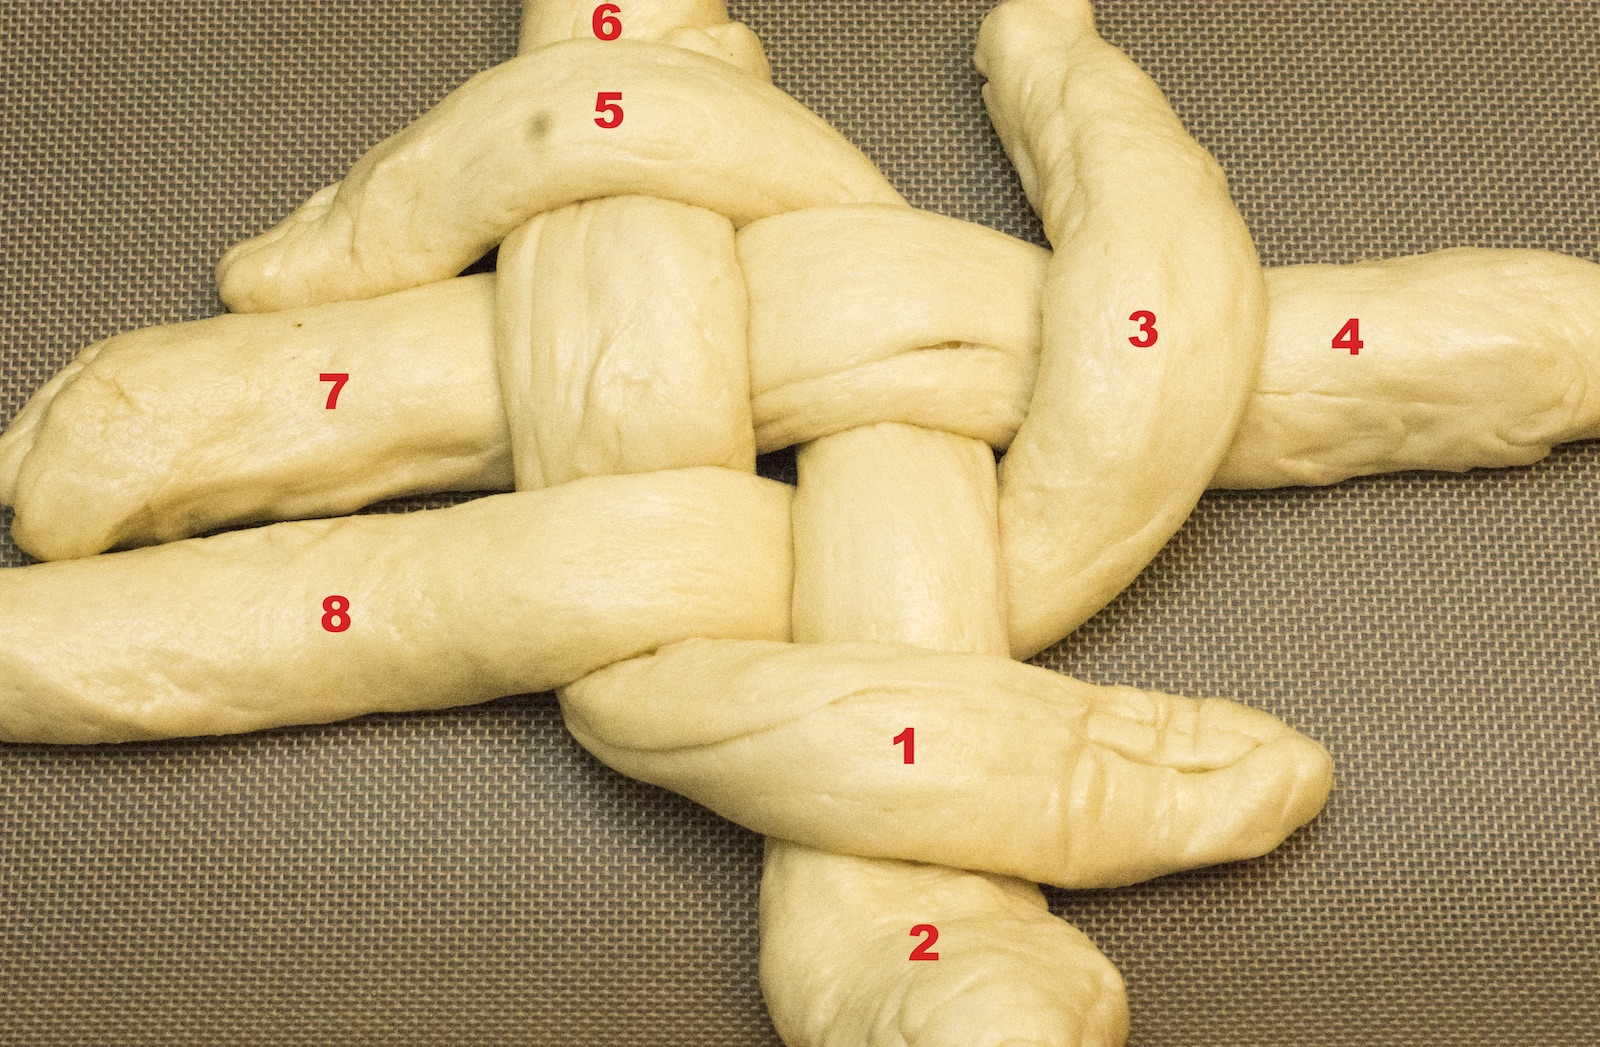
21. Take strand 7 and cross it over strand 8.
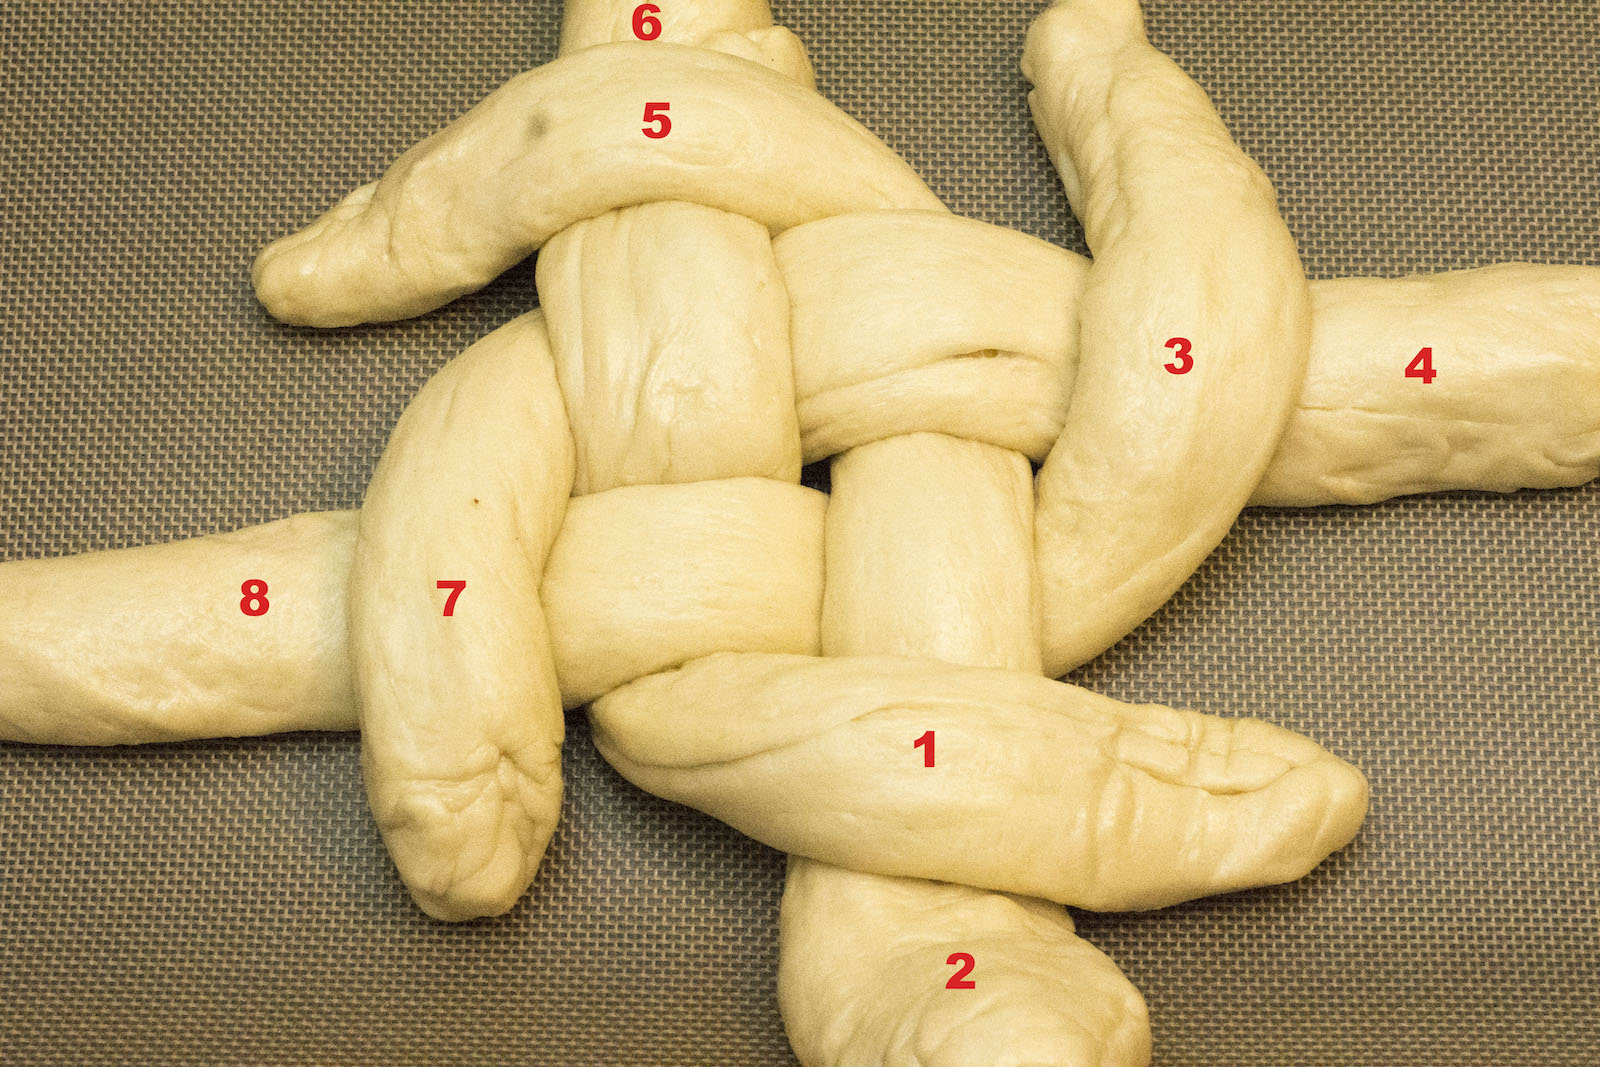
22. Take strand 2 and cross it back the opposite way, over strand 7.
23. Take strand 8 and cross it over strand 5.
24. Take strand 6 and cross it over strand 3.
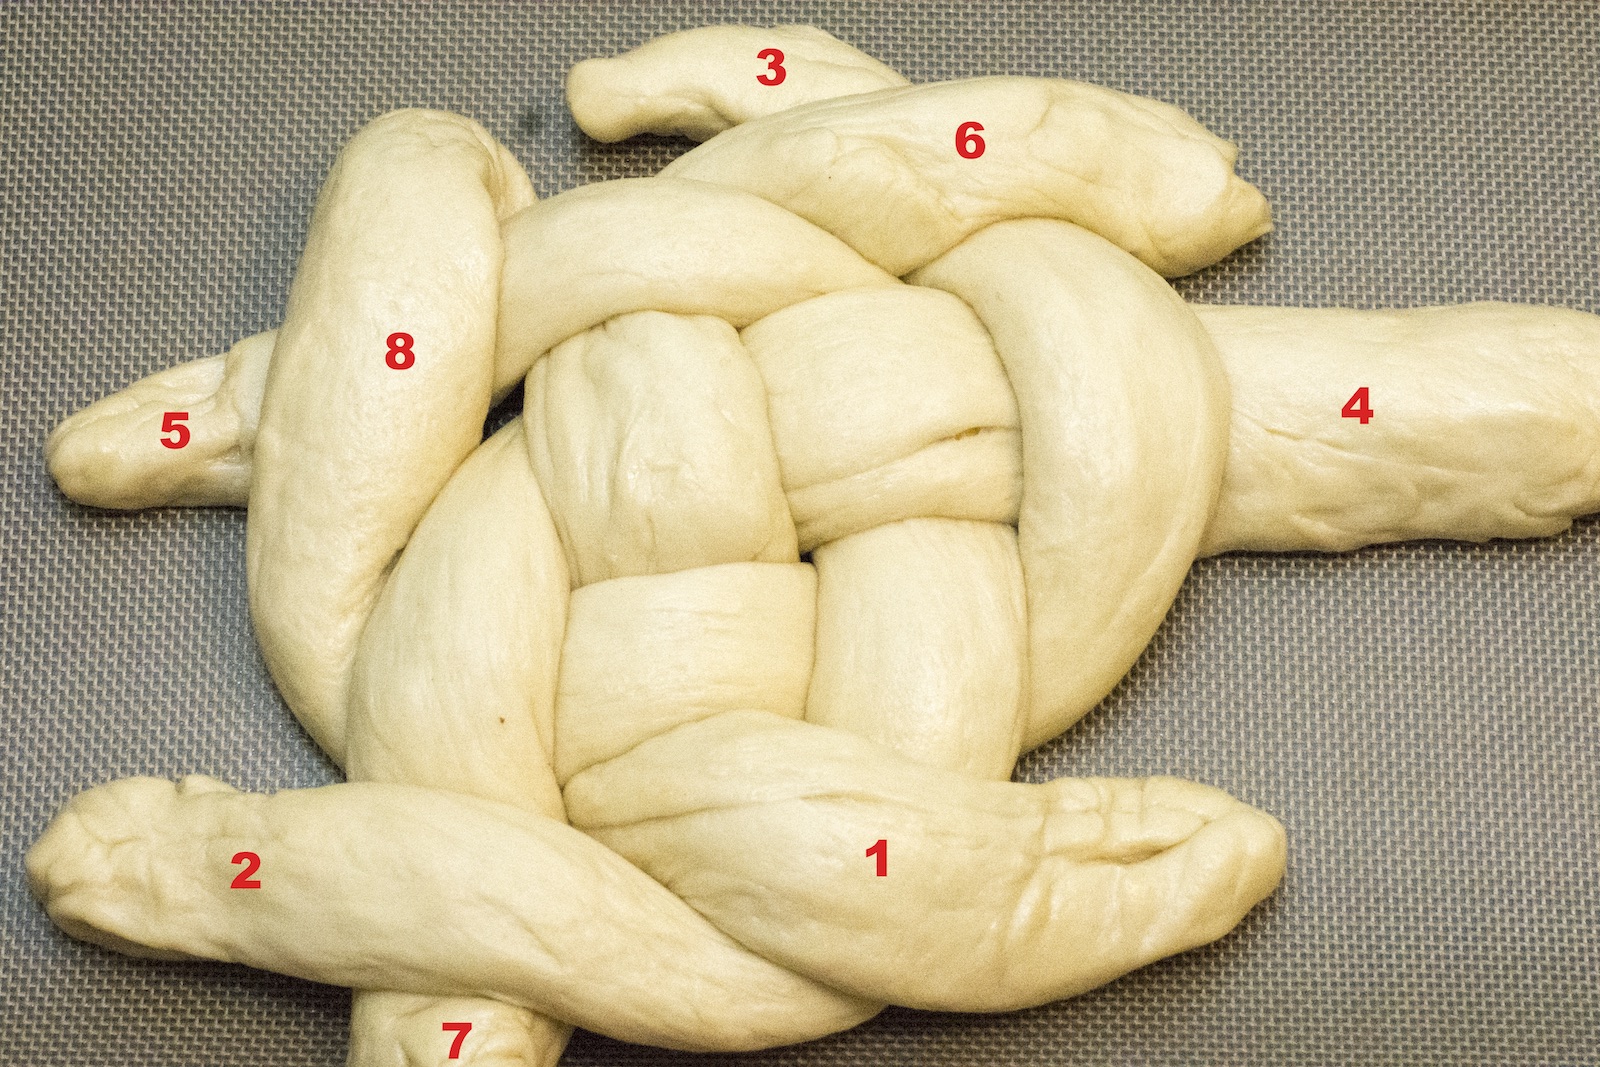
25. Take strand 4 and cross it over strand 1.
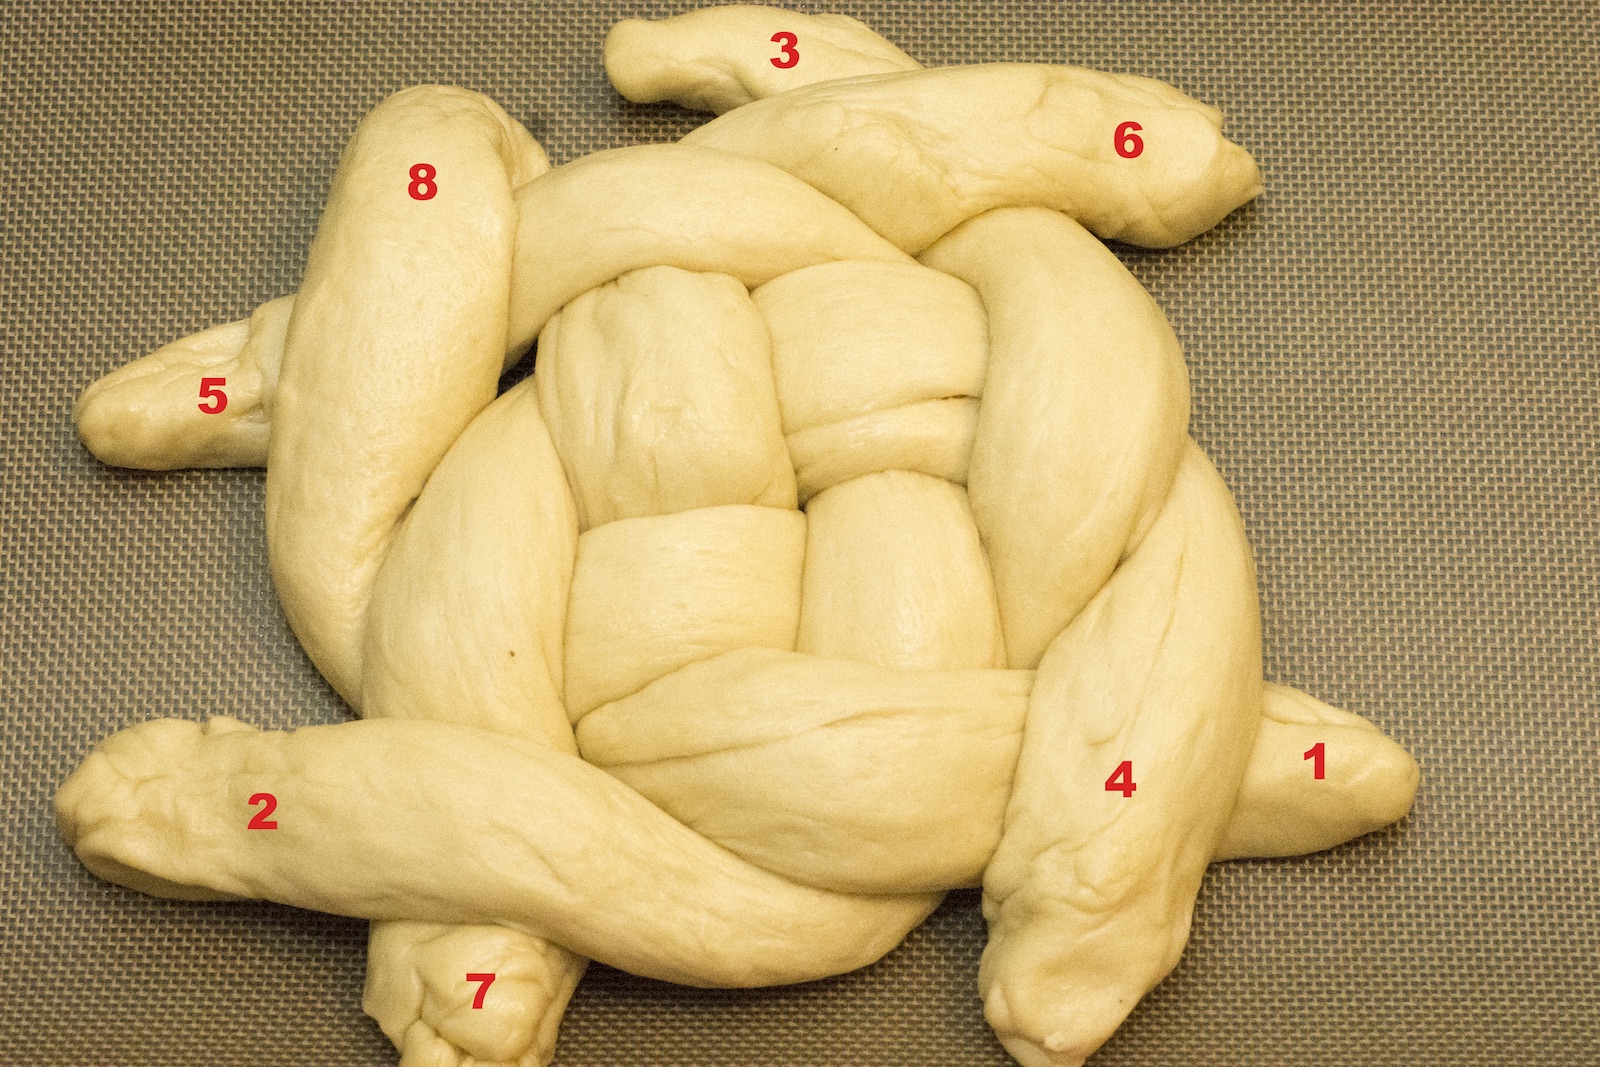
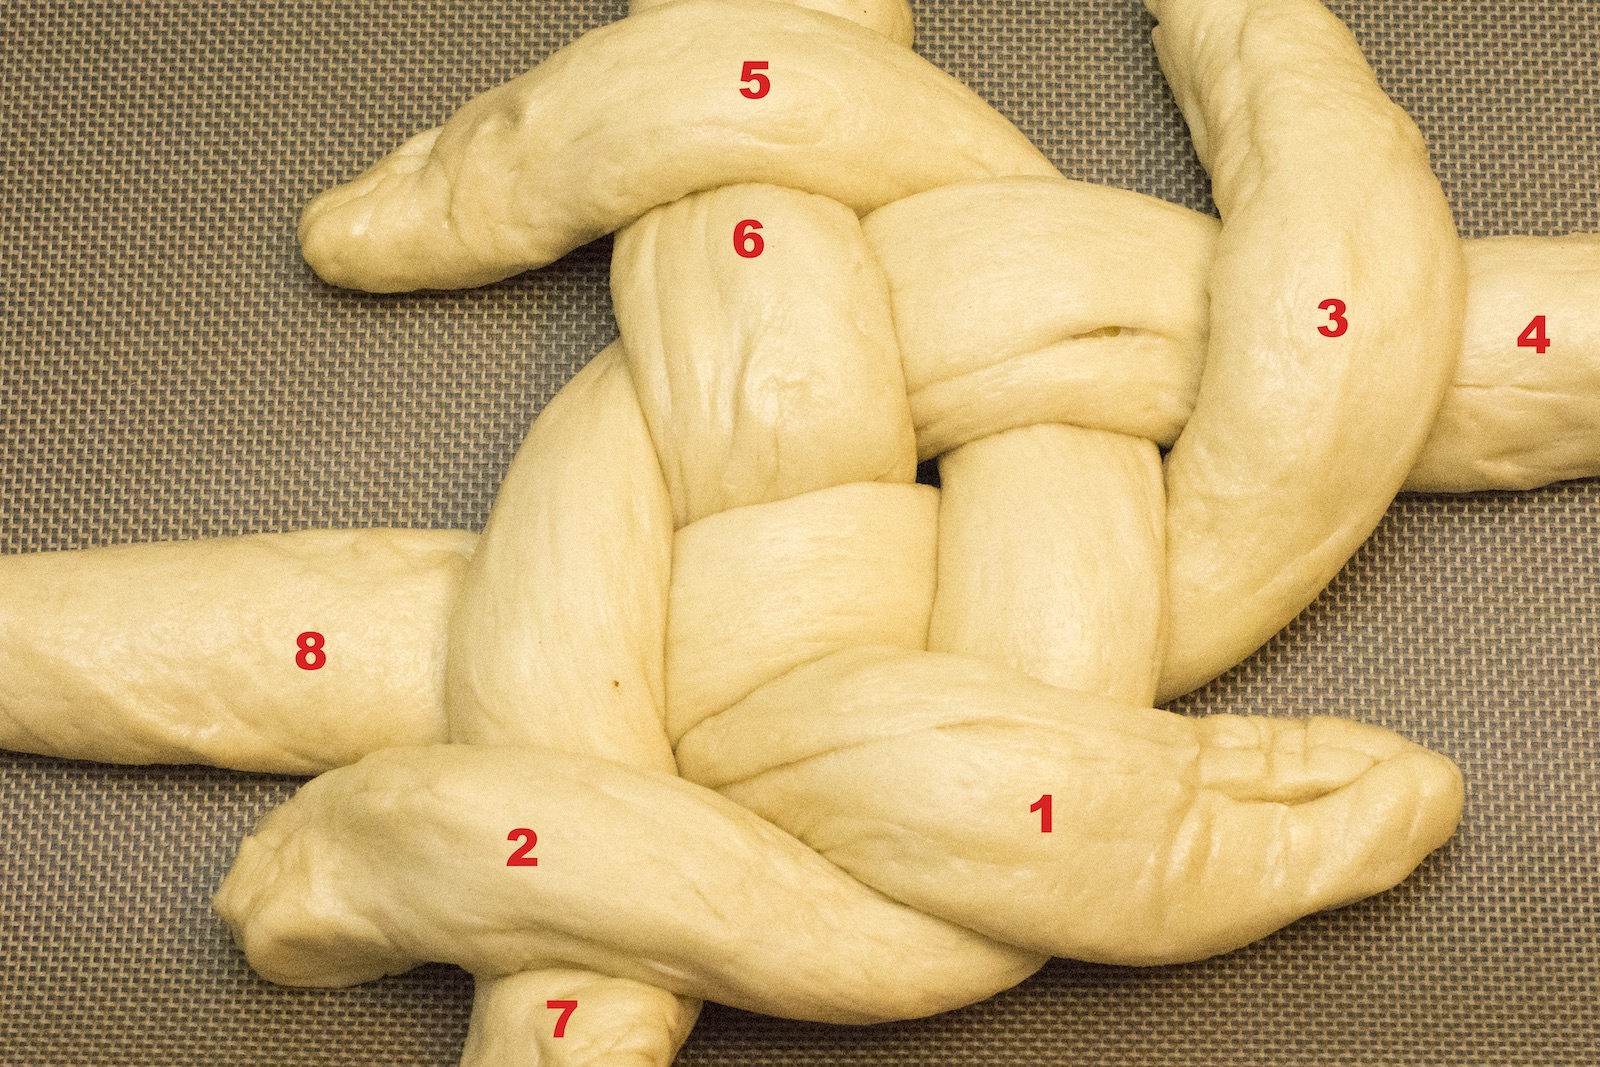
26. Take strand 7 and loosely twist it with strand 4; tuck the twisted ends under the challah. Repeat for all four parts – this part is hidden, so it’s really just to get the unfinished ends neatly hidden to the bottom and at minimal risk of unraveling.
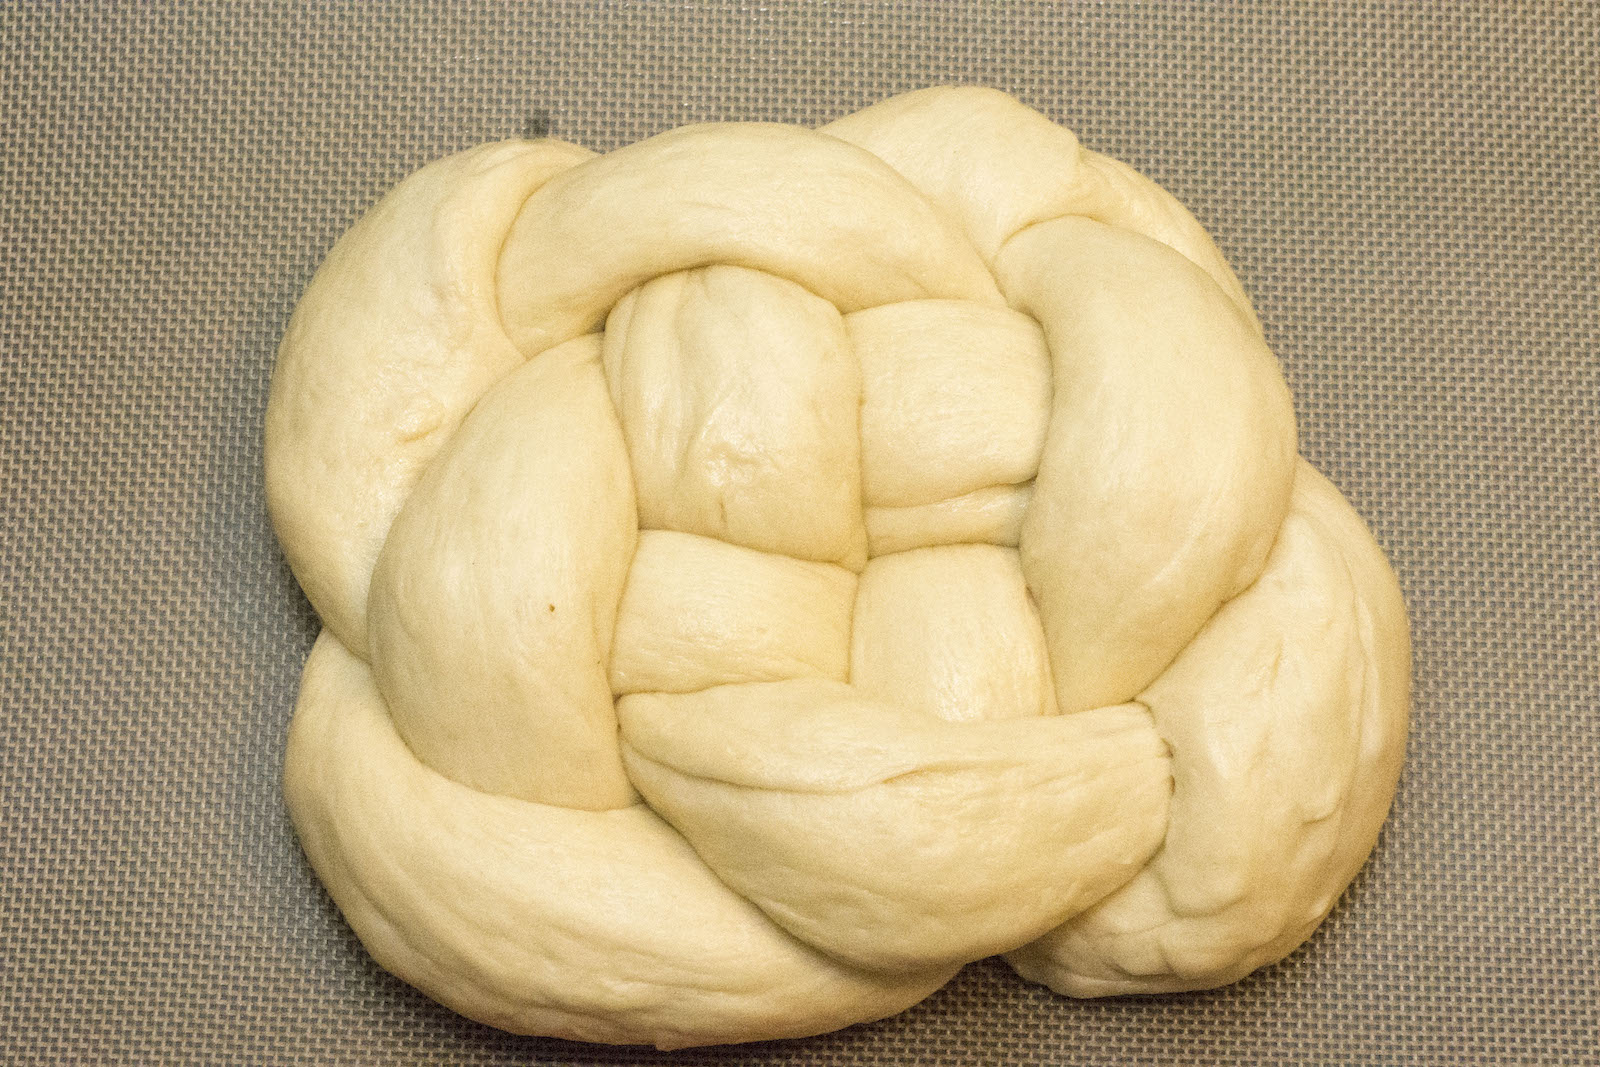
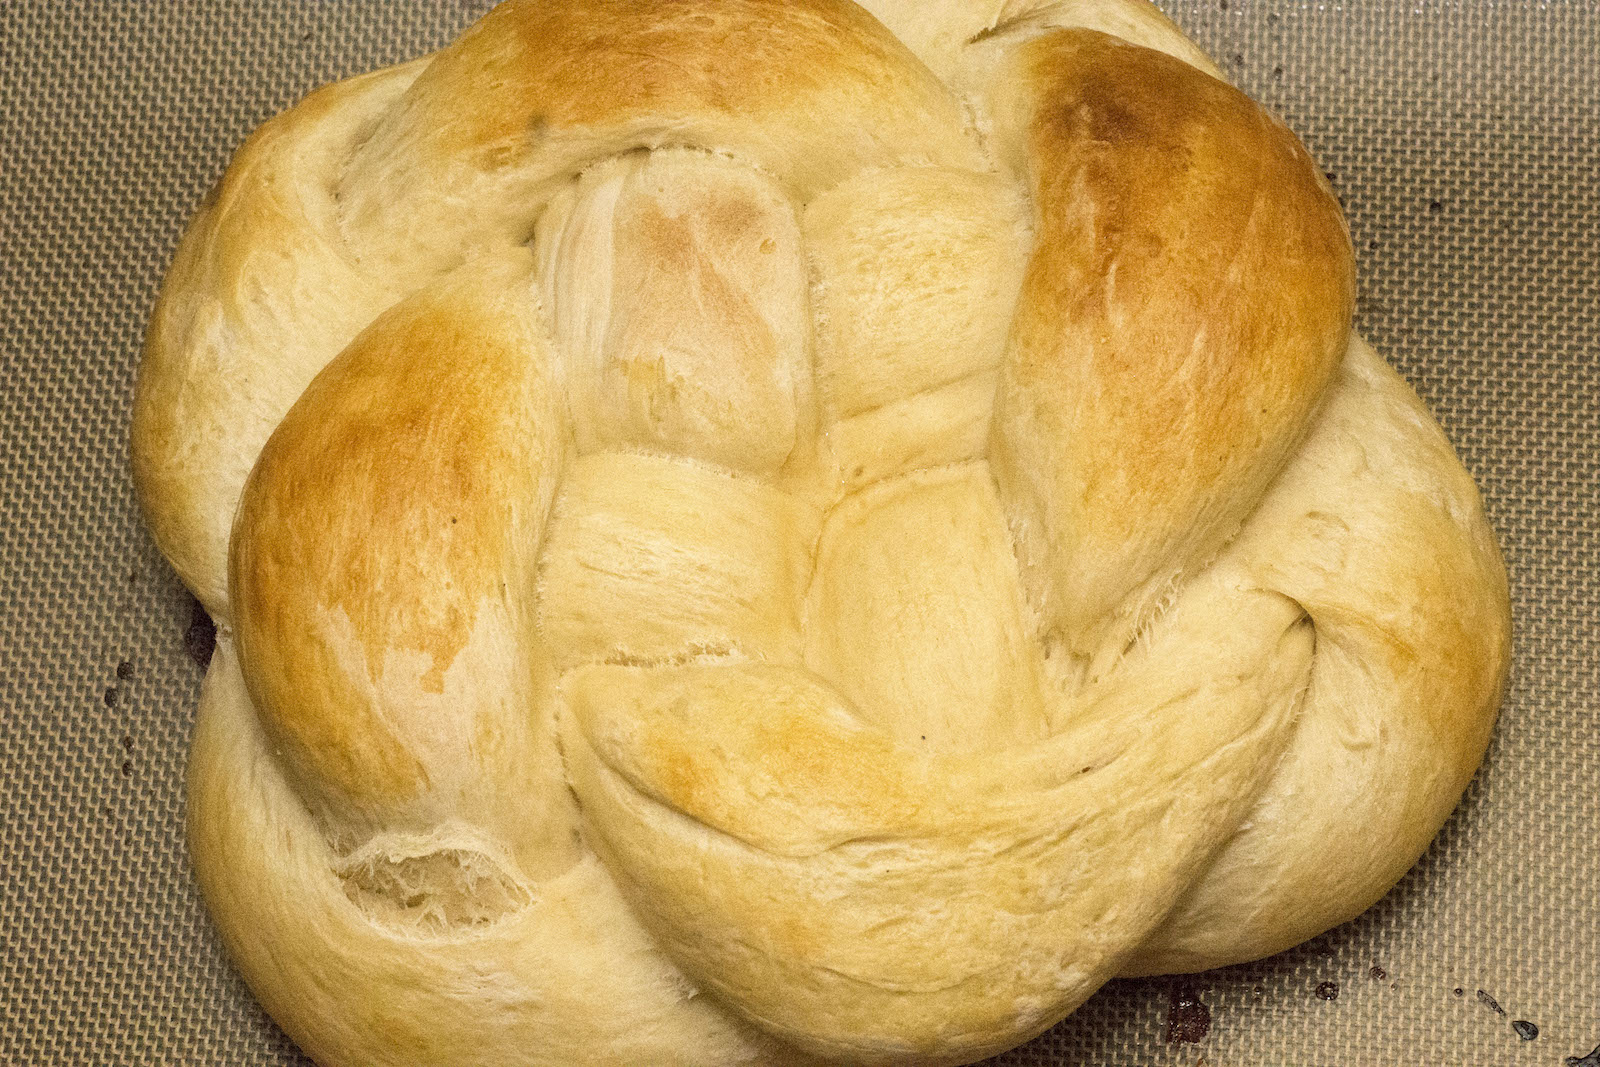
27. Gently pat and plump the challah to be slightly more circular.
28. Place it on a baking sheet lined with parchment paper or a silicone baking mat. Cover loosely with a wet dish towel or cling wrap. Let the braid rise for 30 minutes, turn the oven on to 350 F to preheat, and let the dough rise for 15 more minutes for a total of 45 minutes. If this sounds too confusing, you can set the oven to preheat at the beginning, but I don’t like running it for that much longer than necessary.
29. While the dough is rising, prepare the egg wash. The original recipe called for egg, salt, honey and water. Since those ingredients sounded familiar, I used a tablespoon of the liquid left at the bottom of the chopped apples & honey mixture, added a dash of salt, and mixed with the retained egg white for a very successful wash. Beat until smooth, and use a pastry brush to brush the challah thoroughly. Keep the leftover liquid. If you have turbinado sugar (the large sugar crystals that come in brown little packets at the coffee shop), sprinkle some on top for some attractive sprinkles.
30. The challah will bake for 40-45 minutes total, in stages. First, put the challah in the oven for 20 minutes. After 20 minutes, take out of the oven, noting which side was facing back, and brush another layer of eggwash over the challah, focusing on the grooves that expanded during baking. Rotate before putting back in the oven, so it browns evenly.
Set an alarm for another 20 minutes, but after around 10-15, check how brown it is – if it seems sufficiently browned, cover with foil so the outside doesn’t get darker while the inside continues to bake. Remove the foil for the last two minutes, if using it.
Yay! Your challah is done! Remove from oven, and to double check whether it’s done, tap the bottom of the loaf – it should sound hollow. If in doubt, add a bit more time. Cool on a wire rack and serve within 24 hours if possible. Shanah tovah!
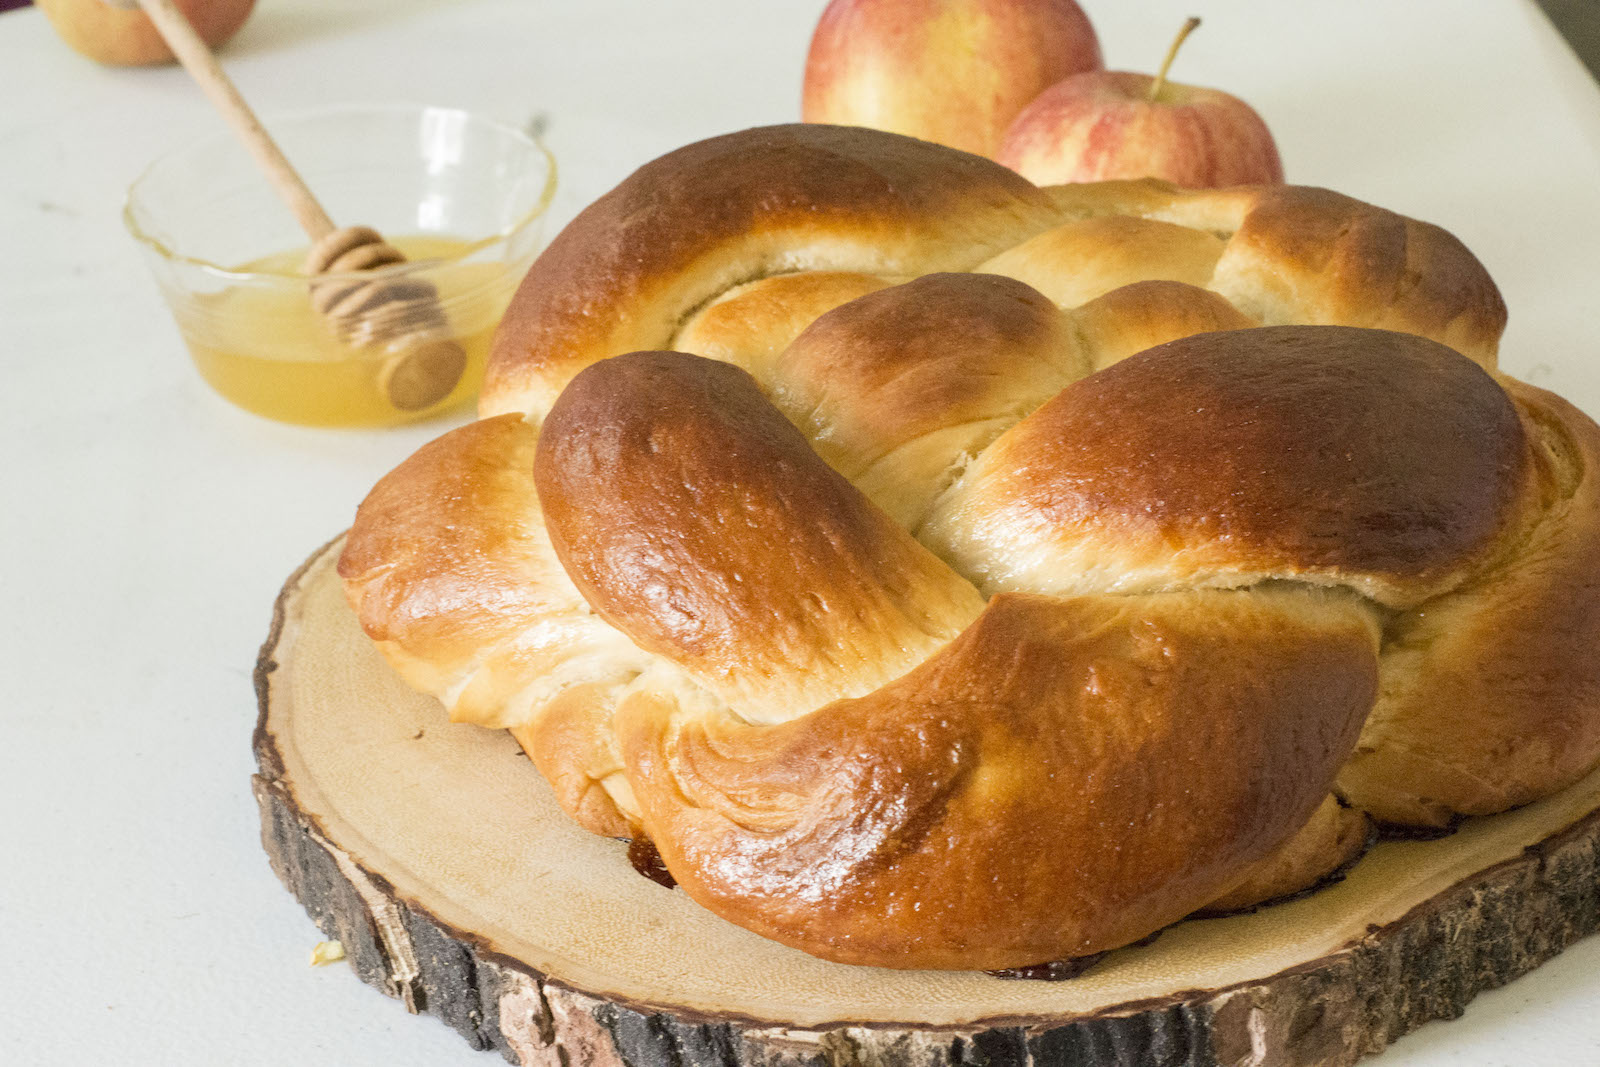
This year, Rosh Hashanah starts at sundown on Sunday, September 29 and ends at sundown on Tuesday, October 1.


Comments
I am so, so, excited for this column. I love the Halberstam quote–It really fits with my experiences of both being Jewish in a world designed for Christians and queer in a world designed for straight folks.
Also, your cat is hella cute. Can we be friends?
Yay!! I’m glad it also spoke to you – and Luna is the cutest, she’s officially my roommate’s but we all love her, and yes!
Apple-stuffed croissant cat is my new favorite recipe, but the challah part sounds excellent too.
I can tell you’re going to be giving Reneice a run for her money, ’cause reading this made me hungry.
the cat is a highlight of literally everything
Wow, I’m so excited for this columm and a year’s worth of Jewish recipies! My father just asked me if I was going to make a challah for Rosh Hashanah, and I think he’ll be happy with this as an answer. I will let you know how it turns out…
so excited to hear how it turns out! please share :)
How gorgeous! We actually have a very dedicated weekly challah baking practice. I LOVE it. Not only do I like it; my kid is really into it and my hope is that it gives her (and my baby) a super special smell/taste/sight memory to treasure when they’re grown.
It got me into sourdough baking too, and I made my own starter and make a sourdough creation or 2 every weekend on top of the challah. I now have a lot of friends who call me the carb queen 😂. And since I bake a lot more than I should eat a lot of my loved ones are gifted bread. We have walked loaves of challah down to the fire station to thank the firefighters and give loaves to sick friends and family… I’m trying to use it to teach my kids to care for folks too (mitzvahs or just being a good human, choose your language)…
Last week I made a basket shape out of a braided strand and placed apples soaked in honey inside. We had picked the apples at an orchard as a family and baking this challah was like living my parenting best life, just pure perfection.
Yours looks like a bit more work but utterly amazing! I stumbled on an instagram account of someone who bakes the most ridiculous stuffed challahs. I wish I could remember who it was but I’ve been off social media for a while. Have you heard of this? Worth checking out, I couldn’t look away!
PS I went to the bakery last week to buy challah because my baby’s been sick (no sleep!) and we just had an epic pile on of stuff that went wrong and had to be taken care of. I saw that challah and said nope and turned right around and made some ridiculously involved baked goods that night. It’s so addicting to bake your own and store bought will never taste the same!
That all sounds so wonderful!
I’m a Kinderland alum too! So excited for this column!
Go figure! Hi!
This is great and to my interest. I kind of wish I knew Yiddish as I grew up around Mizrahi folks & went to a Sephardic Shul that did some of the prayers in Ladino. I know a great recipe specific to Mizrahi Jews from Iran if you need one.
Yes, I’d love to see it if you’d be open to sharing!
I can share the recipe, but not really good at making it.
Oh my god a year of queer Jewish recipes, this is peak content
Yayyy I’m excited to share with y’all!
I have lil organisational tip earned from experience:
When looking at an ingredients list for a yeasted something with a filling identify which ones are ONLY for the filling AND measure them out only after the dough ingredients have been used, OR just physically isolate them as much as possible from the dough ingredients.
Also NEVER ever measure out a spice over the thing you’re going to add it to, a car could like backfire startling you into dropping the whole bottle right into it and well powders/grains aren’t legos.
Oh no that sounds like it was learned through painful experience!
Nutmeg is not a forgiving spice, and yes ruining the last of my supplies for something I was trying to make on a time table with a budget was painful.
Nothing I had on hand could balance the nutmeg out.
Haste does indeed make waste, I’ll always cook and bake mise en place style for even the tiniest ingredient.
Not only was the challah delicious and a perfect new year dessert.
The recipe (especially step 12) was one of the few I found a joy to read through from start to finish.
This has been a wonderful little gem. Our challah is already half gone!
Thank you so much, what a lovely compliment! Glad you’re enjoying :)
Thank you so much for this recipe and post! I am a pretty secular/slightly witchy Jew…ish person who still cares about holidays but no longer connects to my family’s/more religious practices, and this post inspired me to try the recipe (which was a very satisfying process and delicious to eat!) AND to write a new year ritual/picnic to go with it with a few friends, Jewish and non-. All in all a really lovely experience.
how lovely! shana tova!
I made this bread! It did not turn out perfect (my strands were not long enough to do the double braid) but for a first attempt I’m very happy! Will be eating it tomorrow, but posting it on Instagram tonight.
Thank you for sharing the recipe!