

feature image via Serious Eats NY
Magnolia Bakery is a fairly ubiquitous NYC spot. If you’ve ever seen an episode of Sex and the City or even so much as heard of Carrie Bradshaw, you may have been led to believe that you must try their cupcakes, but the truth is the cupcakes are only okay and if you’re going to eat one cupcake while you’re in New York I’d suggest Baked By Melissa instead. The thing Magnolia Bakery does really well is banana pudding. Real talk, I don’t even like bananas, and I’m not a huge pudding fan, and I’m still obsessed with their banana pudding.
I’ve been dying to make it for months and last weekend Lemon, my girlfriend and I had a joint birthday party, so it seemed like the perfect excuse to make a million desserts. I expected it to be tough to track down the recipe, seeing as Magnolia is like, A Big Deal, but it was actually ridiculously easy. Magnolia Bakery has a cookbook, and in it is the banana pudding recipe, and many people have taken it upon themselves to get that recipe up on the world wide web! So here we are. Let’s make the best banana pudding you’ve ever had in your entire life, courtesy of Magnolia Bakery and the good people of the Internet.
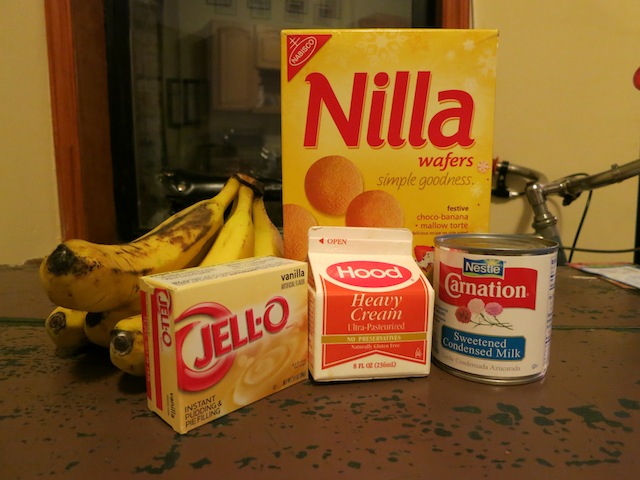
Ingredients
1 (14-ounce) can sweetened condensed milk
1½ cups ice cold water
1 (3.4-ounce) package instant vanilla pudding mix (Jell-O brand)
3 cups heavy cream
1 (12-ounce) box Nabisco Nilla Wafers
4 cups sliced ripe bananas
Directions
1. Combine the can of sweetened condensed milk and the water in a medium sized bowl and mix together very well. The recipe suggests an electric mixer, which I did use, but I think it could have been accomplished with a regular spoon and some muscle — with an electric mixer this took about 30 seconds. Also, try not to cut your finger on the can of sweetened condensed milk right as you embark on this adventure. Not that I did that, or anything. Ahem.
2. Add the pudding mix to the bowl and stir everything together, making sure there are no streaky yellow lines and that the whole mixture is more or less the same beige color.
3. Pop this bad boy in the refrigerator and leave it alone for 3-4 hours to set. Alternatively, you can put in the refrigerator for 10-15 minutes and then put it in the freezer for 10-15 minutes. It’s very important for the pudding to be completely set before you go on to the next steps, but both methods do the trick. An optional step here is to ask your girlfriend and your roommates over and over if they really think the pudding is set or if you should put it in the freezer for five more minutes. They’ll get annoyed with you but it’s fine. Just, whatever you do, don’t let the pudding become frozen. That’s not fine.
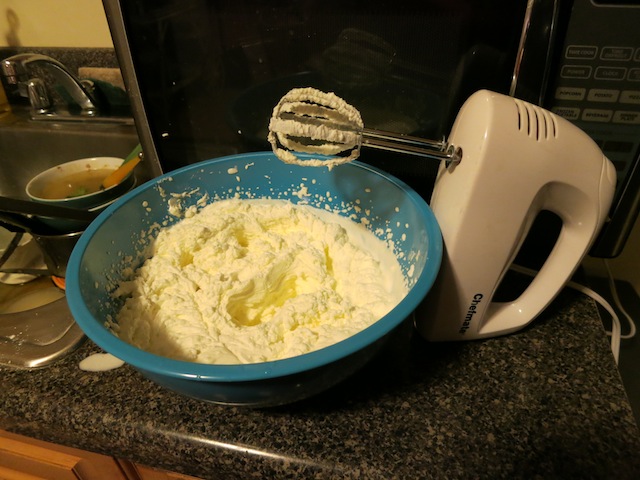
4. Once the pudding is set and good to go, grab a new bowl and put all 3 cups of heavy cream inside it. Use an electric mixer to beat the heavy cream until it forms stiff peaks. For this step I actually do 100% recommend an electric mixer. Ali has supposedly beaten eggs and things with nothing but her own two arms, but she does circus and as such is crazy strong in the upper body area, and I just don’t think my little biceps could’ve handled all the exertion. You don’t want to be sweating into your dessert. Just use an electric mixer.
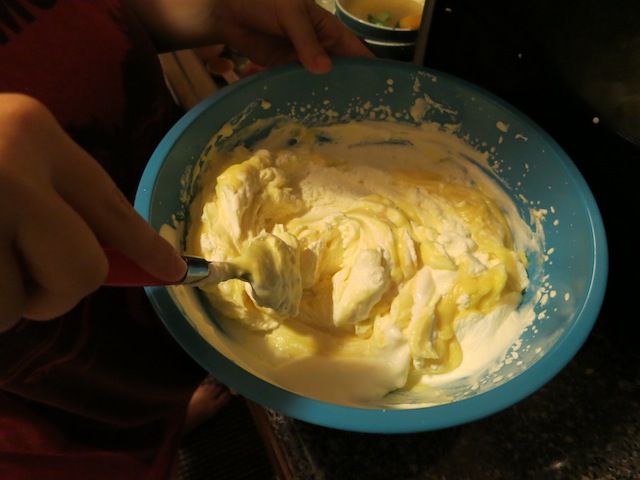
5. Once the heavy cream is all nice and stiff-peak-y, take your bowl of completely-set-but-not-frozen pudding and slowly add it to the heavy cream situation. Then mix everything together very well. Avoid the temptation to eat the entire mixture out of the bowl immediately because we’re not done yet and it’s not banana pudding yet, just amazing light fluffy Jell-O instant pudding in formal attire.
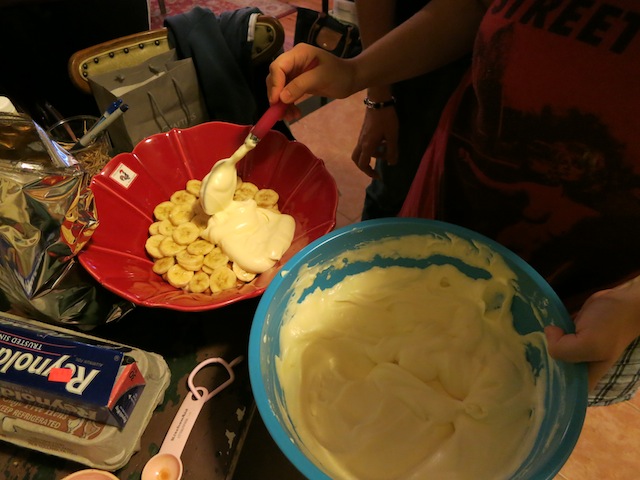
6. Chop up the bananas into thin slices.
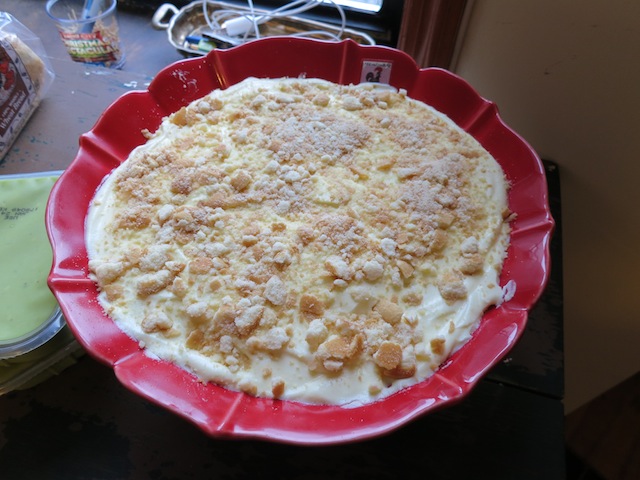
7. Get a nice large bowl and get ready to assemble everything. The original recipe suggests a glass bowl if possible, presumably because the sides of the dish can look very elegant when prepared properly, but I used an opaque ceramic bowl and honestly it was totally fine. You’re going to assemble this like a layered Napoleon. I’ve actually never made a Napoleon but I’ve watched enough episodes of Chopped to know it’s all about the layers. Put down a layer of Nilla wafers at the bottom of the bowl, then add a layer of banana slices, then top this off with a very generous layer of pudding mixture. Repeat this 3 times, or as many as possible. Some people mentioned that they needed more wafers than were provided in a single box, but I did not have any problems.
8. Garnish the fully-assembled pudding however you like. I crushed up Nilla wafers and sprinkled it over the top but I bet banana slices or whole Nilla wafers would also be delicious.
9. Cover the pudding tightly and leave it in the fridge for 4+ hours. This step is very very important as it gives the bananas time to seep flavor throughout the pudding and gives the wafers time to get mushy and cake-like which is the absolute best. I left my pudding overnight and the consistency and taste in the morning were perfect.
Not only is this pudding crazy easy to make, but it honest to god tastes exactly like the one you can buy at Magnolia Bakery. A few of our party guests didn’t even believe me it was homemade! But it was, and once I convinced them of that fact I became a baking goddess in their eyes. So go forth, hungry Straddlers, and impress your friends and loved ones. Or don’t tell anyone else about your pudding and eat the entire thing by yourself. Both are acceptable options.


Comments
Instant pudding and box vanilla wafers. :(
Pudding isn’t hard to make and home baked vanilla wafers are amazinger than box will ever be.
but the crazy thing is that this is what they printed in the magnolia bakery recipe book
like i can’t verify that they 100% use this recipe
but SUPPOSEDLY they do
and their banana pudding is honest to god the best i’ve ever had in my life
and this version of homemade stuff was REALLY GOOD
so…i dunno! i admire your made-from-scratch stuff but i’m just saying, give instant pudding and box vanilla wafers a chance.
(or don’t, obvs! you do you etc etc etc forever and ever amen.)
Yeah man :(
Homemade vanilla pudding (although, homemade vanilla wafers are not a thing I’ve heard of) and homemade meringue are a thing your grandma makes on a very special occasion! The meringue uses the whites and the pudding uses the yolks, HARMONY. It’s DELICIOUS and time consuming and lasts like, a day and is far better than what Magnolia ever thinks of serving.
This looks like the right kind of recipe:
http://www.texascooking.com/features/apr99bestbanana.htm
Not to diss on your article though Vanessa! Now I feel shitty man! The Southern-snob-living-in-New-York just reared her ugly ass head. We are bougie as hell about our desserts, which is why we never actually make them very often/ever :D
Ooo, thanks for that recipe!
The other thing about “recipes” that use instant this and box that and various mixes is that if you live somewhere those things aren’t sold, you can’t make that recipe. I have searched, endlessly, for a “1 box [colour] cake mix” to “ingredients and quantities for cake” converter, and cannot find one. So not-from-scratch recipes are actually really difficult and needlessly complicated, which defeats the entire point of them.
Puddings!!!
My first thought after reading this was, “I need to find a girlfriend fast so I can make this and feed it to her face.”
Vanessa, there are no words to describe the love I feel for you right this very moment. No words. This feeling I’m feeling might actually be best conveyed through interpretive dance. But first I’ve got some banana pudding to make.
I will join you in dance. I will now do the dance of my people. When they get pudding. And bananas.
*Snoopy Dances*
omg digger is dancing for me.
life goals i never knew i had = achieved.
I read those ingredients and couldn’t figure out why my scroll bar wasn’t working because it couldn’t possibly have that few ingredients… I’m still saying to myself, “that’s it?!?!?!”
This reminds me of a Paula Deen banana pudding recipe that is pretty much the most delicious thing I have ever put in my mouth. Like I can’t even make it unless I’m taking it somewhere, because it’s the only the I’ll eat til it’s gone. I’m all about nilla wafers, but something about chessmen…it’s epic.
http://www.foodnetwork.com/recipes/paula-deen/not-yo-mamas-banana-pudding-recipe/index.html
I could never make anything with Chessmen because they’re so delicious on their own, and I’d eat them all.
this is amazing
Guys, I hate Paula Deen, but she has a similar recipe for banana pudding, and hers incorporates CREAM CHEESE. It’s so good, it isn’t even funny.
http://www.foodnetwork.com/recipes/paula-deen/not-yo-mamas-banana-pudding-recipe/index.html
I forgot to add the link. Ooops!
You guys, growing up we called banana pudding “nana pudding.” My whole life I thought it was because my grandmother always made it, like the “nana” was named for her and not the banana and that it was named after her because it was the best thing ever. This is pretty damn close to her exact recipe. Just sayin’.
I am so glad this wasn’t just me. “Nana pudding” was the name we had for it too. :)
this was the best thing i’ve ever eaten and also the best thing i’ve ever smeared on vanessa’s gf’s face, so.
I’m gonna be honest. I took a minute to think over your comment, before fact checking the article to make sure I wasn’t imagining the ‘my gf, lemon’ part above.
Now i’ve thoroughly thought upon the reality of those involved in this evidentially circular reference, and have confirmed that I apparently aren’t going crazy (debatable) I should ask how this worked as a face mask. Rather curious.
gah, this is why i love serial commas! but they’re not autostraddle style so we don’t use them which is fine but this is so confusing now! to be clear (because it is OH SO important to this recipe that everyone understand the nature of my relationship with lemon and my gf, who are two separate people, naturally):
“last weekend Lemon, my girlfriend and I had a joint birthday party”
so this sentence indicates that lemon (person 1), my girlfriend (person 2), and i (person 3) had a party. during that party, lemon smeared this pudding all over my girlfriend’s face. we all forgot about it until i looked through the photos on my camera in the morning.
i am very sorry for the confusion. i will ask my gf if her skin felt softer after lemon attacked her with pudding. i will also love serial commas forever and ever amen (but respect that we do not use them in this publication.)
OK, I am jumping into this discussion not to be obnoxious (at least I hope not) but because I will take any excuse to argue in a friendly manner about punctuation! I think that if you had a serial comma, it would be even more confusing. Because when you are talking about just two people, you write: “Megan Rapinoe, my girlfriend, and I” OR “my girlfriend, Megan Rapinoe, and I”; in both cases, Megan Rapinoe is my girlfriend (only not really, sigh. Anyway —). And when you are talking about three people with serial commas, you write exactly the same thing! So I think the way you did it in the article without the serial comma is actually the least confusing way to do it (without lots of extra explanations)—the “my girfriend” isn’t seet off by commas so it has to mean that she’s a third party to the birthday pudding.
I also fully support your love of serial commas in general; they do come in handy sometimes. And thanks for the opportunity to discuss commas! (Rest of the world, please don’t roll your eyes… :) )
haha i’m not rolling my eyes nor do i think you’re being obnoxious, i love this shit.
when i showed lemon this discussion she actually agreed with you, and said she thought the serial comma would’ve been more confusing for the exact same reasoning.
i guess i feel like the serial comma would’ve clearly implied a list, as they are wont to do, so i thought it would make more sense that way (but it’s not AS style so i know it would never be that way, but still).
i am a BIG fan of dashes, so had i meant to imply lemon was my gf i would’ve written “lemon — my girlfriend — and i” or i would’ve written “my girlfriend lemon and i” with no commas at all.
this is such a silly conversation to be having on a get baked recipe about pudding BUT I LOVE IT THANKS FOR BEING GREAT AND GRAMMAR-CONSCIOUS, FRIENDS.
Now I’ve had it pointed out to me, I get what you’re trying to say. And tbh, I would second glanced at it no matter which of the three options you used, just that says more about me than anything else.
I think the key point to take out of this is my lack of subject familiarity. Should I have read enough of your articles I would maybe be more used to coming across mentions of either Lemon or the girlfriend and differentiated them in my head.
Holy fuck, there is a god. My life hasn’t been the same since I had their pudding well over a year ago. Merci beaucoup.
I am so impressed that this is an Actual Real Life Bakery recipe, because this is something that my dad has made forever and ever. And my dad is the kind of guy that cooks pasta and ground beef, throws in a can of tomato soup, and eats it right from the pot, so this is a big deal. IT IS SO GOOD. (And coincidentally it is his birthday tomorrow, so I feel this is very well timed.)
happy birthday to your dad!
Made this last night, and it really does taste just like Magnolia’s! I AM SO HAPPY RIGHT NOW.

yay! also omg your pup. so cute.
as a former prep cook for magnolia, i used to make this stuff by the vat-ful: using 25 cans of sweetened condensed milk instead of the one, etc.. although this is one of the most disgusting things they had us make, if you love it, this is the way to do it – at home, in small doses.
THAT IS SO COOL!
i am thoroughly impressed right now.
Vanessa, I can’t wait to make this deliciousness!
Ok so true story, last year my friend and I were waiting for our next flight at New Jersey Airport and we desperately wanted milk because we had just spent 2 weeks in a country with suspicious dairy and therefore were craving milk, so we small town Canadians ended up feeling really gansta drinking Hood milk (like in your picture) in New Jersey.
Hi. We are lesbians who craved pudding and fatefully stumbled upon this wonderful site by google searching: The Best Magnolia Banana Pudding Recipe. And guess what? We fucked it up. We live in Brasil and they have no nilla wafers (the American died, me, chaya, dies, i also miss Food Should Taste Good Jalepeno Chips and Disney World), the heavy cream is a different consistency annnnd no jello-o pudding. Ugh. So. We made banana pudding soup. Its the best (only) banana pudding soup in the world, though! Thanks for the recipe, we will try again when we are back stateside.
Anyone have the magnolia key lime cheesecake recipe