Summertime is synonymous with grilling! So in honor of one of my favorite food seasons, I decided to grill up some veggies and share with y’all. Get your charcoal, lighter fluid, and beverage of choice and get ready to impress your friends with the magic of fire!
Safety first, queers: Get a fire extinguisher! Also, if you haven’t lit a grill before, I highly suggest that you enlist some help. Make sure that the grill is clean and lightly oil the racks.
I decided to pick a small variety of things to grill, but since you can basically grill any vegetable, you should pick what looks good at your farmer’s market. There are multitudes of ways to grill vegetables; it makes it practically impossible to mess up. Yay!
Grilled Vidalia Onions
(approx ½ onion/person)

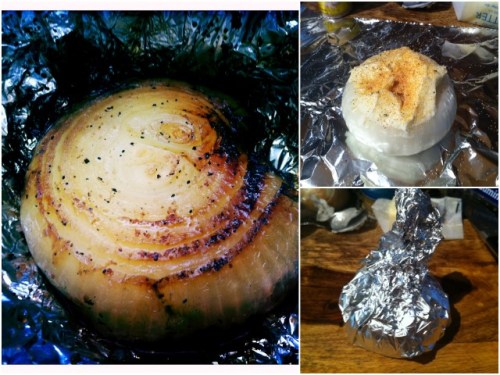
I hail from the great state of Georgia, and as any Southerner knows, there’s nothing quite like a Vidalia (Vie – dale – ya) onion. You can technically grill ANY onion, but the sweetness imparted through Vidalia onions is something everyone should experience at least once. To my excitement, I was even able to find Vidalia onions in my new home of California (I know, not local, but shh). They are everywhere this time of year; you just have to pay attention in the produce aisle. I suggest starting these first because they will take about 45 minutes to finish.
You will need:
Foil
1.5 tablespoons butter (or oil) per onion
Salt and pepper
1 teaspoon garlic powder per onion
(Vidalia) onions, medium-sized, outer skins removed
Remove the top and bottom to the onion so that it sits flat. Each onion will need its own piece of foil. Top each medium onion with 1.5 tablespoons of butter (or oil), season with salt and pepper, and 1 teaspoon garlic powder. If you skimp on butter the onion will burn, so don’t be shy. Completely wrap each onion in foil by bringing all four corners up to a point and twisting. Seal it tightly so that the onion will cook evenly. Place these little nuggets on the back of your grill on medium heat. Let them sit for about 40 minutes, and then open one to check on doneness. The onion is finished when it falls apart and is fork-tender. Yuuuuuumm!
Grilled Corn (with cilantro butter)

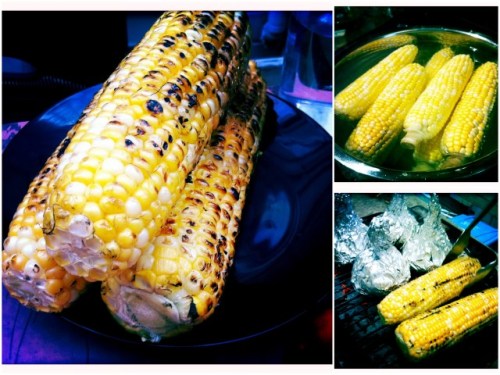
For me, grilled corn is to summer as pumpkin pie is to Thanksgiving. If you’ve never grilled corn before, try it with the husks on and off so you can figure out what your taste buds prefer. Corn tends to have a more smoky/earthy flavor with the husks on, while placing the cob directly on the grill will bring out more of its natural sugars. The possibilities are endless, but here is my favorite way.
You will need:
Corn
Olive Oil (or butter)
Salt and Pepper
Shuck the corn and remove as much silk as you can. Cover the cobs in cold water and allow them to soak for at least 30 minutes before you grill them. This will help remove some of the extra silk and add moisture for cooking. Pat the cobs dry, drizzle them with olive oil or brush them with butter, and season with salt and pepper. Preheat your grill and place the cobs directly on the racks. Give the corn ¼ turn about every 4 minutes. The slower you turn the corn, the more charred the kernels will be, which is up to you. Total cooking time should be about 15-20 minutes, or until the corn is soft to the touch and the kernels are speckled.
I like to serve grilled corn with cilantro butter. I’m seriously obsessed with cilantro and could probably eat cilantro butter plain, but that is besides the fact. Here is the recipe!
Cilantro butter
For about 4 ears of corn:
½ stick butter, softened
½ teaspoon sea salt
4 tablespoons chopped cilantro
½ lime, juiced
Mix all four ingredients in a small bowl and spread over the grilled corn, or you know, just eat it with a spoon.
Grilled Asparagus

You will need:
Skewers (optional, but they will make your grilling session easier, soak in water 5 minutes prior)
Asparagus
Olive oil
Salt and pepper
Balsamic Vinegar (optional)
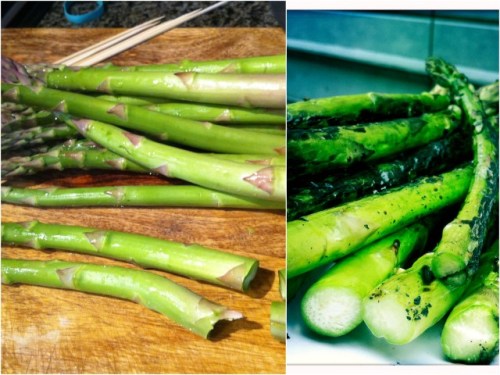
Asparagus is best when it is super fresh because it toughens over time. When trimming asparagus, each stalk will naturally break at the bottom where it turns from tough to tender. Snap each spear at the bottom and discard the tough ends when prepping. The tougher the asparagus, the harder it will be to skewer, so if the stalks begin to break during your prep, I recommend just grilling them directly. If using skewers, line up about 4-5 asparagus spears and run two pre-soaked skewers through the group, one towards the top and one towards the bottom. Repeat with the remaining asparagus, drizzle with olive oil, and sprinkle with salt and pepper. Place each bundle on the grill, at medium heat. Allow them to cook about 4 minutes per side, and then remove from the heat. If you’d like, finish them by very lightly drizzling with balsamic vinegar.
Grilled Portobellos

For 2 large mushroom caps, you will need:
1/3 cup oil
Salt and Pepper
Ziploc bag
1 tsp dried thyme
1 large garlic clove, minced
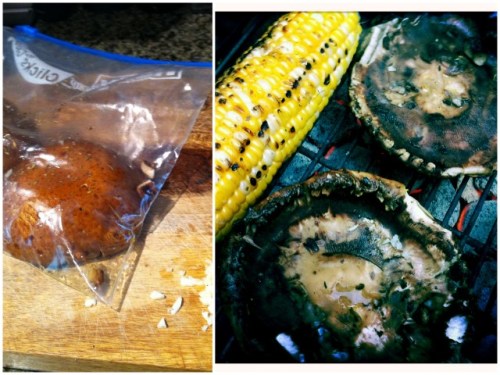
Clean the mushroom caps by removing the stem and cleaning out the gills with a spoon. Very gently clean the top of the mushroom with a damp cloth. Put the caps in the Ziploc bag, add the oil, salt, pepper, and thyme. Allow the caps to marinate for an hour before grilling. Right before grilling, toss the caps with the minced garlic, and throw them on a medium-heat grill, tops down. Wait for 4 minutes before turning, allow about 4 more minutes, and then remove from heat when the mushrooms have beautiful grill marks and are soft to the touch.
Ok, now it’s your turn to throw a cookout Share your favorite grilled veggie technique / recipe in the comments! Best of luck and happy summer!


Comments
two days ago i was watching dr. oz (ikr, wtf?) and he said that grill marks, like the dark parts on stuff you cook on a barbeque, is unhealthy because they contain carcinogens. (he later defined carcinogens as cancer. wtf?) i haven’t verified this allegation with the rest of the internet, but at the time my number one feeling was sadness that dr. mehmet oz had fucked with my joy of bbq. i mean who doesn’t love perfect grill marks?
if grill marks killed dana imma be hella pissed.
There’s some evidence of this, but I think the grill marks issue is actually for grill marks on meat (possibly just beef? can’t remember), as there’s a chemical reaction that occurs when a protein in the meat gets super hot. Or something.
But so long as you aren’t eating totally blackened steaks every day, you’re probably fine. It was a very low association, I think.
My main feelings re: charred food giving you cancer is fuck that, humans have been eating fire-cooked things since we discovered how to make fire. I will enjoy my slightly burnt food and die young if necessary. BBQ and burnt toast are worth it.
Agreed (w/r/t our cavemen ancestors and grilled meat). Also, my main feelings about Dr. Oz is that he hates women and wants to make us all miserable. (Have you ever seen his “sexual health” shows where he shames women for not knowing how to find their cervixes on a cross-sectional chart, or makes them feel stupid for not having g-spot orgasms, or whatever? UGHHHHHHHHHHH.) He doesn’t want us to have good sex OR barbecues!!!
Also, I just googled “grilled food cancer” and found that grilled meat is mostly the problem and grilled veggies are safe.
http://www.cancerproject.org/media/news/fiveworstfoodsreport.php
Wow that cilantro butter looks gooooooood.
This makes me sad that my lease has strict clause on NO GRILLING :(
that’s why george forman made an indoor grill : )
Oh snap! I never even thought of that. I should save up! Thanks :)
I’m usually the only vegetarian at the bbq. Watermelon, grilled onions, and grilled corn are what I survive on during bbq season. Can’t wait to try the portobellos and asparagus.
Thanks for the post!
as a member of the bbq team, i appreciate this post.
X2
x3
Just bookmarked this page for future grilling. Thank you.
Walla Walla Sweets grill up nicely, too. They have a similar sweetness to the Vidalias.
I’m in Australia, so I think grilling outside right now would be considered an extreme sport… I hate how recipe posts (not just here!) are often seasonal but seasonal for the northern hemisphere, which means I see delicious things I want but would be totally inappropriate to cook at the mo’! (This goes for delicious soups and baked goods in summer, too, because turning on an oven when it’s over 40 C outside is also an extreme sport.)
I feel your pain.
Hey, do you know an Australian equivalent of Vidalias? I see them mentioned on US food blogs all the time, but I’ve never seen them here. Thank you :D
I haven’t found an acceptable substitute, unfortunately. The yellow onions at the greengrocer aren’t nearly sweet enough. *Maybe* you could sub in the red onions, since they’re a bit sweeter, but I think their flavor is too sharp and doesn’t really hold up to cooking the way Vidalias and Walla Walla Sweets do. :(
Ah well ): thank you for the response. I am with you on the red onions, I have tried caramelising them in balsamic before in the oven, and the flavour is still too sharp. I might give it a go with brown sugar to boost the sweetness and see what happens.
I wonder if leeks or spring onion bulbs might work? Hmmm…
Ohhh fuck yes.
Summer just got a lot better for another solo vegetarian at the party.
I have learned a great number of things from my awesome father. The best have been:
marinate veggies in ziplocs for a day
any veggie is a grillable veggie
have beer. in fact, when grilling, have 2.
always have leftover grilled veggies in the fridge. actually, have some couscous with them, too.
and finally, a Labrador is the best grilling companion. or your daughter. mostly the lab.
I second the lab. And beer.
Yesss I love grilling! That cilantro butter sounds like something I’d try to eat with a spoon too. >.>
One thing I love to do is grilled pineapple.
Mix coconut milk and cinnamon, then marinate if you have time/coat if you don’t pineapple slices, the fresher the better. Throw them on the grill uncovered, turn once or twice so both sides get cooked, maybe 7 minutes? or as long as you can wait. Take them off and eat that shit hot!
It’s kind of imprecise because we always made them after we’d been drinking for a little, but they are delicious.
YESSS I LOVE GRILLED PINEAPPLE!!! my friends think it’s weird and they don’t like the sweet taste of it on their meat, so they don’t let me grill it. which is fine because i don’t like their meat on my pineapple
WUT your friends are crazy, I used to loove pineapple on burgers when I ate meat. Grill that shit up and don’t let them have any, haha.
Pineapple burgers, never tried that. I’ve gotten them to eat pinapple on pizza (pinapple, mushroom, green pepper) , but they were really really stoned couch locked and all, so doesn’t really count
p.s. awesome robbinwear
As someone from the PNW, I have to stick up Walla Walla Sweet Onions, apparently they are amazing and totally the best onions ever (I say apparently because I hate all onions and consider them to be the devil’s food).
Love, love, love me some vidalia onions…glad I’ve been reminded of one of my all-time favorite summer foods. Grill on!
ahhh so good
all that is missing is eggplant!
summer summer summer
grilling grilling grilling
veggies for vegetarians
YAY
(^these are my feelings)
Grilling is the king of food preparation. I claim that anything can be marinated in olive and oil and balsamic, be BBQed, and turn out twice as delicious as any other cooking method.
Seriously. I’ve had grilled avocado, apricot, everything. Delicious. My favorites are bbqed corn, onions, mushrooms, and steaks. Helloooooo summer, you’re looking fine. ;D
red potatoes. garlic. salt and pepper. butter. butterbutterbutter. wrap them in foil, put them on the grill. when they’re soft and blackened eat them. if you want eat them straight from the foil. don’t bother with dishes, chores are for suckers. it’s all about the potatoes.
I share your feelings re: grilled corn, abby. My favourite way to do it is husks off, and when it’s done I rub them with lime wedges and sprinkle with salt, chili powder and parmesan cheese. SO GOOD TRY IT.
Also delicious is grilled fruit, like peach and pineapple slices. Christopher Walken taught me to do bosc pears: slice off the bottom of the pear and place it on the grill flesh side down, like a little cap, and sit the pear on top of it; grill it on medium heat until the pear is softened. So delicious and caramelized.
Ooo, that sounds awesome! Definitely going to try. Everything is better with cheese :)
holy shoot I used to eat corn like that when I was a kid, haven’t had it in a while.
you should try:
skinning a mango (skewer or cut it into slices) and spraying it with lime juice and sprinkling it with chili powder. you can do it with a cucumber too, but sub the chili powder for salt
simple yet awesome
. watermelon and extra hot valentina sauce
Veggie Kabobs. Get some skewers, soak them in water for half an hour if they’re wooden. Stick things on the skewer like Pearl Onions, pineapple chunks (fresh, not canned as it will just fall off the skewer), garlic cloves, bell peppers (red, yellow, green) cut into chunks, button mushrooms, cherry tomatoes, red potatoes (boil them a bit first since they take longer to cook) quartered.
I usually put chunks of chicken on mine. You cold probably put chunks of tofu. I always end up with a few skewers of just veggies (whatever’s left over), and they’re plenty good.
You can put a marinade on them if you want, but I usually just brush them with olive oil.
Grill them over direct medium heat until they’re as charred as you like. Turn them every 2-3 minutes or so.
I am a big fan of grilled zucchini… marinate in olive oil, salt and pepper, grill then serve up with lemon wedges or drizzle with balsamic.
to those of you who have not tried grilled cilantro butter corn, it is fucking awesome
this is the beeest.
having just graduated from college without a “real job” yet, I spend a lot of my time cooking/browsing food blogs. the cilantro butter corn sounds amazing.
also, trader joes has this marinade called “soyaki” and it tastes phenomenal on anything grilled.
[…] […]
[…] Granted, we can put roughly anything succulent on a griddle and make it ambience delicious, but here are a few reason to raid your produce drawer. […]