

Now that we’re well into January, can we talk about resolutions for a minute? Real talk: not all of mine are going so well. Drinking apple cider vinegar, for example, is actually disgusting. As much as I want to have world’s strongest immune system and hair that glows with all the might of the godesses, it’s just not something that I can ingest a tablespoon of every day. Writing in my journal, on the other hand, is something I can handle. I made the executive decision to starting working on two of my resolutions at once (attempting to learn crafts that appear to require years of apprenticeship, I’m looking at you) and make my journal with my own two hands, and you know what? So can you.
Learning coptic binding has been on my crafty to do list for a while now. First of all, it’s ancient. I mean, who doesn’t want to learn how to make books in the style of Christian Egyptians from the 2nd century? It’s also damn impressive what people can do with a stack of paper and some string.
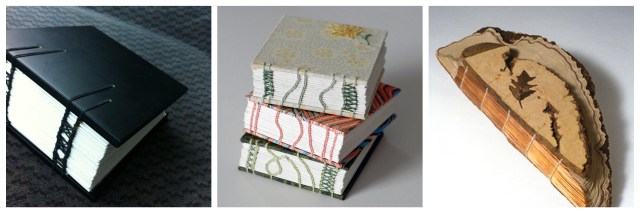
Functionality-wise, Coptic binding doesn’t use any special glues and results in a book that can open flat. If you’re left-handed or have a southpaw who you hold close to your heart, you know how irritating spiral-bound notebooks can be. You can make blank journals so you have somewhere beautiful to store your thoughts, or print your own book using our template or doing some crafty Microsoft Word margin-tinkering of your own.
Coptic Binding
Supplies
Paper
A cover
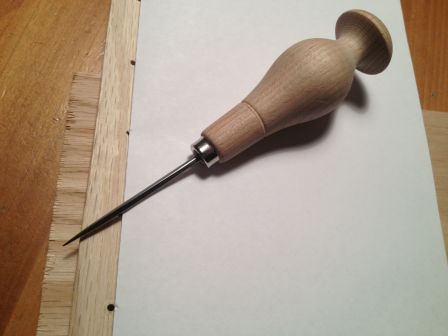
An awl: Or a suitable replacement. Basically you just need something pointy enough on one end to pierce a stack of paper and round enough on the other to not pierce your hand.
A needle: If you want to feel really official, you can get a curved needle. It’ll make the work infinitely easier, I swear.
Waxed thread: Waxed thread keeps your string from accidentally knotting which keeps your insanity level low. It also helps keep the thread from shredding through the pages while you’re sewing. Wax helps the knots you mean to make stay knotted and holds up better to wear over time.
Instructions
1. Procure your paper
Any size, shape, color and texture of paper works for this kind of binding. If you can fold it in half, you can bind it. Find something pretty or functional, fold it in half, and measure how long and wide your resulting bifolia are. Look at you, expanding your vocabulary like that! Okay back to measurements: keep these in mind because they’re going to help us when we go to make covers.
Because I was making a journal to last a year, I counted my pages very specifically. I wanted 12 signatures – one for each month – and for each month to have 32 pages – one for each day plus an extra for the title. Since folding a piece of paper in half results in 4 pages, I used 8 pieces of paper to make each of my signatures. Math! You can make as many signatures with as many pages as you want.
2. Create your covers
Your covers can be made out of pretty much anything flat and durable: Cardboard, leather, wood, game boards, postcards, plastic, album covers, playing cards, you name it. I wanted something that will really hold up to being schlepped around in my bag for a year so I went with wood.

When you’re making your cover, you can either make it exactly the size of your pages or slightly larger. I used a standard 8.5″ x 11″ piece of paper and folded it in half, so I cut my covers to 9″ x 11.25″ since I wanted a quarter inch margin on each side except the binding.
3. Hew some holes
One of the easiest parts about coptic binding is deciding where to put the holes. Why? Because it doesn’t really matter as long as they’re all in the same place. You can bust out your ruler and go for precision or just let them fall wherever. You can also have as many or as few seams as you want. If you want simple, try starting with just two. Punch the holes in one of the covers then use that cover as a guide for the other one and for each of the signatures.
4. Bind the book
I’m going to be upfront about this: coptic stitch looks really tricky. And it is until you get the hang of it. The good news is that since you’re using waxed thread, you can easily pull out any stitches that you did wrong. Trust me: I know because I had to do it. I could draw you illustrations for days, but you’d probably be just as discouraged as I was when I was trying to figure this shit out. So in the interest of everyone’s books getting made, lets’ get some video up in here.
[vimeo 57627037 w=500 h=281]
coptic binding from laura wooley on Vimeo.
Front cover
Signature: inside to outside
Cover: outside to inside
Cover: outside to inside
Signature: outside to inside
Signatures
Signature: inside to outside
Go around previous stitch
Signature: outside to inside
Back Cover
Cover: inside to outside
Go around previous stitch
Cover: outside to inside


Comments
I love book binding! I made a cloth-bound book last semester for a midterm (and hand printed the fabric), and the kids I nanny love when I bring them little simple books made out of printer paper and card stock. If you want to get really fancy, you can buy a hunk of beeswax and make any string suitable for binding.
oooh i would really like to see this. and the beeswax tip is so useful.
This is awesome and I want to make one! …and also buy an awl and overcome fear of electric drills (nice pic) so maybe this’ll be the motivation. Thanks for making the video!
You don’t even need a drill if you don’t use wood! Get on it, friend.
laura you’re a king among women
incredible! thanks!
The picture of you and the cordless drill. You’re the cutest.
I want to do this but I have zero patience so I’m nervous for myself.
^ Yep, I read this article and sighed wistfully. No way would I have the patience.
This is so helpful! I just learned how to coptic stitch before this article and it took several tries. Your video made it much more clear.
I did this after watching this with my diary. It looks much sexier now. It even got to the point on the Tube where someone took out their normal looking shop bought diary and I got mine out just to show it off. They didn’t look at mine at all but I knew they were jealous.
i made a planner like this for free, and more beautiful than any hipster moleshit mass-produced notebook :)
great video, thanks for taking the time to make it
LOVE the video! Thanks for sharing! I make fabric covered case bounds, hard cover pamphlet binds, and some Coptic as well. So far yours is the best video I have found explaining the Coptic stitch. Love that bit, ” and if your completely lost I bet you are really pretty”. Haha!!
Again thank you for sharing! Ashley @ PapertoThread
I never commented back on this but I just wanted to say THANKS!
Hi! I am a bookbinder by profession and I’ve been thinking a lot about binding with wood. Where did you get your wood, and how did you prepare it? Thanks!
Ooh! You probably have a lot to teach me then =)
Howevs, I’ll share my little bit of knowledge. I just when to Lowes and got a piece of 1/4″ solid wood. It was a little pricey because most of their wood is particle and pressed board but it’s not too bad. I sanded it within an inch of its life and left it natural for this project. I’ve made books with wood covers where I’ve woodburned the covers, and others where coated them with stain varnish and even a mixture of beeswax and mineral oil (the same stuff I put on my cutting boards).
Oh my Goddess! I googled a thing and an Autostraddle article was the best of my options!!!! As a longtime straddler, I got ALL the feels!
1) Make all the books.
2) Document all the feels.
3) ???
4) Profit.