

Last weekend Cara and her roommates threw a fancy holiday party and I was determined to bake something that would impress everyone. Of course I turned to Joy the Baker, one of the very first food blogs I started following and my go-to when I need a perfect dessert. Cara’s amazing Martha-Stewart-esque roommate Kristine offered to help me, and though we encountered some obstacles along the way – such as running out of cinnamon and working with a set of unmarked measuring spoons – I believe we did indeed create one of the most impressive holiday desserts I have ever made. This cake is so yummy and so seasonal – it’s very rich and decadent, with just the right combo of spicy dense gingerbread cake and sugary sweet cookie butter frosting, with a healthy dose of dark chocolate to boot, because why the heck not. I feel comfortable telling you that this cake will be a hit at absolutely any holiday situation. Your girlfriend will love it, your girlfriend’s roommates and friends will love it, your mom will love it, your cranky uncle will love it, your cat will love… you get it. This cake is super lovable. Let’s get baking so we can all feel the love.
Gingerbread Cookie Butter HoliGAY Cake
Ingredients:
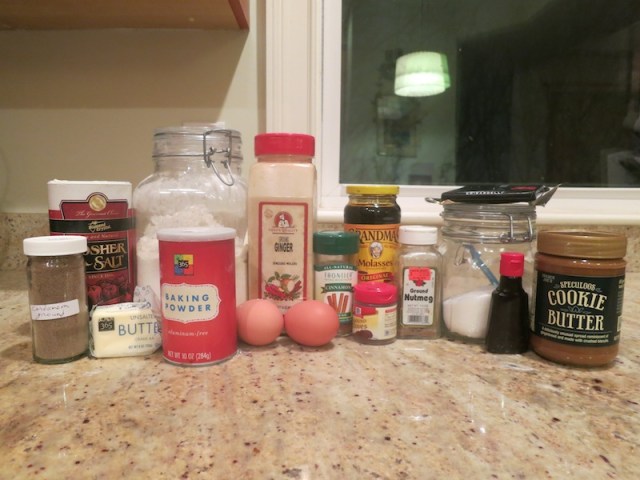
2 1/4 cups all-purpose flour
1 tablespoon ground ginger
1 teaspoon ground cinnamon
1/4 teaspoon freshly grated nutmeg
1/8 teaspoon ground cloves
1/8 teaspoon ground cardamom
1 1/2 teaspoon baking powder
1/2 teaspoon salt
1/2 cup unsalted butter, melted and cooled
3/4 cup granulated sugar
2 large eggs
3/4 cup unsulfured molasses
3/4 cup hot water
2 teaspoons pure vanilla extract
1 cup Speculoos Cookie Butter spread
3 ounces dark chocolate, melted
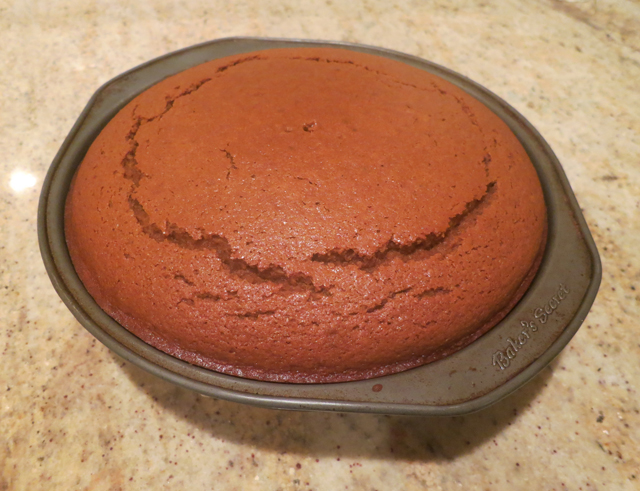
Before we talk about how to make this masterpiece, let me admit a few things I did “wrong.” The original recipe says to use an 8×8 cake tin, but we didn’t have one so we used a pie tin instead. Also, the measuring spoons I was using didn’t have any labels on them (they’d worn away with time) and instead of asking Cara to help me figure out the measurements I just guessed and hoped I was right. Turns out I was wrong and I used more spices than were called for. Finally, we didn’t have a cooling rack or parchment paper, so while the original recipe requested that we use both, I used neither. How did this all affect the cake? It didn’t! The round pie pan worked perfectly and added a chic dimension to the dessert, the cake was definitely very spicy but everyone loved it and complimented that aspect (I think because the ratios were intact despite the measurements being off everything was still balanced well) and it turns out the rack and the parchment paper are sort of suggestions, not necessities. All of which is to say I think this is a pretty forgiving cake, as baked goods go, so don’t be intimidated or shy about trying it out. You can do it even if you make 3+ mistakes!
Directions:
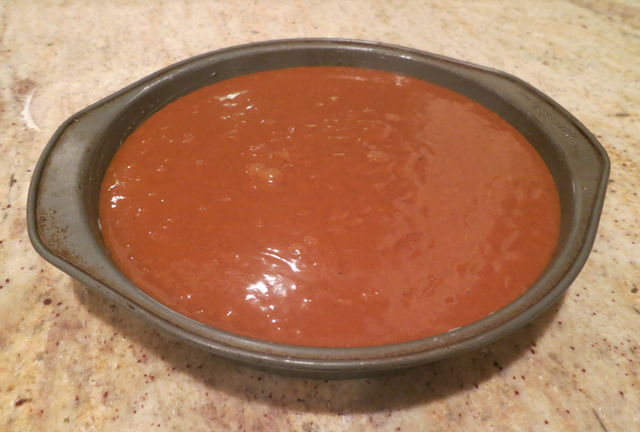
1. Preheat the oven to 350 degrees. Grease your pan, whatever shape it may be.
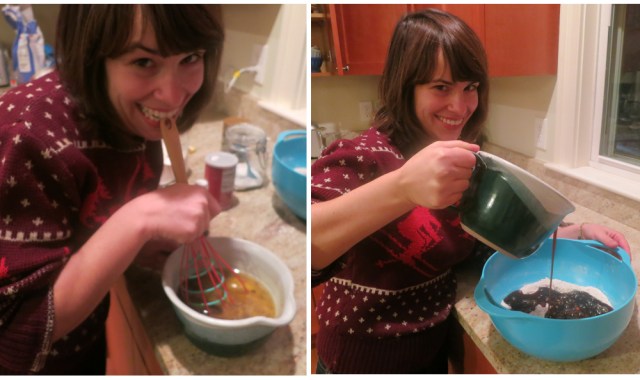
2. In a large bowl, mix the flour, ginger, cinnamon, nutmeg, cloves, cardamom, baking powder, and salt all together. Try to convince a cute girl to do this for you, if possible.

3. Melt the butter! This was very exciting for me as I usually do this instead of softening butter and then feel guilty because I know it’s “wrong” and Kristen once even explained why, BUT in this recipe we’re actually told to do it! You MUST melt the butter! Do it do it do it!
4. In a medium bowl, combine the melted butter, sugar, eggs, and molasses. I’d never worked with molasses before and it’s kind of weird. Not bad. Just weird. Anyway once it’s all pretty mixed add the hot water and vanilla and stir very carefully so as not to get scalding molasses mixture all over your shirt/hands/counter/ceiling.
5. Pour the wet ingredients in with the dry ingredients. Mix mix mix. Taste taste taste. Yum yum yum.
6. Pour the well-mixed mixture into the pan you greased earlier and pop that badboi in the oven. Bake for 30-35 minutes or until you can put a toothpick through the center and have it come out clean. We had to leave our version in the oven for an extra 5-7 minutes so if that happens don’t worry. Just make sure not to over-bake it cause you don’t want your cake to be dry.
7. Let the cake cool for 20 minutes in the pan, but do not let it get cold. You want to frost it when it’s still warm, trust me. Once it’s cooled get it out of the pan (I suggest take a knife and gently wedging it between the cake and the tin to loosen it up and then maybe hitting the bottom of the pan with your palm a few times if things are feeling sticky – don’t be afraid to bring consensual BDSM into the kitchen) and if you have a wire rack place it on that and if not just pop it on a plate and you’ll be fine, pinky swear.
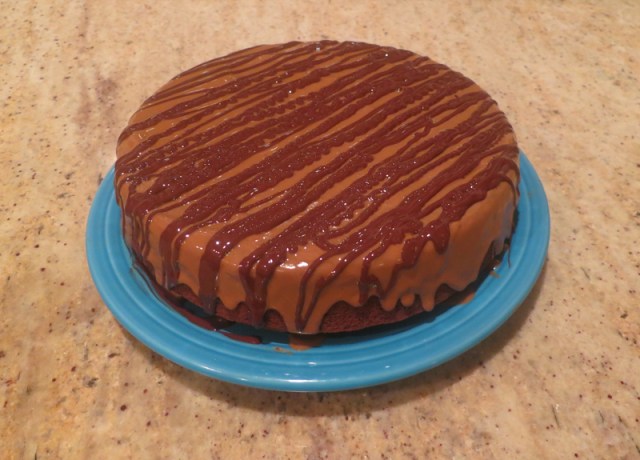
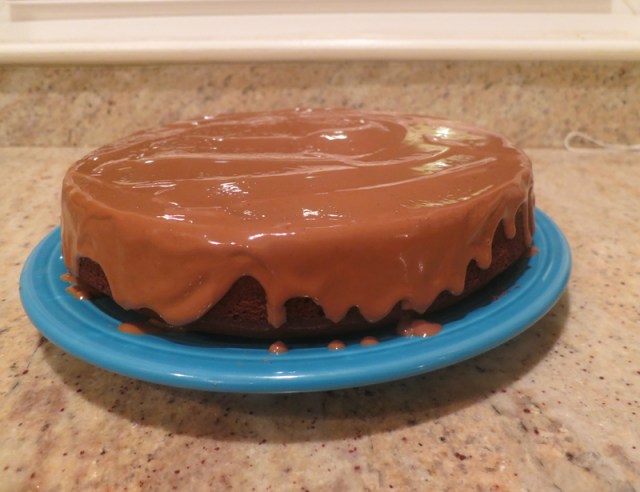
8. Spoiler alert: This part is a tiny bit tricky but also so fun. You wanna take your Speculoos Cookie Butter and start spreading it all over the cake. It’s going to be tough at first because cookie butter isn’t super soft and spreadable, and the cake is gonna feel really fragile under your knife. But perservere! Eventually the cookie butter will start to get melty (that’s why it was important to do this while the cake is still warm!) and you’ll be able to spread it very easily. Plus, once it starts melting it sort of seeps into the cake and infuses the whole thing with delicious cookie butter flavor. The recipe calls for 1 cup of cookie butter but I didn’t measure – I just kept adding more and more, making a thick layer that melted beautifully and dripped over the sides of the cake in a very pleasing fashion.
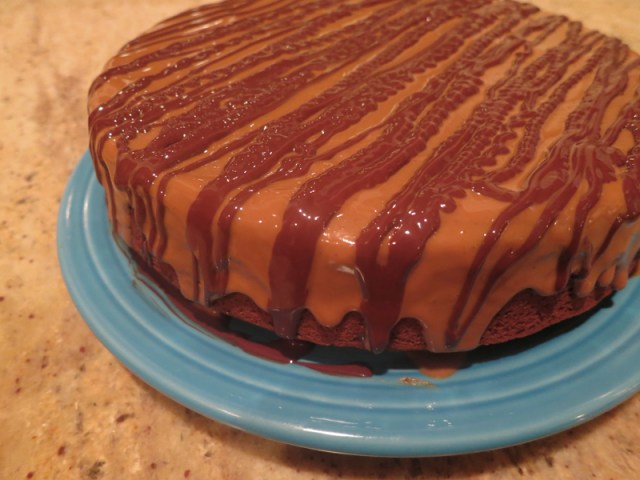
9. We’re almost done! Now you want to take your dark chocolate and melt it in the microwave (or on the stovetop I guess but the microwave was quick and easy and my preferred method). Pour the melted chocolate into a ziplock bag (or a fancy pastry bag apparatus if you have one) and cut a tiny hole in one of the bottom corners of the bag. Use this makeshift pastry bag to drizzle chocolate all over the top of the cake – you can go for any pattern but I copied the original recipe and aimed for lots of thin lines. They were a little shaky – I accidentally used my left hand instead of my right and once you start going it’s kind of hard to stop and start – but everyone who saw the cake insisted the “wavy lines” looked beautiful so I just started pretending they were intentional.
10. Put the cake in the fridge for about 30 minutes so the cookie butter and the dark chocolate can set.
11. SERVE AND ENJOY. MERRY CHRISTMAS.
But wait…there’s more!
While I would say my cake was extremely well-received at the party, the true highlight was when Cara and her friend Ben got tipsy and performed a wide variety of holiday tunes to an audience of adoring fans/significant others/party-goers. In the spirit of Christmas I decided it was only fair to share one of these stellar performances with all of you. Behold, I gift you the best cover of Mariah Carey’s All I Want For Christmas that you will see all season, I guarantee it. MERRY CHRISTMAS FOR REAL.


Comments
OH
cookie butter truly is the most versatile of all delights. cookie butter frosting! COOKIE BUTTER FROSTING. WHO KNEW.
thank you for another enlightening, eye-opening post, vanessa
Fact: I did not know cookie butter existed until this post. It seems magical.
CAROLYN how have we been working together for a year and a half and you’ve NEVER heard me talk lovingly about cookie butter?! i feel like i have failed you.
I remember you telling Bren about it! I remember this via the power of search in gmail. I think my brain just did not understand that cookies could become a peanut-butter-like thing. It was too fantastic to process.
Yes this is the best version of the Mary Cary classic I have seen this holiday season! Recipe question, what is cookie butter? (sorry i’m English and confused) :)
from one hat to another, a sincere thanks.
Cookie butter is a thing sold by Trader Joe’s. I haven’t tried it myself (I only recently moved within the vicinity of an actual TJ store) but it’s apparently MAGICAL.
it’s not just sold by trader joe’s! that is where i discovered it, but it also goes by the name Biscoff — you might know it as that if you’re English? (http://www.biscoff.com/indulge/biscoff-spread)
oh but also i can confirm that it is MAGICAL x 10000. i have been known to consume an entire jar in one sitting with a spoon. no shame.
That video has truly put me in the holiday spirit :)
CARA.
also i’ve never wanted gingerbread cake like i want gingerbread cake rn. i love that you made it round and not square! everyone knows round things are better than square things anyway. i think i would’ve left it crack-side up though, and i’d say pseudo deep stuff about bravely showing our flaws as people and cakes, we are all made of cakes, etc.
laneia you’re a magic fairy cake.
I’m gonna be honest and say that I had forgotten about the existence of cookie butter until yesterday when my ladyfriend started talking about it inside chocolate bars? But omg cookie butter as frosting?!
My body is ready.
I was highly skeptical about the hype around cookie butter.
But then I tried it.
AND ITS MAGIC IS TRUE.
I AM DROOLING ALLOVER EVERYTHING IS SIGHT.
I drooled all over my fingers which made them so slippery that I couldn’t even type correctly
<3
that cake is fucking beautiful. If I weren’t such a hot mess this season and didn’t have to host too many of my extended family, I would totally try to make this.
you should make it in january! why not? :)
oh, I was definitely considering it!
Omg, Cara sing Christmas songs to us all day long.
I want this cake, cake, cake, cake.
MY FAVORITE SONG
MY FAVORITE HUMANS
<3 <3 <3
I need this cake in my life.
Aw, Cara :)
If you look really quick at the first pic of the cute girl….she looks like Alice Pieszecki.
hmmm perhaps… but I more think Carrie Brownstein
Did someone say my name?
No cookie butter in my land! What can I mix to substitute it?
I had never even heard of cookie butter before this.
I desperately want it in my mouth.
That is the only version of All I Want for Christmas I ever want to hear again.