

![]()
Welcome to Nerdcraft! Nerdcraft is a workshop where we make nerdy crafts, talk about our favorite fandoms and bond over our love of Doctor Who, Super Mario Bros. 3, Adventure Time and The Legend of Zelda. If you’re not at A-Camp, it doesn’t mean you can’t host your own Nerdcraft event with local Straddlers or friends — all you really need is good company and a few craft materials you can grab at the local craft store.
One of the activities I’m really excited about is Perler Bead Sprites, where we make video game sprites of notable characters and objects in video games and various fandoms out of perler beads. Remember perler beads? They’re those plastic beads that you arrange in patterns, iron them with some paper and a hot iron and the beads fuse together into a unified masterpiece. It’s like elementary school craft time all over again, except that you can wield the hot iron yourself.

What I love the most about perler bead sprites is how they can reproduce pixel art perfectly — throwback art you can find nowadays that emulates the visuals of old 8-bit and 16-bit video games. Perler beads are the perfect medium for crafting Mario’s fire flower, The Legend of Zelda’s boss key, and Yoshi’s egg. And when you’re done, you can put your beer/tea/mixed drink on them as snazzy drink coasters, string them through with a chain to make a necklace, or attach a keyring to them to make a keychain. You can even make a 1-up mushroom for your backpack to attract the attention of other nerds and voilà — you now have a conversation starter with that geeky queer you’ve always been wanting to talk to. Perler beads bring people together.
Here are the materials for the perler bead sprites! I found everything at a local craft store and I even had some of the things (like parchment paper) in the house already, so the obtaining-the-craft-material rodeo should be pretty painless.
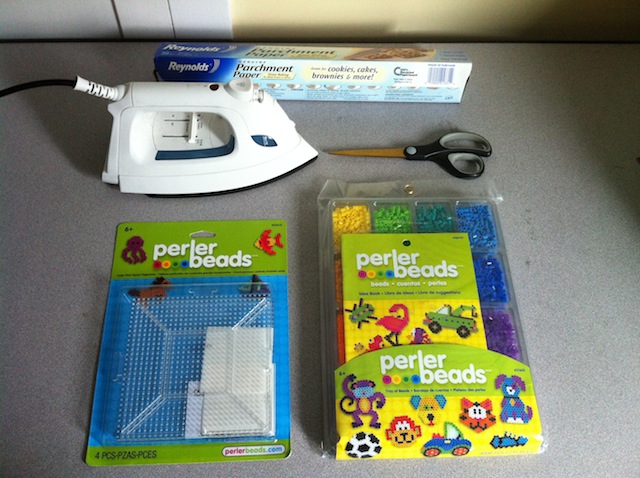
What you need:
+ Assorted perler beads (which you can find at a craft store in your town — you can also order them on Amazon!)
+ Perler bead pegboard (also called perler bead mats — you can get the square ones 2 in a pack for pretty cheap — you can also order these on Amazon!)
+ Parchment paper or wax paper (I prefer parchment paper because wax paper can sometimes fuse to your beads, and I haven’t had that problem with parchment paper)
+ A clothes iron that has a linen setting (if your iron has a “steam” option, turn it off!)
+ Scissors (for cutting the parchment paper into pieces)
And that’s it! I’ll go step-by step through me making my first perler bead masterpiece (ever? ever — seriously, you guys, I have no idea how I have never done this before) and will leave you with a top 10 nerdy perler bead idea list for your perler beading pleasure.
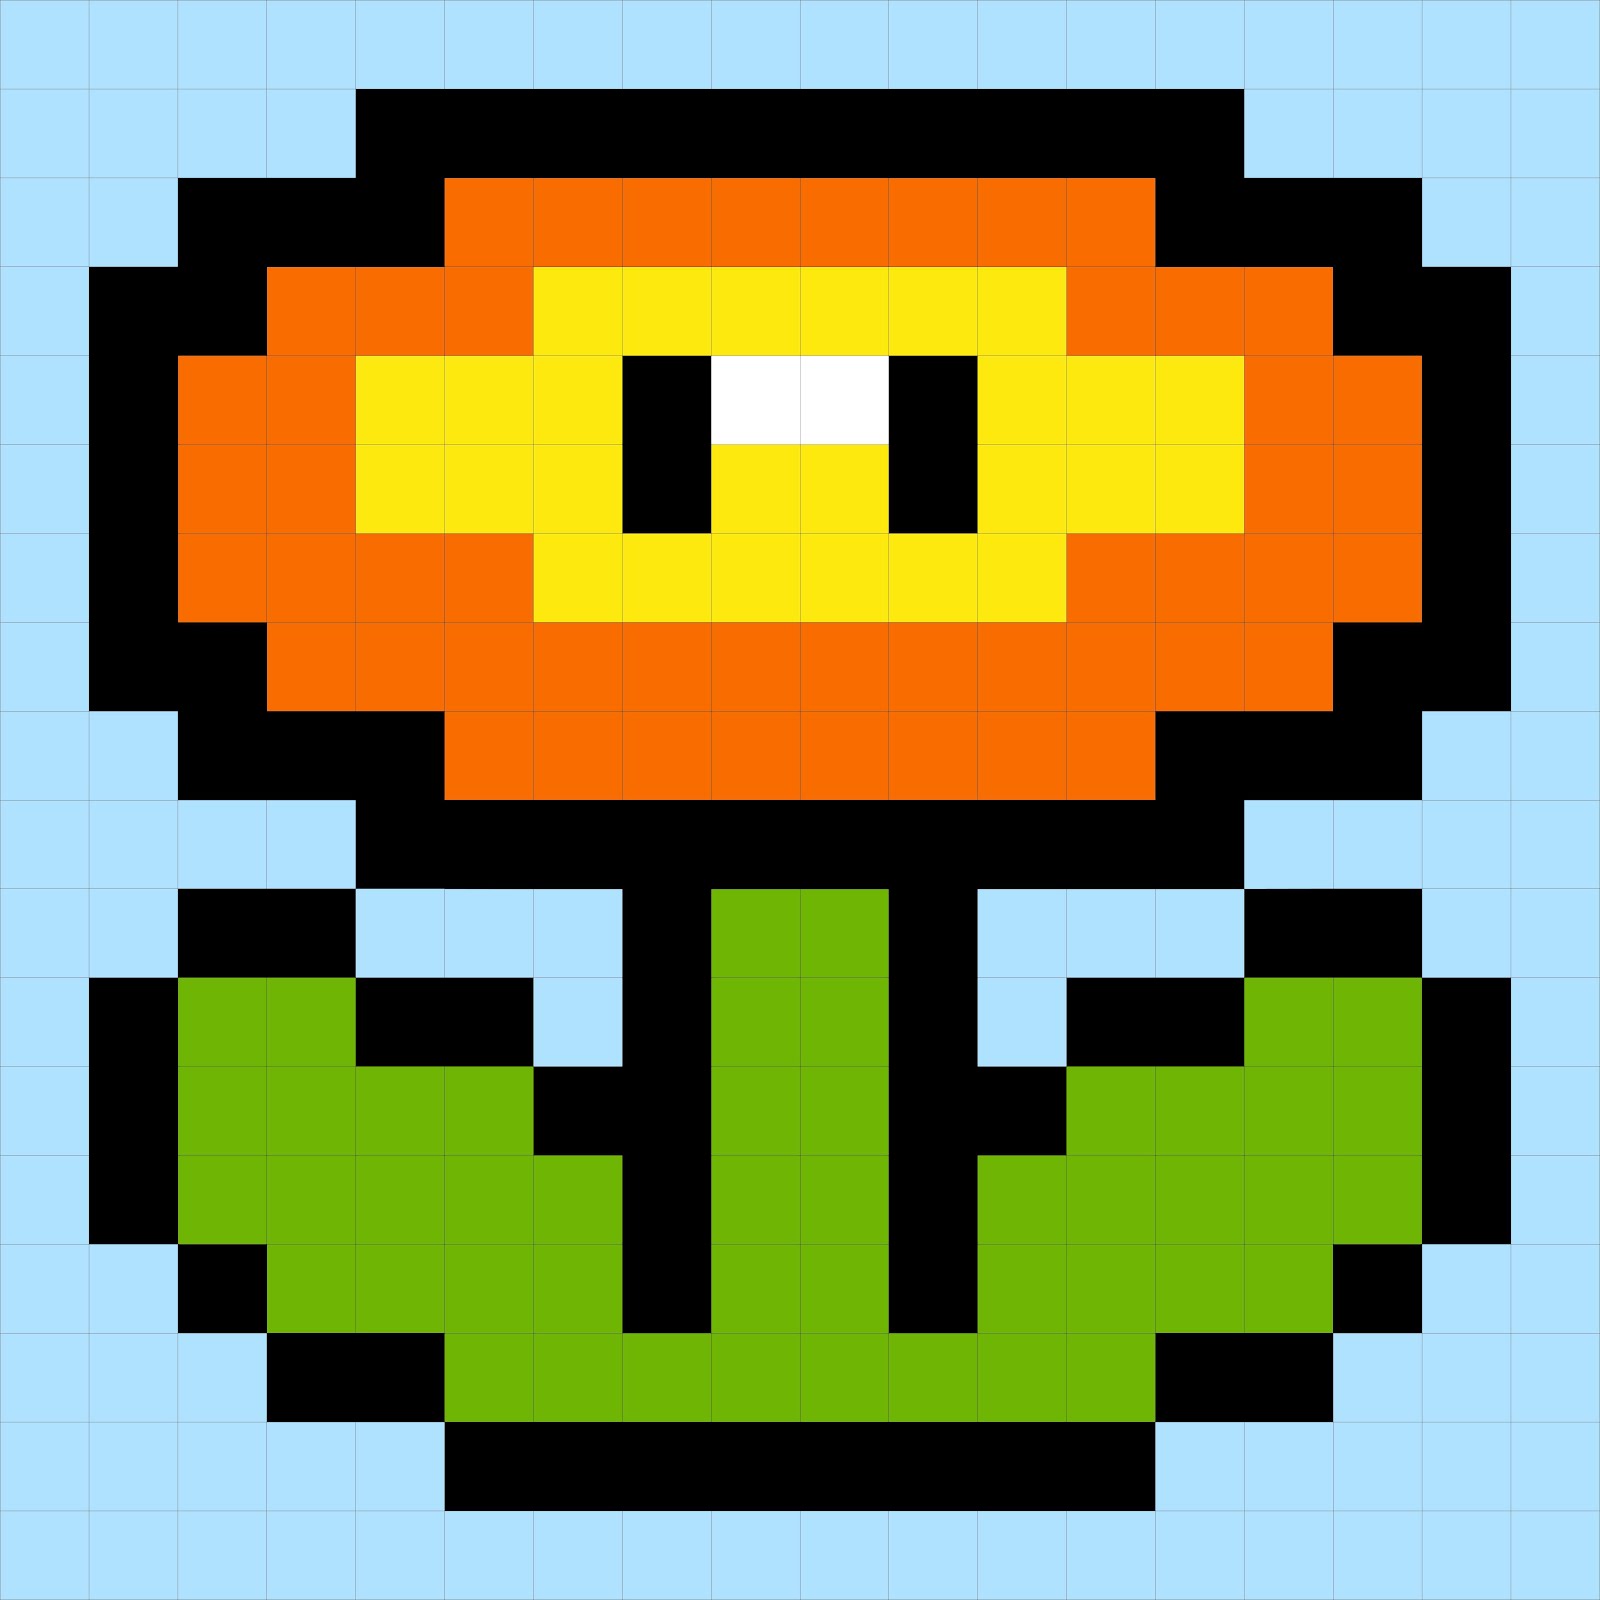
First things first: I decided to make Mario’s fire flower, and I based it off of the picture below. I’m not sure why I chose the fire flower — there’s something about those beady little eyes that gets me.
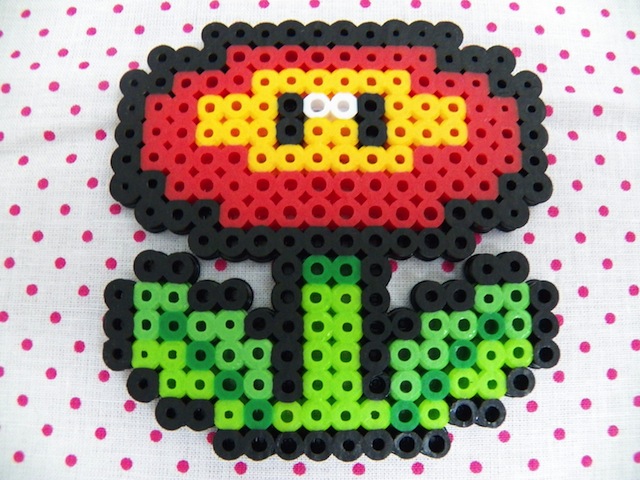
My first tip while making perler bead sprites is that you should work in rows from the bottom of bead sprite pattern and work your way, row by row, upward. I tried making the sprite first doing the outline of the fire flower — bad idea! It was painful how easily those little beads can get knocked around when you’re arranging beads inside of rows of other beads. It’s best to keep it one row at a time so you don’t have to have as many surrounding beads to accidentally bump than necessary. Pro tip for life!
The rest of it is pretty simple — just make sure you count how many beads are in a row so you’re aware of how many of which color bead you need to put down. The perler bead mats are really useful, but it’s easy to jostle everything out of place. My advice is to make no sudden movements while you’re crafting — if you’re planning to move the mat from one place to another, do it slowly. And it might be best do this when you’re not terribly caffeinated or outdoors in a hurricane or in a place where people are having really loud sex in the floor below and making the whole floor shake. Or even while having sex. Protip: Don’t make perler bead art while having sex.
When you’re done with your perler bead sprite, the next step is cutting out a piece of parchment paper that’s a little larger than the size of your sprite, putting it on top of your beads and ironing your craft very carefully, moving the iron in circles over the mat. I say this because my first bead sprite ended up turning into a bit of a melty pancake. Life experiments! In order to figure out how to iron my beads, I briefly watched this Youtube video of a tiny child telling me that I had to iron my perler beads for only 10 seconds with her dad ironing in the background, and while I tried to take this child’s advice to heart, it was very tempting to keep ironing and keep ironing past 10 seconds. Which I did. And then colorful pancakes happened.
I found out through my second perler bead art masterpiece that there’s a certain point at which the beads fuse together, so while 10 seconds is a good estimate, you should check your perler beads by lifting the parchment paper a little bit. If the beads are not stuck to the paper and are loose on the mat, you should put the paper down and iron it a bit more — maybe another 5 – 10 seconds of moving the iron in circles. Be aware that while one side of the bead sprite might look a bit melty, if you turn it over, the other side will look a lot better. Don’t worry too much!
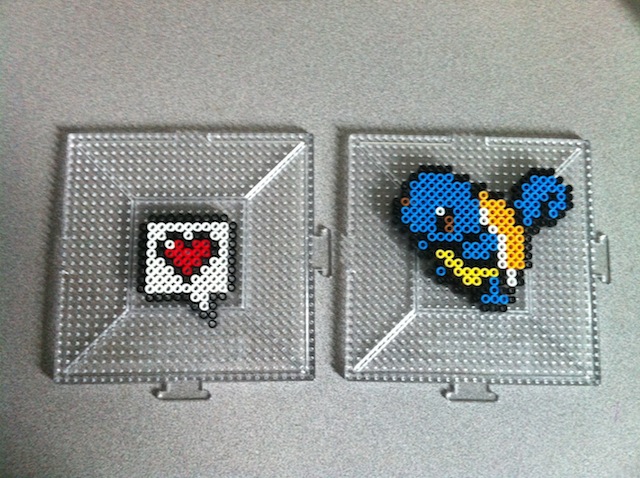
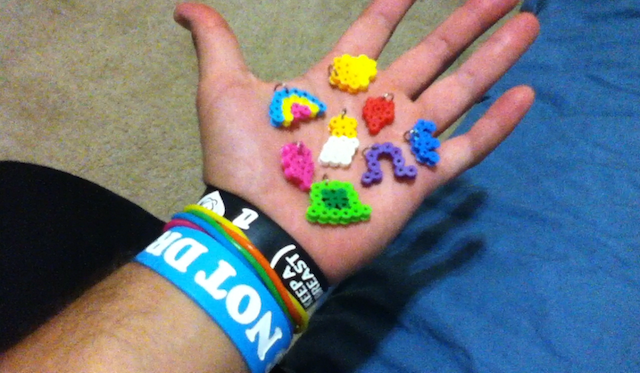
And then, voila. You’ve got a fire-flower shaped drink coaster! I put together a few other bead sprites, one of a heart in a pixilated speech bubble, and one of Squirtle (the Pokémon!) and still had a lot of beads to spare. Pretty adorable.
Here are some ideas to get you stared on your own perler bead sprite Nerdcraft — sprites ranging from Nyan Cat to Doctor Who to Adventure Time to Lucky Charms. The possibilities are endless! Craft away!
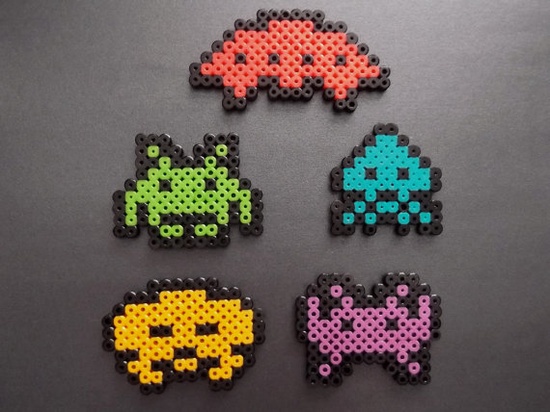
1. Space Invaders!
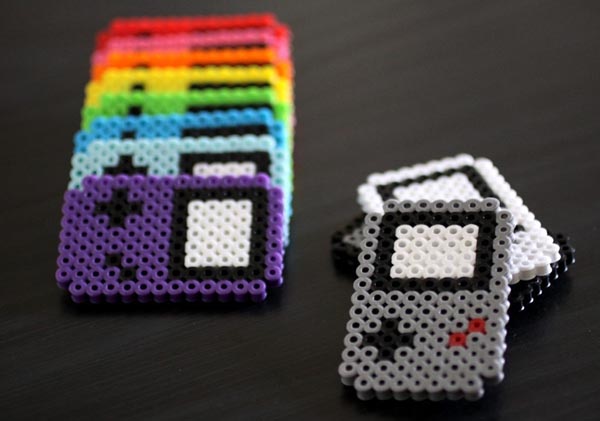
2. Game Boy Coasters!
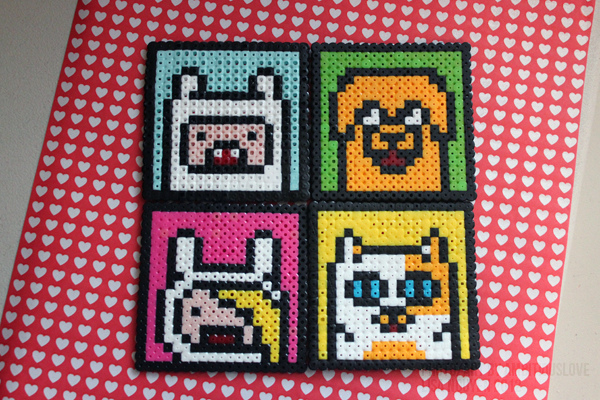
3. Adventure Time!
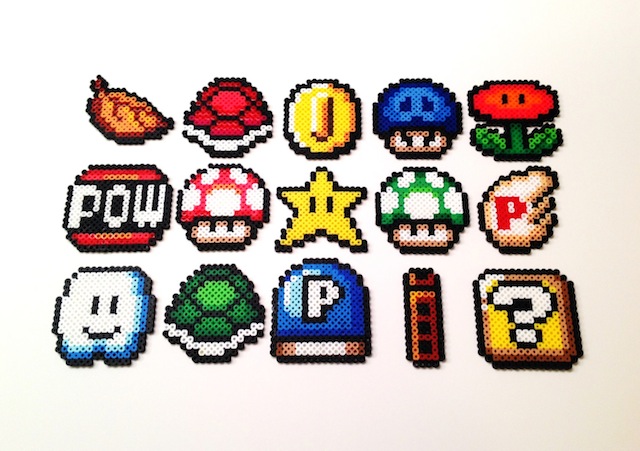
4. Mario Power Ups!
5. Doctor Who TARDIS and the 9th, 10th and 11th doctors!

6. Lucky Charms!
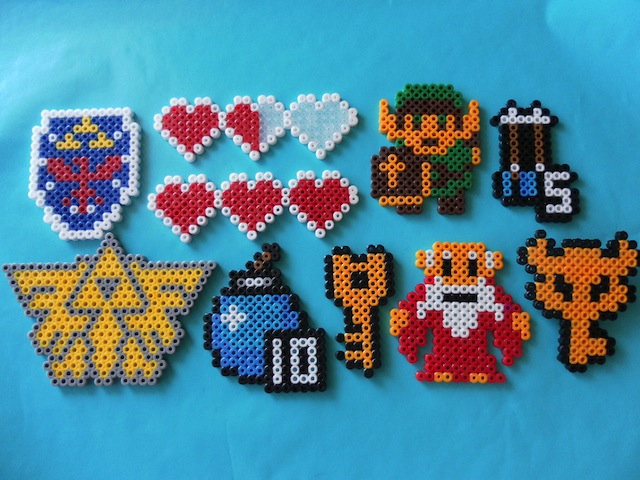
7. Legend of Zelda Sprites!
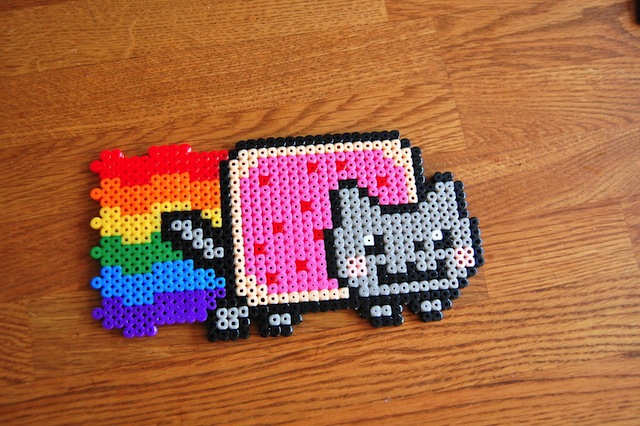
8. Nyan Cat!
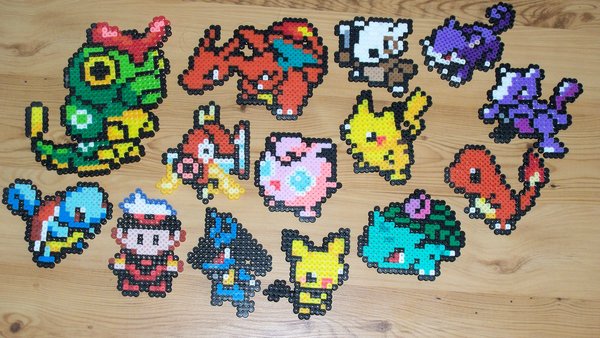
9. Pokémon Galore!


Comments
This Article: Why Nerns Never Did Any Actual Work Ever Again
Some of my friends have done some Mario pixel perlers and they’re really cute!
I keep meaning to dig out my ancient perler boards and get some more beads (I seriously didn’t realize they still made them) and go to town like this, but I also keep forgetting I mean to. :(
How did you know the perfect gift for my girlfriend would be Adventure Time coasters?
YOU GUYS ARE THE BEST!
oh my god.
Well thats my Christmas presents sorted.
Pixelate all the things! Actually, this would be ideal for street art, as theyre waterproof and easily superglued…
Definitely use parchment paper, or the paper that comes with the pegboards. Wax paper always sticks when I use it with my students, leading to sad faces and stuck designs. It also messes up your iron.
These designs are cute!
Not going to lie, I only went to Sunday school to make masterpieces out of these beads…if I remember rightly, it never looked normal- it’s about time I try again!
Very cool craft idea, especially for my boys, reaching a whole new niche generation good on you.
OMG, I always wanted to do these when I was little but never convinced my parents to let me have them. Time for some grown-up actualization!
There’s also a program that will create a pattern out of any image you like. There’s also palette options to match the colours for 3 different companies that make these sorts of beads. It’s java based, and creatively named Perler.
Also, have you guys seen the 3D companion cubes made from these? Pretty freaking awesome.
Bead coasters? Genius idea! I’m imagining a whole set of Super Mario RPG characters. *swoon*
My roommate sells these on Etsy! She mostly does Pokemon but she’s done other stuff. She’s also making them as part of table designs for her wedding. Perler beads = awesome.
For redditers, r/beadsprites is pretty cool.
I made 3 of these at camp (minecraft axe, happy piece of bread, and superman logo). I just ordered some supplies online while I wait for my flight home from camp. I can’t wait to get back to it!
HOLY BATMAN!! I love this so much! especially the adventure time art
Whitney! Thanks so much for doing this with us at camp. :) I turned my Zelda life hearts into a keychain thingy today and it looks so good. Looking forward to future nerd crafts with you!
i didn’t get a chance to make these at camp and it’s one of my biggest regrets!! everyone was having so much fun. but now i can make some at home, thanks to this lovely post! yay!
Hello, We’ve just launched a new peeler bead iPhone case and thought you might want to take a look http://www.bitbead.com/kickstarter
Oh this is so fantastic! Definitely going to use this to make gifts for my game-lovin’ partners <3
Hi, I fell in love as soon as you see the hama beads pearl inadvertently on the Internet, bought some, but export to Brazil is a bit complicated … I hope as soon as possible the sale in Brazil is made, I loved what you posted. <3
Oh my god! The motives look so cool!
Check out the Bearded Beadier for the cheapest price on beads. There is some pretty cool art work too
Maybe you can help me out.
I came across your blog.
My company manufactures crafts and toys and we created a new type of bead that’s very unique and has been a massive success with all the schools and camps that we’ve introduced it to and, within time, it will replace perler beads.
I was wondering if you’d be open to reviewing our product on your blog.
If yes, you can email me at: yoni@econocrafts.com