

On Christmas morning, after we’ve opened up our presents and after my dog has sufficiently torn the wrapping paper into the tiniest pieces possible, we get out this massive garbage bag and throw away all the paper that spent weeks just hanging out under the tree. And every year, I can’t help but think about how wasteful it is. When you think about it, wrapping paper isn’t much more than really expensive toilet paper (and I hate buying toilet paper). I mean, what else do we throw away as soon as we use it?
This year, though, I’m not buying any wrapping paper. I’ve got all kinds of stuff around my house that’s going to be thrown away anyway, so why not use that? With a little bit of tape and some string, any package can look pretty. Wrapping presents creatively doesn’t even have to be a big thing, either. Choose a theme, wrap them all the same and change a decoration here or there. We’ve got three guides — one for boxes, one for paper and one for decorations — that’ll convince you to kick the wrapping paper habit once and for all.
Everything You Wrap In a Box To The Left
If your presents are shaped weird, you’re going to want to put them inside some kind of box situation before wrapping them. Otherwise you’re just making things harder than they need to be. But your box doesn’t have to be any old box, it can be just the right box.
 a. Boxes from your pantry – Your kitchen is full of all different kinds of boxes that you usually just throw away. While most of these babies are easy to handle, cylindrical shaped stuff — like nutella jars and oatmeal containers — are tougher to handle. Here’s how to do it:

1. Wrap a piece of paper around the cylinder and tape it. Since you’ve got two sides you’re going to be working on, hold the roll between your legs while you do the first side.
2. Start by folding the inside bit of paper in to the middle of the circle.
3. Crease it after about a centimeter and fold the next bit down to the middle.
4. Continue making one centimeter folds the entire way around the circle.
5. When you reach the end, tuck the ugly bit in.
6. If you want to show off the top, make a circle of tape and hide it underneath the folds. Otherwise, tape that baby shut and throw a bow on it.
b. Origami boxes – If you don’t have something small enough to house your present or if you want to give something that’s reusable, fold your own box.

1. If you’ve got origami paper, skip steps 1-3. If you don’t, you’ll need to make a square. Start by folding the short side against the long side.
2. Fold the extra bit over.
3. You can cut it, but I prefer licking the crease (did she say that? she might have?) and ripping it so that I’m sure I get a straight line. If you want to decorate the paper, now’s the time.
4. Fold the paper in half diagonally both ways and then at a right angle both ways. This way you know exactly where the middle of the paper is.
5. Fold each corner to the middle.
6. Fold the sides into the middle. Unfold the sides and the corners should come along for the ride.
7. Fold the other sides into the middle and unfold them.
8. Pull two of the corners out.
9. If you’ve made really awesome creases, your paper should be absolutely aching to become a box at this point. Help it along by folding one of the corners up, over, and into the box.
10. Repeat with the other side and you’re done. To make the bottom of the box, make an ever-so-slightly smaller square to start.
c. Pop-up bags – This kind of bag is good for cookies and other not-so-secret gifts that just need to look cute until they’re ready to be given.

1. You can use any size square or rectangular paper. Remember when you used to do hot dog folds and hamburger folds in elementary school? Well, we’re going to start by doing a hot dog fold.
2. Unfold the paper and fold each side into the middle.
3. Fold the paper in half hamburger-style.
4. Fold the creased side in, then unfold it and fold it the other way. If the longest side of your paper is shorter than 12 inches, you don’t want the part folded over to be any more than an inch.
5. Unfold until you’re back to step 2. You should have creases so that you paper looks like an M from the side.
6. This part is trickier to explain than it is to do. You see the fold that makes one of the tops of the M in step 5? Well, you want to pull that over to the long side of the paper and create a diagonal crease so that it stays there.
7. Do this with all four sides. As you can you, you’re basically just making a paper vagina.
8. Bring the sides together and glue them or punch holes and string them together.
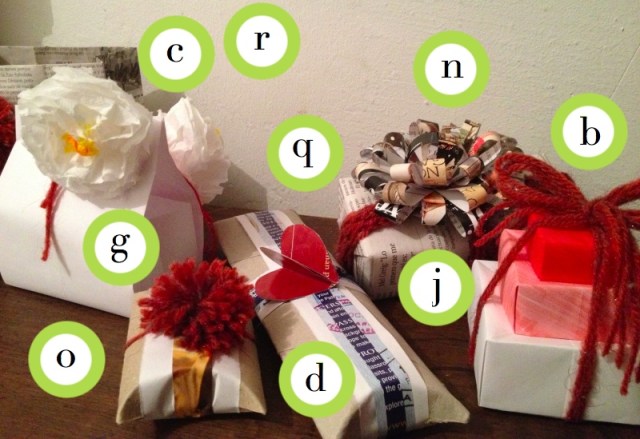
d. Toilet paper rolls – While you may not have empty pasta boxes or oodles of paper lying around, I can guarantee that you will have a toilet paper or paper towel roll free in the next 3 days. You can make a little box that’s perfect for a gift card or something else that’s tiny.

1. Get a toilet paper roll. If you don’t have one, go drink a lot of water. I’ll be waiting.
2. Flatten the roll.
3. Fold down one of the sides in a U-ish shape. Look! It kind of looks like sad lips.
4. Keep going, now. All the way around.
5. Decorate the little guy and make sure you put ribbon or string around the sides so it doesn’t open up accidentally.
e. DIY bags – Personally, I feel like giving someone a present in a bag is the absoute worst. First of all, bags are pretty fucking ugly. Whoever is in the sad business of bag making only makes bags for small children and incredibly stereotypically girly women, you know? When was the last time you saw a bag with a grill on it? Never, that’s when. Instead they’re all just Big Bird and high heels with actual feathers glued on them and shiny silver paper. Second, how do you know when you’re done? I mean, if you stop too soon, you risk accidentally throwing part of the present away but if you keep reaching in for more, you look like a greedy scoundrel. Third, “wrapping” in bags is just lazy. It takes all of 3 seconds to put something in a bag and but tissue paper on top. That’s a whole 2 seconds less than it takes to wrap a present. That being said, realizing I could make my own bags has totally changed my mind. You can make beautiful bags out of burlap and glitter and you can make them just the right side so that no one gets caught in a bag conundrum when they open up your present.

1. Star with a rectangle of paper. I used an A4 sheet (8.3″ x 11.7″), so I folded the bottom in about 2 inches and the top in about half an inch. You can adjust based on the size of your paper, but don’t feel like you have to bust out a ruler or anything. Just feel it out.
2. Fold the side in half an inch or so and then get out your ruler. You want the opposite sides to be the same length, but you can choose what that length is. I had 11 inches left, so I did 3.5″ and 2″. Measure these out and drap lines.
3. Fold along the lines with the top and bottom still folded in. Unfold the bottom and fold again so that the bottom has been folded both ways.
4. Glue the half inch piece to the side.
5. Imagine that you’re wrapping an invisible present; fold the short side of the bottom down and make a diagonal crease along the long side.
6. Do the same fold on all four sides.
7. Glue the bottom together and let it dry. When it’s dry, bring the long sides together at a the top and crease the short sides so that your bag is collapsible.
8. Punch holes in the top and tie a string through them.
f. Cigar boxes – I know I accused bag-wrappers of being lazy, but here’s the thing: I’m actually a zealous advocate of selective laziness. If you absolutely cannot bear the thought of wrapping a present, get a cigar box. Cigar boxes are so much prettier and sometimes they even smell nice. They’re also the kind of thing that you’re giftee will want to use to store jewelry or secrets or something important, so you’re pretty much securing yourself a spot in their thoughts by giving it to them.

Other ideas – lanterns take out boxes, teacups, morigami, jars, balsa wood boxes
Next up: Cover it up with wrapping paper


Comments
I think what I got out of this is that Laura likes licking the crease and is good with her fingers. :P
i typed the words “box” and “package” so much writing this article that everything/nothing sounds sexual to me now
No but seriously thank you–I need to make a gift bag!
Okay so I was like “I can make a gift bag without looking up the article again and also without glue!” and now it’s just really sad but whatever, it has presents in it.
such cute ideas!
I need to bookmark this!
I loved this Laura! It’s right up my alley! I don’t know if I’ll be able to kick my wrapping paper addiction entirely, because like the song, it’s one of my favorite things, but it will definitely help cut down on it.
But there are so many awesome ideas here. Bookmarking this for sure.
Also also also you can get into Furoshiki (Google it for endless videos) which is the Japanese art of wrapping presents in fabric. I use old sheets torn up, or cheap cloth from a yardage store, or even old t-shirts torn up. Particularly good for oddly-shaped things.
Holy shit this furoshiki business is the best wrapping idea I’ve seen for weirdly shaped things.
it seriously is! and it’s faster, greener, and generally cheaper than just about any other wrapping art.
Ever since my company started doing furoshiki-inspired wrapping (with fun scarves that support good causes!) I wrap most all my gifts in fabric (and use a scarf I loved but never wore as my purse). furoshiki.com/techniques is quite useful for basics:-)
This is just the perfect post. Laura, you are my idol.
Wrapping always gets creative in my house because we’re all trying to disguise the actual gift — your gift card will be inside a box of cereal, weighed down with six rolls of pennies; your earrings have been stuck to a packaging peanut thrown in a puzzle box with a bunch of decoy packing peanuts (and the puzzle pieces are in a shirt box, and the shirt was rolled up in your stocking); the keys for your new car are inside a pair of new driving gloves which are hanging from the tree. I once wrapped a hat in legos. But the all time winner was a little custom made puzzle, which my sister had to put together to read a clue which directed her to look in the linen closet for her gift, where she found an origami dodecahedron that she had to figure out how to take apart to find a silly putty egg. Pressed into the silly putty was a charm for her charm bracelet.
this is the cutest thing ever i want to be a part of your family
My family does crazy stuff with wrapping too. My brother bought a Folding chair for my dad one Christmas…and spent about six hours wrapping each section of it individually, so it was completely covered but could be unfolded and folded back up. It was hilarious. Dad took it to church and used it in his sermon.
Your family sounds amazing too.
ahhh I love the pun!
…said a hip hop the hippie the hippie
to the hip hip hop, a you dont stop..
Also if you use plain white paper for wrapping, you can use watercolor techniques from the AS Penpal post. I’ve been spattering secret Santa gifts with red/green paint and I’ll probably make some thumbprint people soon.
And I’m definitely going to make a few popup bow name tags, as well as a couple of package-esque boxes with brown paper and stamps!
The other day I used butchers paper left over from moving to wrap a Kris Kringle, then drew (I can’t draw) in oil pastel all over it. It looked so bad. Such a pity I hadn’t read this! (Although since the gift I was giving was Autostraddle inspired tea, maybe it’s just as well. People already think I’m obsessed!)
But now I’m making Eric Carl style Xmas cards, which are super adorable.
These are all great ideas, but I’d still rather hire you to do it for me Laura!
These are amazing….and even though it turned out really good, I think I’d feel a little weird using a TP roll for that one packaging.
FYI, I wrapped a present in magazine pages with a magazine bow for white elephant at a party tonight, and it was a huge hit. Everyone things I’m super talented now, when in reality I’m just too poor to buy wrapping paper. So thanks, Laura!
Aww thanks for thinking of Australians. I just learned it is going to be 40 degrees celsius where I am on Christmas! Christmas in Australia on a scorching summer’s day, indeed.
Cool flower but i think the magazine blow wins this year.
Fantastic, excellent publish and also the precise product information, time to share tell my friend in facebook.